How to change bearings and seal on an LG washing machine?
 If you have diagnosed that your "home assistant" needs to replace the bearings and seal, do not worry. In fact, even a non-professional can understand the essence of the upcoming work. The main thing is to have patience, free time, the necessary set of tools and delve into the detailed instructions for the repair stages that we will provide you with. So, we’ll tell you further how to replace elements in an LG washing machine, and what pitfalls you might encounter in doing so.
Let's collect materials and tools
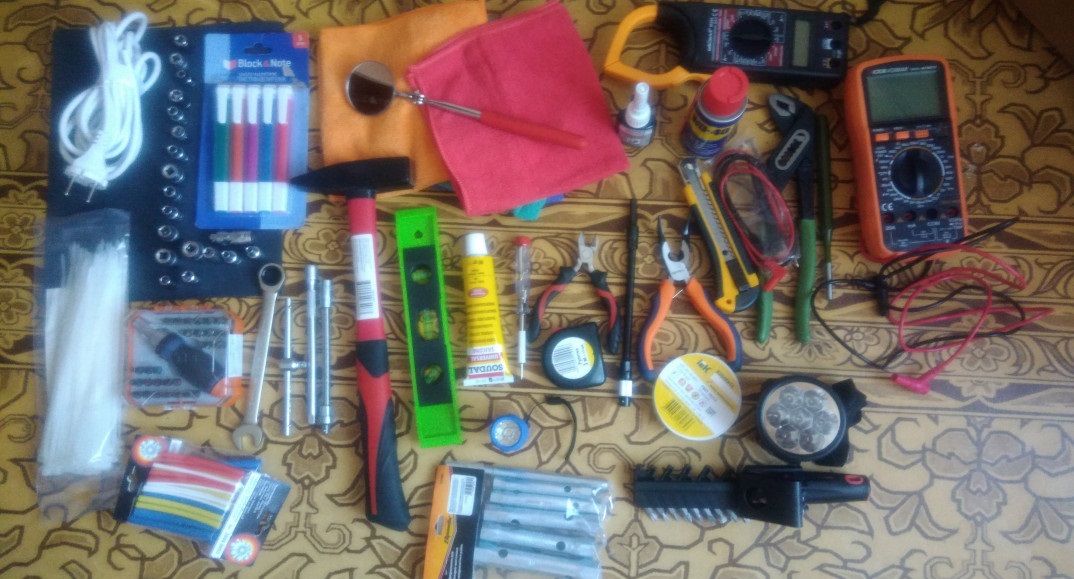
Proper preparation for repairs will save time and nerves on the upcoming work. To change the drum bearings in an LG washing machine, you will need a whole set of tools. You should have the following equipment on hand:
- a pair of screwdrivers (slotted and Phillips);
- pliers;
- hammer with a bronze head;
- set of open-end wrenches;
- set of socket heads;
- metal rod;
- WD-40 aerosol lubricant;
- silicone sealant;
- special lubricant for oil seal and bearings.
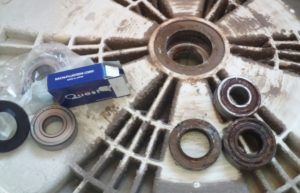
Having figured out that all the required tools are available, you need to purchase replacement parts. When selecting components, be sure to pay attention not only to the model of the washing machine, but also check the size of the oil seal and the type of bearings. The necessary details about the parts can be found in the technical data sheet of the equipment.
When buying spare parts in a specialized store, contact a consultant for help. Please provide the serial number of the washing machine and information about the components. A specialist will help you choose the right size bearings and oil seal.
It is best to visit a store with the parts to be replaced already removed from the washer body, so the likelihood of buying the “wrong” will be reduced to zero.
You should not purchase spare parts that are not intended for this category of equipment. In this case, there is a high risk that some time after installation, the repair will have to be repeated again. As for the cost, the original bearings will cost about $3, the o-ring will cost about 300 rubles.
After the set of tools and replacement parts is prepared, you should take care of the workplace. It will not be possible to disassemble the machine in a cramped bathroom; the ideal option is to move the device to the garage or, at worst, to a spacious room. If you are making DIY repairs in an apartment, take care of the safety of the flooring - cover it first.
It is important to free up as much space as possible so that nothing interferes with disassembling the automatic washing machine and changing components.
Removing the tank
The first step, if it is necessary to replace the bearings and seal, will be to disassemble the washing machine. To remove the tank, you will have to remove the top cover and the front wall of the automatic machine, and remove other elements of the system from the body. The upcoming algorithm of actions will be as follows:
- unscrew the 2 bolts holding the top cover of the case, remove it and put it aside;
- remove the detergent dispenser. You can immediately clean it of plaque and debris;
- Unscrew all fastening mechanisms supporting the machine control panel;
- Carefully, being careful not to damage or tear off the wires, place the panel on top of the washer;
- remove the lower false panel of the case; to do this, bend the special latches using a screwdriver;
- loosen the metal clamp surrounding the tank cuff, remove the ring out;
- disconnect the contacts of the hatch locking device and remove the sensor;
- Next, you need to unscrew the bolts holding the front wall of the case. You should look for self-tapping screws behind the drain valve, cuvette, at the top right and left of the body, at the bottom right and behind the dashboard. Now removing the front wall of the washing machine will not be difficult.
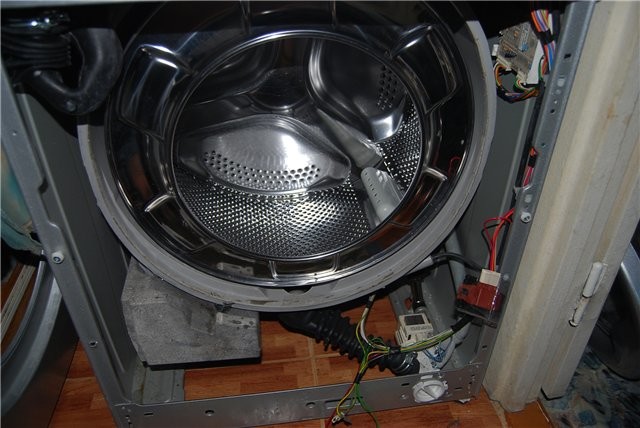
The case is almost completed, access to the tank has been gained. Next, you need to disconnect the wiring connecting the tank with other elements of the washing machine and remove the fasteners. This is about:
- fastening the filling valve;
- drain pipe;
- wires leading to the heating element;
- electric motor wiring;
- cables of the pump that takes in water;
- counterweight mountings;
- pressure switch pipe;
- shock-absorbing elements.
When everything that is possible has been disconnected from the tank, it is necessary to remove it from the housing. Here you should call an assistant. The first person must release the springs, the second must pull out the part. If you try hard, you can cope with the task alone.
Tank disassembly procedure
The tank of an automatic washing machine consists of two fastened parts. To separate the halves, it is necessary to remove all the bolts and loosen the special fasteners.
If any fasteners cannot be removed, you can treat them with WD-40 spray lubricant.
When the main mounting screw is unscrewed, it is necessary to remove the drum pulley and return the bolt to its original place. Afterwards, place the prepared metal rod on the bolt and start gently hitting it with a hammer to knock out the shaft. It is important not to damage the shaft, otherwise DIY repairs will result in significant costs.
We replace damaged parts
After the tank has been disassembled into two halves, you can proceed to removing worn components and installing new parts. Further work will take place specifically with the rear half of the drum device. In the middle you will see an o-ring, in other words, an oil seal. Use a screwdriver to remove it from its seat.
The bearings will have to be knocked out using the same metal rod. The end of the rod is placed on the edge of the bearing and tapped with a hammer. The action must be performed several times, around the entire circumference of the part, until the elements are removed.
To minimize the risk of damage to the mechanism, you can use a special puller, but this will increase the cost of repair work.
The opened hole should be thoroughly cleaned of metal shavings, oil layers and other dirt. It is important to place new bearings and seals in a prepared, clean place.
Now you should take the new components and prepare them for installation. Don't forget about the special lubricant that should be used to treat the seating area. The bearings are driven into the old place. To install the oil seal correctly, coat it with a good layer of lubricant. This measure will prevent water from entering the bearings.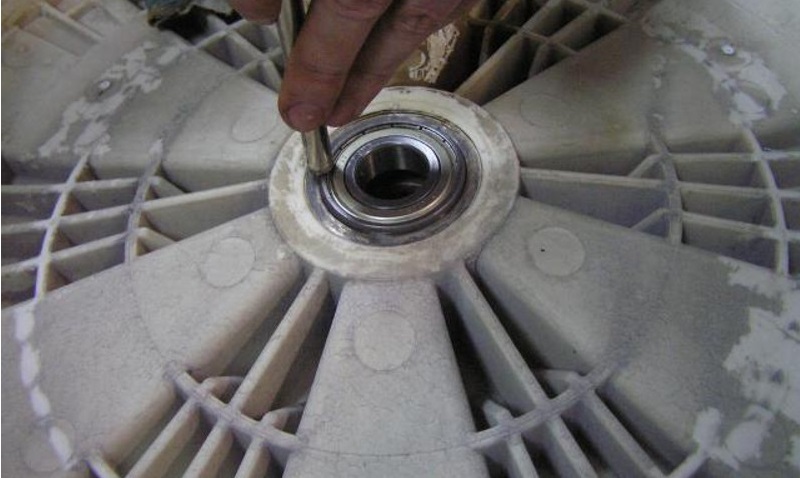
The shaft of the washing machine can also be treated with lubricant. The main thing is not to forget in this case to run the machine “idle” a couple of times to prevent soiling of the laundry. Further assembly of the tank and washing machine occurs in the reverse order.
When connecting the halves of the tank, you should use a moisture-resistant sealant to more securely secure the structure. When the equipment is completely assembled, check the operation of the washing machine.Plug in the machine and run the “idle” wash cycle (without putting things in the drum).
What problems might arise?
If you are disassembling and repairing an automatic machine for the first time, there is a risk of making some mistakes during the work. To prevent an annoying mistake from leading to a malfunction of the unit and increased cost of repairs, it is better to familiarize yourself in advance with the most common mistakes made by beginners.
- The wiring of the hatch locking device simply breaks off when the front wall is removed carelessly.
- The door seal becomes unusable due to its being “pulled out” from the body with great force, without the metal clamp being pulled out.
- The tank pulley is damaged when it is carelessly removed from the axle.
- Fasteners that are not pre-treated with WD-40 lubricant, but are removed by craftsmen with enormous effort, deteriorate.
- The wires leading to the temperature sensor come off.
- The water supply pipe breaks out, along with the inlet hose.
- The drum is damaged if the bearings are not carefully knocked out. As a result, you have to change the drum completely, and this increases the cost of repairs several times.
Before you start replacing, think carefully about whether you are capable of such work. If you are not sure that you can handle it cleanly, it is better to trust a professional master. In this case, the specialist will have to pay $45 or more for the services, but you will receive a guarantee for the repairs performed. The final cost depends on the model of the equipment, the type of tank (collapsible or cast), the price of spare parts, the complexity of the work to be done, its urgency, etc.
Interesting:


Reader comments
- Share your opinion - leave a comment
Categories
Washing machine repair


For buyers


For users


Dishwasher


Add a comment