How to change the bearing on the drum of a Candy washing machine
 The components and assemblies of Candy brand washing machines, like any other brand, wear out over time, which becomes the basis for the appearance of extraneous sounds (buzz, noise, rattle). The frequency and intensity of the use of the mechanism do not reduce, but increase the tension of unpleasant sound. Do not be scared! Bearing wear is recognized as a traditional problem causing such discomfort. For the correct and stable operation of the installation, replacement of the drum bearing on the Kandy washing machine is required. You cannot call the process particularly difficult, but you have to work hard.
What causes bearings to break?
In case of failure of the part, it is necessary to find out the cause of this phenomenon. The information obtained will facilitate the repair process and help to eliminate the possibility of a breakdown. The basis for the wear of a part may be:
- long-term operation of the installation (metal parts have a certain service life, after which the manufacturer can break them);
- corrosion due to moisture on the bearing;
- design features - the belt drive causes serious loads on small parts, which leads to serious destruction of their surface layer.
Failure to timely replace a worn bearing and gland entails incorrect operation of other components of the device, which leads to a complete failure of the machine. To restore such an aggregate will be more difficult and more expensive. The purchase of a new washing machine will be cheaper.
We begin to prepare for repair
Before starting repair work, it is worth taking care of the preparation of both tools and materials, and the machine itself. First of all, the device is disconnected from the communications and extends into free space, capable of providing the “master" with access to all units. It is recommended to opt for non-cluttered spaces (rooms, outbuildings, garages). The next step is preparing the tool. To perform simple manipulations you will need:
- hammer;
- hand tools fitter-pliers - pliers;
- two curly, Phillips and slotted, screwdrivers;
- metal rod;
- set of spanners;
- one-component sealants;
- lubricants that prevent the occurrence of corrosion (as an option - lithol);
- a pair of bearings, oil seal (sold at service centers or specialized retail outlets).
In order not to make a mistake in choosing parts, it is worth implementing the advice of an experienced master. Disassemble the unit to find out what bearings are on the Kandy washing machine. Thanks to accurate information, the seller will offer the required consumables. Tell the seller the brand of the machine.
The purchase of original spare parts for a particular model of Candy washing machine will ensure uninterrupted operation of the unit for a long time.
Making repairs with your own hands, it is worth using the camera. Thanks to its use, it will be possible to control the process of the correct assembly of components upon completion of repairs without much difficulty.
Get access to the tank
Disassembling the Candy should begin by removing the top cover. For this, the back panel of the unit must be freed from the self-tapping screws holding it. The top panel gently slides back and slowly released. At this stage, difficulties should not arise. To get to the drum, you need to disconnect:
- top counterweight;
- upper side panels on the left and on the right (loose, pulled out with a slight upward movement);
- front panel (held by two bolts on both sides of the structure), carefully disconnect the connected wires;
- hoses connected to the powder tray;
- pressure switch;
- control unit (held by two bolts, attention to the correct disconnection / connection of the main wires);
- rheostat (held by one bolt);
- a cuff on the tank door held by a snap clip;
- receiving tray for detergents (held by a screw);
- nozzles holding the powder receiver (bottom left, behind the cuff);
- a tube leading to the rheostat;
- TEN, tube, motor, temperature sensor, (bottom, near the tank);
- postings that read the number of rotations of the drum;
- mounting bolt (bottom left);
- a drain pipe from a barrel held by a clamp.
In the process of disconnecting the wires (control unit, heater, temperature sensor), it is necessary to carefully remember their location and color, so as not to make a mistake during assembly. For fidelity, it is recommended to use colored markers. All ongoing work requires accuracy and caution, control of fixtures and sequence of actions.
Before proceeding to the stage of removing the tank from the housing, the pulley should be disconnected, once again check the places of possible fastenings and take care of the availability of sufficient free space. The machine door must be open so as not to interfere with the excavation of the machine. In the absence of interference, the drum is removed by removing from the side springs and lifting up. The knot is quite heavy (including due to the presence of a lower counterweight), which requires remarkable efforts or friendly help from the “master”.
Craftsmen, to raise the drum, use a towing sling from the car or a strong rope. The specified device, mounted closer to the front side of the node, allows to facilitate the process of removing and putting the drum in place.
Let's look inside the tank
To continue the disassembly process, it is required to remove the rubber cuff and the lower counterweight from the tank. This will open the bolts holding the cover. Having unscrewed the indicated structural elements using a small ratchet, you should remove the cover and put it to the side.
The next step is to remove the drum. To do this, the tank is installed on its side (working position in the assembled device). With the help of a hammer and careful blows on the shaft, the drum should be knocked out and released from the structural frame.
The next step is the inspection of the sleeve and shaft. Use a clean cloth to clean the shaft of grease and dirt. This will reveal the degree of wear and eliminate possible damage. Detected output is the basis for replacement parts. The actions taken led to the stage of trying on new bearings.
The presence of play is the basis for replacing the cross.
Mandatory is the process of determining the state of the shaft sleeve. This structural element is intended for installation of an epiploon. The presence of pronounced wear and clearly visible transverse furrows is the basis for replacement. These facts, ignored, will lead to permanent moisture leaks, which will quickly and very negatively affect the condition of the new bearing.
Part Replacement
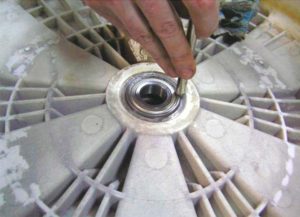
 The location of bearings requiring replacement is the rear wall of the removed drum. Before removing them, the oil seal must be removed. For this, a straight-head screwdriver is used, which simultaneously pushes and removes the gland, which is subjected to a thorough inspection and, if necessary, replacement.
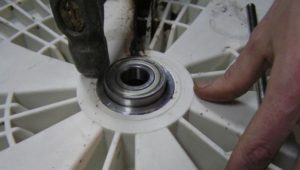
The next step is to remove the internal (small) and external (large) bearings. The process is carried out with the help of a punch (metal rod) and a hammer. The outer one is knocked out first, the inner bearing is the second.
Next, make sure that the new parts are installed on a clean seat. The first is installed small, and the second - a large bearing. The parts are also clogged with the help of a metal rod installed on the principle of "crosswise". The dull sound emitted by the part during the clogging process becomes louder at the stage of proper installation.
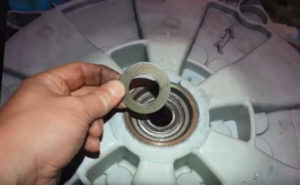 The gland, before installation, must be treated with a lubricant with water-repellent characteristics. The installed part is a signal for assembling the washing machine in the reverse order of how the disassembly was performed.
Craftsmen say that changing bearings in a Candy washer is not a very complicated process. The main condition is consistency, caution and attention to detail, especially fragile. Advice for those who doubt their own abilities and abilities: seek the help of professionals. But remember that changing a bearing from a professional will cost money - approximately 30% of the price paid for a new Candy machine.
Article
Interesting:


1 reader comment
Add a comment
Headings
Washing machine repair


For buyers


For users


Dishwasher


Good, helpful article. Thank.