How to replace the hatch cuff of a Zanussi washing machine
 If the washing machine door does not fit tightly or water leaks are noticed, you should think about replacing the hatch cuff. Most likely, the elastic band has become dislodged, damaged or worn out - in any case, the problem cannot be ignored. Anyone can fix the situation: just prepare two flat-head screwdrivers, purchase a new seal and spend some time. All instructions and recommendations for owners of a Zanussi washing machine are given in our article.
How to buy the right part?
First of all, you should think about a new cuff, or rather, choose the right ring of the appropriate diameter and thickness. The easiest way not to make a mistake with the size is to remove the old elastic band and go with it to a specialized store. It’s even easier to find the article number on the seal in the form of a license plate and tell it to the seller.
There is another option - find out the serial number of the washing machine that needs replacing and use it as a reference. For machines from Zanussi and Electrolux, this marking is applied to a sticker located under the hatch. It is best to photograph the entire label in order to further clarify the model, year of manufacture and industrial code, if necessary.
In addition to the updated cuff, you will need a slotted screwdriver, soap, pliers and a washing sponge. This is where all the preparations end. All that remains is to replace the rubber seal of the Zanussi washing machine according to the instructions below.
Removing old gum
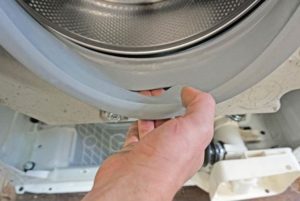
Simply removing the seal and installing another one in its place will not work.The cuff is securely fixed with two clamps - an outer plastic one and an inner metal one, which must be carefully removed. This is done like this:
- find the outer ring;
- pry it up with a flat screwdriver, pull it to the side and remove it;
- we bend the edge of the cuff and get to the inner clamp, which in Zanussi machines is a solid spring;
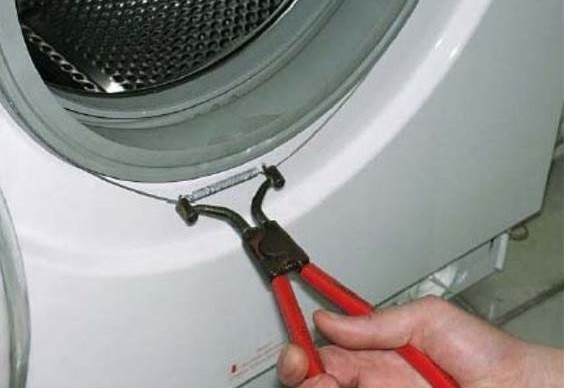
Important! On some Zanussi models there are screw clamps, to dismantle them it is enough to loosen the fastening and remove the clamp.
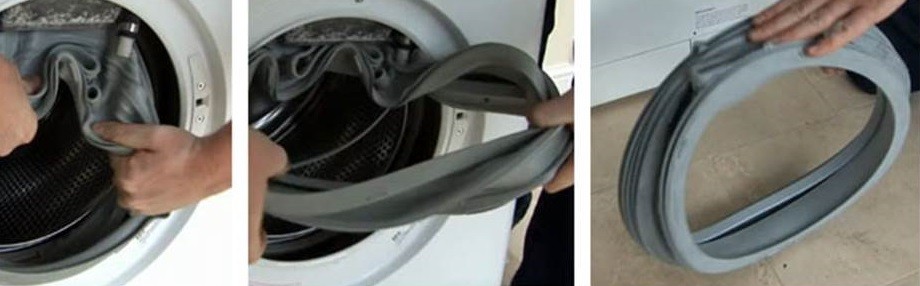
- we pull the edge of the cuff towards ourselves with one hand, and with the other we help the elastic band move away from the tank.
Now you can carefully examine the seal and identify the cause of its damage. This will help in the future to be more careful with new tires and increase their service life. Now let's talk about further actions.
We put the part
It is much more difficult to tighten and secure the cuff than to remove it. It is better to find an assistant, as additional hands will help you cope with the installation faster. It won’t hurt to practice on your own with the elastic band removed earlier - you can rehearse the upcoming work. What will the process look like next?
- Preparing the site. Take a sponge, soap and water and thoroughly wash the seat. There is no need to completely wash off the formed foam - the slippery surface will make installation easier.
- Pulling the elastic band. First, we find the mounting marks and combine them. Next, place the cuff in the recess and use your thumbs to tighten it, moving in a circle in both directions. This will prevent loss and displacement.
- Installing the internal clamp. If the ring is a screw ring, the installation process will be easy: loosen it to the desired diameter, place it in the grooves and tighten the screw. Spring fasteners are more difficult to install.To begin, we tuck the edges of the cuff into the drum, unscrew the hatch lock on the body and insert a screwdriver into the vacated lock hole until it is completely stable. Then you need to put a spring on the tool and tighten it around the entire circumference of the hatch with another screwdriver. Then we remove the latch and return the lock to its place.
Attention! We use the screwdriver extremely carefully, as the rubber band can be easily damaged.
- External fastening. With the second clamp it is easier, since access to the seat is not blocked by anything. The procedure itself is the same: with a spring ring, we put the ring on one side, hook it from the opposite edge with a screwdriver and carefully pull it around the perimeter. If there is a screw, loosen the fasteners, install the lock and tighten securely.
On an old-style Zanussi you may find another type of clamp equipped with special hooks. They are separated with pliers, and then tightened back in a similar way.
All that remains is to evaluate the quality of the repairs carried out. We compare the compliance of the mounting rails and the tightness of the cuff. Finally, turn on the machine, select the rinse mode and start the cycle. Upon completion of the work, tilt the machine body back and inspect the bottom and floor: there should be no traces of water, puddles or drops.
Why does a rubber band deteriorate?
 Despite the ease of replacing the hatch cuff, no one wants to do it regularly. Therefore, we recommend that you examine the old rubber band and determine the reason for its unsuitability. The main thing is to understand that the seal has its own wear life and with regular use of the washing machine it gradually and inevitably wears off. The following factors accelerate the spoilage process.
- Careless installation.It has already been mentioned that it is not difficult to pierce the ring with a screwdriver.
- Aggressive detergents. Many powders have unsafe compositions that have a detrimental effect on rubber.
- Friction. We are talking about the contact of the seal with other elements of the machine, and directly with the laundry.
- Solid objects. The condition of the cuff is also worsened by sharp objects, coins, keys, and heavy shoes getting into the drum.
- Sloppyness. The rubber band often suffers from careless loading and unloading of things.
- Fungus and mold. If you do not dry the machine after each completed wash, a coating may form on the rubber surface, which over time will eat away the structure of the material.
By following the operating rules of the washing machine, you can delay the procedure for dismantling the cuff for a long time. But even if there are obvious violations of the seal of the hatch, you should not despair - installing a new rubber band in place of the damaged one is quite easy. The main thing is to follow the instructions given and act as carefully as possible.
Interesting:


Reader comments
- Share your opinion - leave a comment
Categories
Washing machine repair


For buyers


For users


Dishwasher


Add a comment