How to replace the cuff on an Indesit washing machine
 If there is a hole on the cuff of the hatch of the washing machine, the abrasion or bloating, then the gum urgently needs to be replaced. Such damage violates the necessary tightness and provoke the leakage of water from the tank during the start of the cycle. And this is unfinished washing, dirty floors and flooded neighbors.
Replacing the cuff on the Indesit washing machine will take no more than an hour, and it is enough to open the door and cook a minimum of tools. The main thing is to turn off the power first and follow the instructions exactly. And detailed algorithms for dismantling a damaged part, installing a new rubber band and preventative measures are given below.
Dismantling a damaged part
A damaged sunroof cuff is not a sentence for a washing machine. On the contrary, such a repair will cost much less than replacing a control module or flying electronics. And what’s even more pleasant - almost every owner of the Indesit model can remove the rubber from the drum with their own hands and install a new one.
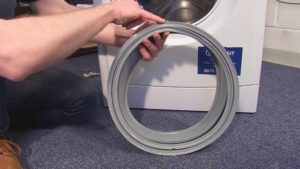
The first thing to do with the replacement is to prepare: purchase a new cuff identical to the damaged one, focusing on the diameter, marking and recommendations of the consultant in the store. Next, we take care of our own safety: we disconnect the car from the mains and wipe the case with a dry cloth. After that, we proceed directly to the dismantling.
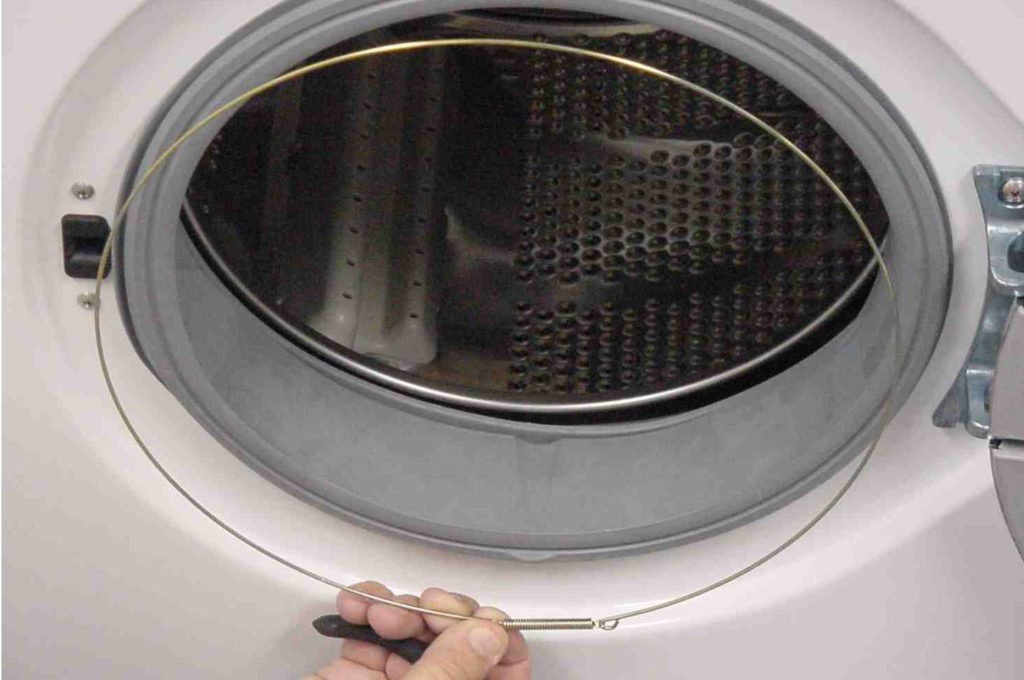
- We remove the fixing collars. If the holders are plastic, then holding the junction of the two latches, pull forward, and with metal rims, unscrew the screw or pry the spring with a flat screwdriver.
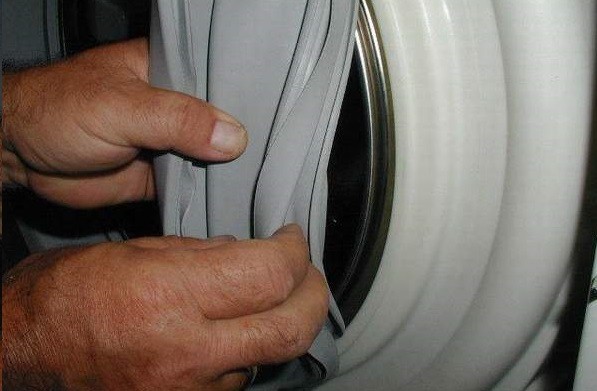
- Gently push the front of the rubber pad.
- We are looking for a mounting mark indicating the desired location of the cuff to the drum of the washing machine (most often the mark will be a characteristic ledge).
- Mark with a marker the response mark on the case.
- We pull the elastic on ourselves and take out from the recess.
After removing the old seal, do not rush and mount a new part. It is important to carefully clean the lip of the lip from dirt, scale and detergent residue. A richly soaped sponge is perfect for these purposes, and the soap will become not only a cleaning agent, but also a lubricant.
Important! It is not necessary to wash off the foam and wipe the recess to dryness: a slippery solution will help speed up the installation process.
Instructions for installing a new gum
To put the rubber hatch seal back onto the drum, you have to try a little. The factory cuff is quite elastic and dense, has a strong "resistance" during installation, which often causes difficulties for amateur craftsmen. The following instruction will help to cope with the gum:
- A new cuff is applied to the seat so that the mounting marks on the gasket and tank match each other.
- Replacement starts from the top edge, the inserted area is held with one hand while the other pulls the elastic on the edge.
- Next, the inner edge is dressed, starting from the center and moving in turn in both directions.
- At the bottom of the cuff, it pulls heavily onto the tank.
- The gasket is probed along the entire length and is finally set into the edge for a snug fit to the body of the washing machine.
- Checks the fit of the mounting marks. If a shift occurs, it is recommended to remove the rubber and repeat the procedure again.
For convenience, it is best to remove the front door to provide easy access to the washing machine. However, it is worth remembering that in Indesit models, the cuff is also replaced without a vacant opening.
 The most difficult step is the installation of the internal clamp. The installation method depends on the type of holder. For example, for washing machines with metal clamps on screws, it is necessary to loosen the clamps, and then tightly lay the rim on the seat. With plastic latches, it is enough to loosen the holders by pressing on the junction of the “tails”, pull the elastic on the edge and fasten the clamp back. If the washer is provided with wire fastening without tensioners, it is necessary to place it evenly along the entire length, pull the ends together with pliers, and hide the resulting assembly in a special protrusion on the cuff. It is most difficult to cope with a spring tension, for which you should insert a flat screwdriver into the hole for locking the hatch, pry off the spring and put on the bracket.
Installation ends by dressing the external clamp. This is done in two ways. The first proposes to grab the rubber from both ends of the spring, and, stretching and maintaining the tension, push it into the existing recess until it is fully seated. The second option is to lock on one end of the spring and pull the rim in only one direction.
Attention! Only old clamps that have no damage can be installed back. In the event of defects, cracks, chips, distortions, it is important to replace the holders with new ones.
If everything was done correctly and accurately, the cuff and collar should lie tightly on the seat. It’s easy to check the quality of work: it is enough to conduct a tank leak test. This is done very simply:
- we draw a bucket of water into the drum to the border of the lower seal;
- we start the fastest washing mode.
If there are no leaks (even drops under the door), then the cuff is installed correctly. Otherwise, it is necessary to drain the water, inspect the tightness of the gum to the edge, tighten the clamp and re-test the machine for leaks. When re-leaking, you will have to dismantle the seal and reinstall.
For what reason does the cuff deteriorate?
 In order not to make the replacement regular, it is important to “work on the mistakes” and identify the cause of the damage to the gum. Nobody has canceled the natural wear and tear, but often the Indesit cuff washing machine suffers due to the carelessness, negligence and lack of education of its owner.
The sealant, like any other part of the machine, has its own safety margin, however, the service life is greatly reduced due to specific negative factors. It is not difficult to determine the source of a crack or abrasion: it is enough to carefully examine the old gasket. After that, it remains only to choose the cause of the malfunction that is suitable in nature and direction:
- constant friction against solid elements, metal parts of clothes to be washed, shoes, heavy things;
- foreign objects (nails, keys) getting into the drum;
- fungus, mold and plaque, worsening the general condition of the rubber;
- inaccurate loading and unloading of laundry, resulting in serious mechanical damage.
Aggressive detergents, continuous use of the unit, strong vibration during the spin cycle and high temperature of the water also have a destructive effect on the cuff material. To avoid accelerated wear of the part, it is recommended to regularly clean and dry the seal, carefully check the pockets of the items to be washed and do not exceed the permissible dosage of powder, concentrates and cleaning compounds.
Ideally, before each wash it is necessary to carefully inspect the cuff for flaws and defects. Even a slight crack on the seal is considered a serious leakage and requires immediate replacement. If it is not possible to change the damaged gasket in a timely manner, it is recommended to repair the part - sealing the damaged area with a suitable patch.
Important! Gluing a patch is just a temporary measure. Defective gum should be replaced as soon as possible.
It is not recommended to joke with tightness in the machine, so if you suspect a damaged cuff, you must immediately correct the situation. You can evaluate the size of the flaw, dismantle the damaged seal and put on a new rubber band yourself.Moreover, all the necessary tips and instructions are described in detail in this article.
Interesting:
 How to replace the cuff of the hatch of a Zanussi washing machine
 How to change the cuff on a Samsung washing machine
 How to change the cuff of the washing machine?
 How to put gum on the drum of a washing machine
 How to change the bearing on a Samsung washing machine
 How to put on a rubber band of a washing machine
Reader Comments
- Share your opinion - leave a comment
Headings
Washing machine repair


For buyers


For users


Dishwasher


Add a comment