How to replace the drum on an Indesit washing machine
 Many problems may require replacing the washing machine drum: a broken crosspiece, worn bearings, a hole in the tank, etc. Of course, in any of these cases you can simply replace the machine, but this will cost you and your family money. With the help of our article, you can make repairs yourself, even without knowing the structure of the drum on the Indesit machine. Go!
Preparation required
In order to open and repair the car, we will need only the most accessible tools. If you don’t have something in your house, try asking your friends or neighbors for a tool. So, we will need:
- flat and Phillips screwdrivers;
- set of wrenches;
- pliers, wire cutters, pliers (all tools must be insulated);
- hammer.
It is recommended to collect the entire list of tools before you begin disassembling the machine. If you are worried about how to reassemble the machine after repair, simply take photographs of the main stages of disassembly, as well as the locations of fastenings, the location of various bolts, the position of wires, etc.
Before starting repairs, do not forget to disconnect the washing machine from the water supply and power supply.
Let's sort it out slowly
There is no need to rush when disassembling the washing machine, as haste here will only harm the matter. Since you will have to almost completely disassemble the car, and you are most likely doing this for the first time, be careful and follow our improvised instructions step by step:
- Place the machine in a comfortable position so that it can be approached from any direction. If necessary, move it to a spacious room or garage.
- Remove the top cover. To begin, remove all the bolts from the back side, and then pry off the cover using a screwdriver.
- Do the same with the back cover. Unscrew the bolts in a circle.
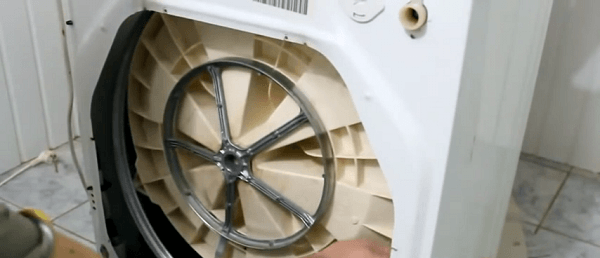
- After this you should see the tank, pulley, motor and belt. Carefully inspect the tank: if there are traces of rust on it, starting from the center of the assembly, we can almost certainly talk about wear of the bearings.
- Remove the belt from the tank.
- Consistently disconnect all wires from the tank.
- Remove the bolts that hold the motor.
- Look at the washing machine through the top hole - you will see a large part that looks like a stone. This part is called a counterweight, it is needed to create pressure on the tank and maintain balance in the car. Remove all fasteners holding it in place using suitable tools.
- Inspect the remaining parts that prevent the tank from being removed. These may be stops for transportation, a drawer for loading powder, etc. Also remove them using screwdrivers and hexagons.
- You can reach the tank from the top or bottom. Choose the most convenient method.
The bad news is that the tank in Indesit washing machines cannot be disassembled. Parts of its plastic body are soldered together, so they cannot be easily separated. You'll have to buy a new tank. Remove the drum, insert a new one, and then reverse all the steps to reassemble your washing machine.
Is it worth doing everything yourself?
It may seem that there is no need to deal with such repairs at all: it is easier to buy a new washing machine than to go through so many steps and change the drum. However, it should be taken into account that now all cars are becoming more expensive, so a few extra hours of your time will help you save $20-50. The drum is just one part, albeit an important one, you shouldn’t throw out the whole car just because of it.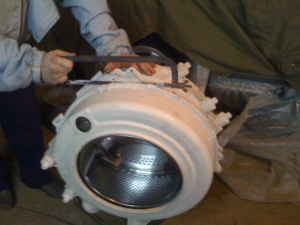
The main problem here is the fact that the tank in Indesit is non-separable. Those. even if you encounter wear on the bearing units (one of the most common malfunctions, since they are subject to a higher load than other parts of the washing machine), the drum and tub will still have to be replaced: the bearings are located in it.
However, private craftsmen or repair shops may offer to cut the tank to separate it from the drum and subsequent repairs (or replacement of internal parts). Then the two halves of the plastic tank body are glued together and the mount is installed.
It sounds good, and you can save a fair amount on this, but there is one unpleasant fact: no one can give you a guarantee that the machine will work for a long time and properly after such cutting and gluing of the tank. Moreover, you can carry out such repairs yourself, only here you risk completely ruining the tank with sloppy disassembly. So if you want to be guaranteed to use your car for several more years after repair, it’s best to replace the tank with a new one.
Interesting:


Reader comments
- Share your opinion - leave a comment
Categories
Washing machine repair


For buyers


For users


Dishwasher


Add a comment