DIY cabinet for washing machine
 Large families tend to have a lot of clothes, and as a result, a lot of laundry. If you don’t have time to wash your laundry on time, it accumulates and waits in the wings. Placing several baskets with dirty laundry in the bathroom can be quite difficult. What is the way out of this situation? Of course, there is a special cabinet for the washing machine, which can easily accommodate several baskets with dirty laundry. But in stores such an element of furniture is very rare, so it is better to make such an exclusive cabinet yourself.
How to make a stand yourself
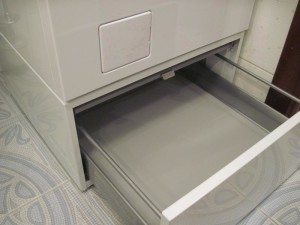
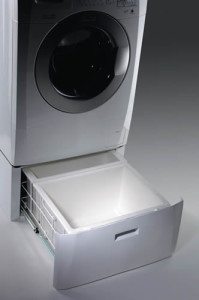
The cabinet for the washing machine is similar to a stand on which the machine will later be installed.
The dimensions of this stand should be identical to the bottom of the machine. Therefore, you need to very carefully measure all aspects of your household appliances. Most often, this element of furniture is necessary in large private houses, where they use not one machine, but several. We are designing a cabinet for them.
What materials and tools will be needed for the job?
- Chipboard boards
- Boards and bars
- Hex screws
 Tape measure and pencil
- Hammer and drill
- Saw and grinder
- Level
Constructing the base of a cabinet for a washing machine
The lower base of the washing machine cabinet should consist of 2 guides and as many crossbars as possible. If there are a lot of crossbars, then the cabinet will be more rigid. And this is very important, since the machine that will stand on this stand has considerable weight and will vibrate when the spin cycle is turned on. In this project, designed for 2 automatic washing machines, there should be 5 crossbars, and the size of the base should be 150 X 67 cm.
We connect the guide boards with furniture screws to cross ones, first drilling holes at the joints so that the head of the screw is not above the surface of the board. The caps will be located in the recesses and plastic caps will be attached to them on top, harmonizing with the color of the washing machine cabinet.
We attach chipboard boards or plywood sheets to the resulting base. The thickness of the plywood must be at least 8 mm. It is better to fill the screw heads with wood filler so that the surface of the cabinet is even. Otherwise, when using it, baskets with laundry will cling to the protruding screw heads. Then we make another base - the top one.
Let's move on to the final and most important stage!
The last stage of making the cabinet
On the prepared legs of the future bedside table you need to attach corners that will be attached to the upper and lower bases. To do this, it is better to tighten screws intended for wood and a corner that will be attached to 2 surfaces. It is better to fasten the corners to the guide boards with bolts. They make the connection stronger.
Now all that remains is to cover the top of the base with prepared chipboard slabs, secure them with screws and fill all existing holes with modern wood filler. In conclusion, all that remains is to give the cabinet for the washing machine a marketable appearance. To do this, you need to treat it with wood stain and cover it with a special varnish or paint it with a suitable paint.
Installation of the cabinet
It is better to decorate the legs of the bedside table with a special decorative element. All! The cabinet for the washing machine is made.We install it in the bathroom and place containers with laundry.
But before installation, you must place anti-vibration stands under the legs of the machine and securely fasten your home assistant to the stand you have made in order to reduce vibration during operation of the centrifuge.
The thing turned out cool, functional and very useful! Looks great and is easy to use. After all, it lifts the washing machine up and it becomes more comfortable to put laundry into it - you don’t have to bend over. But if you have a “vertical” machine, then you can’t put such a bedside table under it and you need to come up with a different design for dirty laundry.
Interesting:


Reader comments
- Share your opinion - leave a comment
Categories
Washing machine repair


For buyers


For users


Dishwasher


Add a comment