Do-it-yourself washing machine maintenance
 Modern household appliances can work for a long time without third-party intervention, especially if you follow basic operating rules. But without maintenance, an automatic washing machine will only last for the warranty period or a little longer, and will soon “please” its owner with an unexpected blockage or jamming. It’s easy to avoid sudden breakdowns - take care of the unit’s maintenance every 2 years. What we are talking about and whether it is possible to cope without contacting the service department, we will tell you in the article.
Initial stage of maintenance
Complete preventative maintenance will require careful diagnostics and partial disassembly of the machine. You can turn to professionals for this, but it is not necessary - any man can cope with the upcoming events. The main thing is to follow safety rules and follow our recommendations. To begin with, it is necessary to carry out the primary stage of work. We proceed according to the following instructions:
- disconnect the washing machine from the supplied communications: electricity, sewerage and water supply;
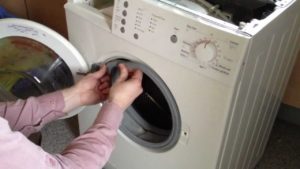
- pull the detergent tray towards you, pull it out by pressing the special tab and thoroughly clean it with water;
- remove the clamp on the existing hose, take out the mesh filter and rinse it from scale;
- We clean the garbage filter, to do this we tilt the machine back, place a container under the right corner, cover the floor with rags and, using a slotted screwdriver, open the technical hatch door. We find the filter plug, unscrew it and wash out the accumulated dirt;
The garbage filter cannot be cleaned immediately after using the machine, as there will be hot water inside that can severely burn a person.
- open the door and assess the condition of the cuff - the rubber seal around the “entrance” to the drum; it should be clean, intact, without cracks, tears, rust or foreign objects;
- spin the drum, just loosen it in both directions: it should move without interference, but with a slight stretch, the main thing is not to hear a sound reminiscent of the creaking of sand.
At the end, the drain hose is disconnected and probed for blockages. But if there were no problems with draining before, then this step can be skipped. This concludes the initial do-it-yourself inspection.
Maintenance with partial disassembly of the machine
Sometimes a superficial check is not enough and you have to carry out a more in-depth diagnosis. Especially if the machine gives alarm signals - it makes a lot of noise, vibrates or buzzes. Then it is necessary to partially disassemble the machine body and assess the condition of the shock absorbers, counterweights and bearings. In order not to experiment, we stick to a simple plan.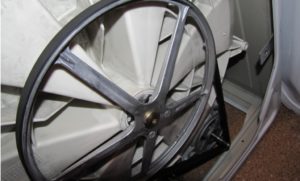
- We move the machine, disconnected from the electrical network, sewerage and water supply, to the middle of the room, providing free access to all sides of the washing machine.
- Let's prepare some rags.
- Unscrew 2-6 bolts on the back panel and remove the wall.
- Similarly, remove the top cover.
- We find concrete blocks - counterweights and carefully inspect them for cracks and chips. Next, we press on the stones to check whether the bolts are tightened enough. If there is any looseness, tighten it; if damaged, replace it.
- We return to the rear wall and evaluate the tension of the drive belt.If it slips, then remove the rubber, wash, dry and generously lubricate with pine rosin.
- We go down and check the elasticity of the dampers by lubricating them with graphite grease.
- Don't forget about the heating element. We release the wiring connected to it, loosen the fasteners and take out the heater. Soak the part in a vinegar solution until the scale dissolves, and then continue cleaning with an old toothbrush or sponge.
To simplify reassembly and avoid mistakes, you need to record the location of the wiring and spare parts for the camera.
It's better to go back to the top of the machine and look at the wires and chips. If the fasteners look loose, then they should be thoroughly tightened or replaced with new analogues yourself. Be sure to probe the pipes leading to the dispensary and run your fingers along the filling valve. Everything must be intact and dry, otherwise damage will occur and replacement will be necessary.
It is enough to carry out maintenance yourself once every 2 years so that the washing machine lasts longer than the 5-7 year period measured by the manufacturers. Or regularly contact service centers, which will be more expensive, but still cheaper than buying a new machine.
Interesting:


Reader comments
- Share your opinion - leave a comment
Categories
Washing machine repair


For buyers


For users


Dishwasher


Add a comment