How to make a juicer from a washing machine
 Using a juicer from an old washing machine is not such a new idea. Back in the late 80s, artisans published their drawings of productive juicers in popular technical magazines, which were made from Soviet machines “Riga”, “Oka” or “Vyatka”. We decided to continue the good tradition and offer our ideas regarding the use of a modern washing machine, namely, making a juicer from its parts with minimal alterations.
Why make a juice squeezing machine?
The question is really good, why spend a lot of time converting a used washing machine to turn it into a juicer, when you can easily buy a powerful device in the store for relatively little money? The answer to this question lies in human nature.
Some people make such things for fans, so that they can stand in their garage or dacha and they can show off their ingenuity and “golden hands” to their friends. And some people make such things with their own hands simply because they like the process of working with hardware and electricity. This is how it is born homemade concrete mixer from a washing machine, emery and God knows what else. Whatever your motivation, the goal is worthy, and we will try to help you realize it.
For your information! Making a juicer from a front-loading washing machine is no more difficult than making a juicer from any other.
What materials will be needed and how to prepare them?
To make a juicer from an automatic machine with front loading with your own hands, we need 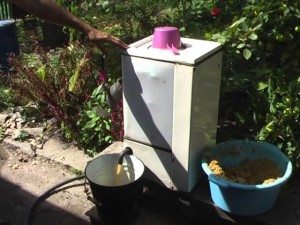 You will need a used washing machine and a few more spare parts on top. We remove excess from the washing machine body immediately. The pump, pressure switch, fill valve, drain filter, block and control panel are all unnecessary parts; we don’t need them. It will also be possible to remove the bottom and back wall of the washing machine. In addition to all this, we will need two additional shock-absorbing springs to compensate for the horizontal centrifugal force.
We also need to acquire two thin strips of metal mesh 30 cm long and 6 cm wide, a large number of 3 mm bolts and nuts, a container for juice, a new drain pipe and plugs made of tin and rubber. The tools we need are:
- drill;
- Bulgarian;
- welding;
- screwdrivers;
- different wrenches;
- thin awl or drill;
- pliers;
- hammer;
- metal scissors.
Important! This design involves using the parts of an old washing machine to the maximum, so in the end the juicer will cost you very little.
The idea is the following: we place the washing machine on its back, place bars in the corners and secure them so that the juicer does not jump off them during operation. We leave the hatch, cuff, drum, engine and drive mechanism in place, and remove the rest. The engine will have to be connected separately, since we also removed the control unit. Next we need to prepare the parts for the future juicer, we do the following.
- Remove the drive belt from the pulley.
- We unscrew the shock absorbers and all other elements that interfere with removing the tank.
- We remove the hatch cuff (to do this you need to loosen the clamp).
- We take out the tank along with the drum.
- If the tank is collapsible, we unscrew it; if it is not collapsible, we saw it along the seam with a grinder.
- The drive mechanism does not need to be disassembled and the drum does not need to be pulled out; our task is to clean the bottom of the tank from debris and dirt, as well as clean the outer walls of the drum from the same dirt. After mechanical cleaning, it is better to additionally treat the bottom and walls of the tank, as well as the drum, with vinegar.
- The tank has been cleaned; there should be no debris or unnecessary parts such as heating elements, thermistors and other sensors left in it. All excess holes must be sealed using tin and rubber patches. We will only leave a drain hole to which you will need to screw a new drain pipe.
For your information! It is preferable to take old front-loading automatic washing machines with a tank made of stainless steel for DIY remodeling. Cars with plastic tanks are worse, but they can also be used.
- We weld all the holes of the drum, they are not suitable - they are too big. We remove the rib punches and leave the attachments for them; they will help chop vegetables and fruits.
- We make hundreds of small holes with a diameter of 1 mm in the walls of the drum around the entire perimeter.
- Putting the tank back together. If it was non-separable, then you will have to drill 15-20 holes in a circle with a drill across the seam, coat the seam with sealant, and then tighten the two parts of the tank with bolts.
- We install the tank along with the shock absorbers and the hatch cuff in place - the preparation is complete.
Assembling the structure
After high-quality preparation of the parts, which was done with your own hands, it costs nothing to assemble the finished device. First, let’s modify the drum of the washing machine so that it turns into a full-fledged fruit receptacle for the juicer.
- We take pre-prepared strips of metal mesh and insert them around the drum between the rib punch mounts and onto the back wall.
- We tighten them with screws to the wall of the drum for strength. The mesh will act as a grater for vegetables.
- In addition, attaching a rib punch will help to break the vegetables in the drum; it must be straightened and the edges sharpened. Now the fruit receptacle is ready.
Now we need to improve the design so that the device lasts as long as possible. We screw additional springs to the tank and the wall of the washing machine in order to dampen the vibration of the tank from the horizontal centrifugal force. This is necessary, since we will operate the juicer with the hatch towards the top. Now you need to “give life” to the drive mechanism that rotates the drum, namely, connect the motor to the electrical network. How to do this, see the video below.
We put our homemade juicer with the hatch up and do a test run. The drum should rotate freely at full speed without knocking or other extraneous sounds. It is also important that the juicer stands securely on wooden supports and does not collapse while working with a full fruit receptacle. We place a container for juice under the drain pipe, open the hatch, pour the fruits into the fruit receptacle and start the juicer.
Be careful! Under no circumstances should you put a full load of vegetables or fruits; not only will they not be crushed and will not yield juice. If you overload, there is a risk of damaging the juicer's drive mechanism, especially the bearings.
 What will happen to the fruits? Rotating at a speed of 800-1000 revolutions per minute, the fruit receptacle, also known as the drum, breaks the fruits into mush.The porridge is kneaded in the fruit receptacle, and the juice, along with part of the pulp, is squeezed out through holes in the side and rear walls of the drum under the influence of centrifugal force and settles in the tank. Next, the juice flows down the walls of the tank and goes into the drain and enters the container through the pipe. This is how a DIY juicer works.
How many vegetables and fruits can be optimally placed in the drum so that they are processed effectively? The answer is simple - the denser the fruits, the less they need to be poured into the fruit receptacle. For example, hard apples are poured into half a drum, that is, until they fill the fruit receptacle halfway. Carrots are very hard, so you need to pour them into a quarter of the fruit receptacle, but berries like currants or cherries can be poured into ¾ of the fruit receptacle - in general, the principle is clear.
In conclusion, we note, as you can see, making a juicer from an automatic front-loading machine with your own hands is not too difficult. The washing machine undergoes minimal modifications; you just need to make some adjustments to the design and you can start processing tens of kilograms of fruit from the garden.
Interesting:


Reader comments
- Share your opinion - leave a comment
Categories
Washing machine repair


For buyers


For users


Dishwasher


Add a comment