Removing the drum of an Indesit washing machine
 The need to remove the drum may arise due to the detection of any malfunction in the washing machine. In most cases, the bearings fail, the replacement of which involves certain manipulations with the washing drum. You will also have to take it out if foreign objects fall between it and the tank, in case of damage to the tank itself. It is not necessary to call a repairman to remove the drum. You can remove the drum from the Indesit washing machine yourself, without resorting to outside help.
Carefully prepare for work
In almost every house or apartment there is a drawer containing a universal set of tools, from time to time used for small chores. We are talking about such tools as a hammer, screwdrivers with nozzles of various sizes and types, a screwdriver, pliers, side cutters, hexagons. In addition to the listed tools, it is necessary to prepare a hacksaw for metal.
Parts to be replaced should not be purchased in advance before disassembling the washing machine, as you may be mistaken with their marking. It would be much more correct and practical to first extract them, and after that already buy a replacement.
Having picked up all the tools necessary for the job, you should start preparing the machine. The upcoming repair process will take a lot of time, so it is better to equip a full-fledged workplace for yourself, where nothing will impede the implementation of the necessary manipulations. It is best to take the washing machine to a garage or other spacious room, where the most comfortable conditions for repair will be provided.
When it is not possible to move the washing machine into a free non-residential premises, free a couple of square meters in the room, cover the floor with a cloth, transfer the machine and tools to the equipped place. When the workplace is ready, you can begin the repair process.
The first stage of disassembly
Before you begin to disassemble the Indesit machine, you must disconnect it from the power supply. Then you should drain the remaining water that could remain after washing at the bottom of the tank. To do this, take a container of the required size, substitute it under the machine body and begin to carefully drain the water, before separating the trash filter. The removed filter must be thoroughly washed, dried and removed to the side; it is only necessary to put it in place at the end of all work.
Important! When disconnecting wires or small parts of the unit, be sure to photograph the actions taken, this will help to properly assemble the washing machine after the repair is completed.
So, to remove the drum from the Indesit washing machine, perform the following sequence of actions.
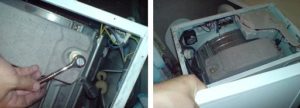
- Remove the top cover of the casing, for this, unscrew the bolts located on the back wall of the casing of the washer. To facilitate removal, a simple tip will help you: first, the cover should be moved back, and then pulled up.
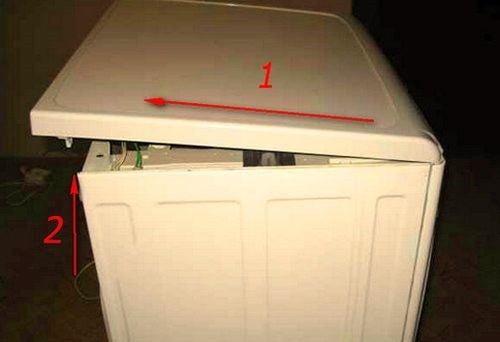
- Unscrew all the bolts on the back of the housing. Unfasten the cover and set aside.
- You will see the part of the drum located outside. Also, you will find the drive mechanism of the machine, namely a pulley with a working belt and an engine. Disconnect the belt immediately. Seeing rusty stains that go out from the central point of the tank, you can safely state a damage to the oil seal and failure of the bearings.
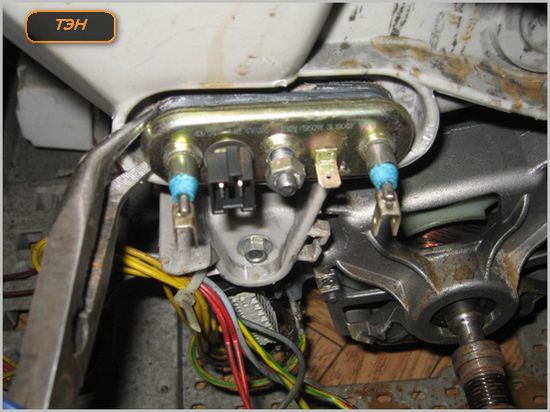
- Proceed to disconnect all cables and wires that attach to the drum. We are talking about powering the heating element (TENA), a temperature sensor. Be sure to unscrew the bolts used to secure the washing engine.
- Unscrew the fixing nut of the heater, then, with a gentle swinging movement, remove the part.
- Remove the counterweight.It is located on top of the unit, you will certainly see it after disconnecting the top cover. This part is large enough and necessary to prevent the machine from “jumping” during the spin cycle. To remove this element, prepare a hexagon of a suitable size and untwist all the parts used to fix the counterweight.
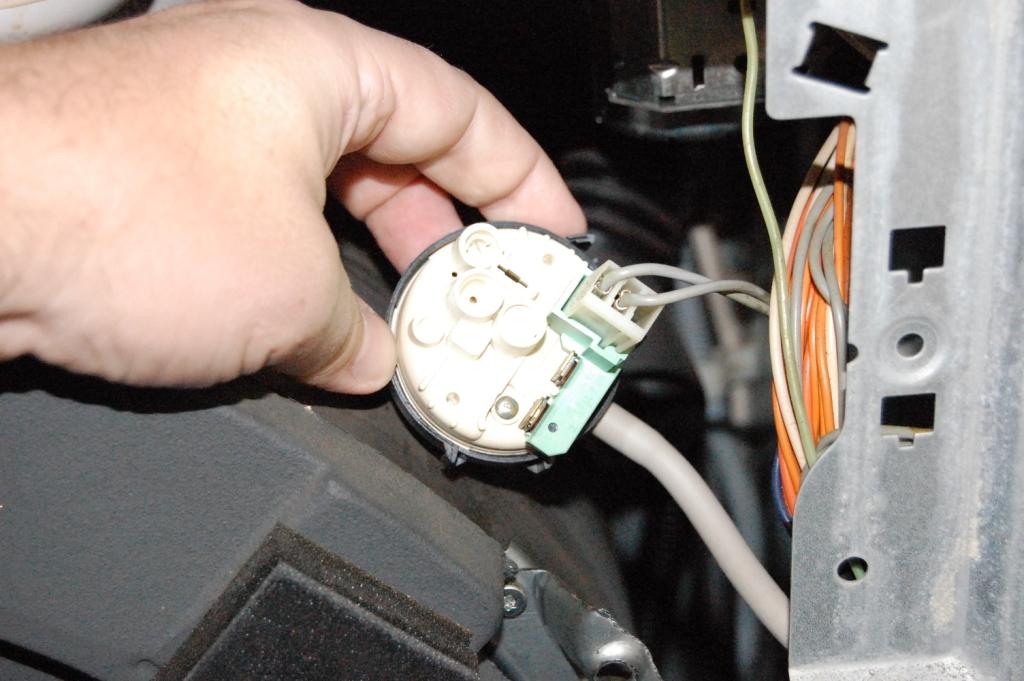
- Disconnect the wiring harness and hose from the pressure switch. Then carefully remove the part from the device.
- Remove the tray used to load the detergent. Then loosen the pipe clamps aimed at the powder receptacle, remove them and take out the dispensary hopper.
- Slowly lower the washer to the right side, look under its bottom. If the bottom is missing - great when there is a bottom, you have to unscrew it. Remove the screws located on either side of the trash filter. Then push the cochlea into which the filter is placed inside the equipment body.
- Remove the chip with the wiring from the pump. After this, you will have to loosen the clamps and remove all nozzles from the surface of the pump. Having finished this, you can remove the pump itself.
- Gently pull out the engine of the machine, to do this, lower the part a little back and pull down.
- Unscrew the shock absorbers that support the reservoir from below.
At this point, the first stage of disassembling the washing machine will be over. As a result, you will be able to free the tank with the drum, get free access to them. You can proceed to the next stage of work.
The second stage of disassembly
 Next, the Indesit machine should be returned to a vertical position, put on its legs. This must be done very carefully, since the tank with the drum is now attached to the body with just two springs. If the control module interferes with getting a drum, you should remove it. To do this, disconnect the wiring, unscrew the mounting bolts of the module and remove this element, not forgetting the latches that support it.
To remove the tank and drum assembly, you will have to resort to outside help. With four hands, remove the mechanism from the shock absorbers and pull the assembly through the top of the machine.
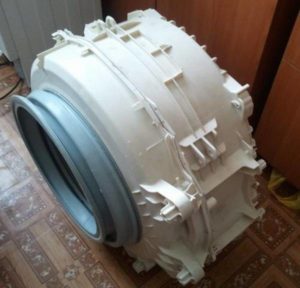
It seems that you are already at the finish line, but it is not. One of the most difficult tasks remains - to remove the drum from the tank. The whole problem is that the tanks in the Indesit washing machines are non-separable. However, even such a nuisance as the presence of a non-separable tank cannot stop us on the road to fixing the washing machine.
Why the manufacturer uses one-piece drum casings is easy to guess. Firstly, it allows to save on production costs, and secondly, it is beneficial for the manufacturer to use a non-separable part, since if one of its elements breaks down, the consumer will most likely acquire new household appliances than agree to pay for repairs equivalent to this purchase .
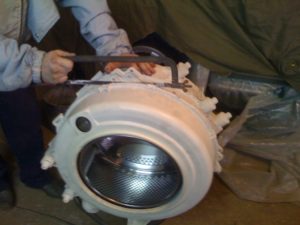 But using a little trick, you can cope with the task and remove the drum from a non-separable tank. To do this, the case should be carefully sawed, all necessary manipulations should be carried out and then glued back with a special compound. Here is a step-by-step description of this process:
- carefully inspect the plastic tank, locate the factory weld. Mark the location of the upcoming cut. You can make the holes you need for this using a drill with a very thin drill;
- Using a hacksaw for metal, carefully cut the tank body according to the marks. Separate the sawn part from the drum;
- turn the structure over so you see a wheel connecting all the parts to each other. Remove it, this will allow you to free the drum from the tank;
- replace all defective parts;
- assemble the disassembled halves of the case, for this you will need silicone sealant. Connect the two sawn parts with it. Additionally, it is recommended to strengthen this design with screws.
The bulk of the work is done, now you just have to assemble the system into a single whole in the reverse order.Carefully fasten all the removed parts, correctly connect the wires and sensors, the photographs taken during the work will help you with this. Of course, the presented process is quite laborious, but by applying the above instructions and having carried out repairs on your own, you will save a fairly large amount of money on maintenance.
Interesting:


Reader Comments
- Share your opinion - leave a comment
Headings
Washing machine repair


For buyers


For users


Dishwasher


Add a comment