Siphon for washing machine - installation and connection
 Modern household appliances have become an integral part of any apartment. Washing machines come in different sizes. Therefore, they can be installed in almost every bathroom or kitchen. The variety of models makes it possible to use machines in combination with a variety of designs. They can also be built into furniture, installed under a sink or countertop, and so on. When installing a washing machine, it is advisable to use a siphon. After all, this small item will prevent the not-so-pleasant sewer smell from appearing in the room. This siphon function is achieved due to the presence of a hydraulic seal.
Let's discuss the correct connection of the machine using a siphon.
Connecting a siphon for a washing machine
The documents accompanying this type of household appliance usually indicate the water pressure value acceptable for operating the washing machine. When connecting a washing machine on a high floor, you need to make sure that the difference in height with the storage tank will allow a sufficient level of pressure to form.
Usually such troubles do not occur on the first floors of buildings. As a rule, the water pressure on them is quite suitable for normal operation of the washing machine. However, if you want to install more than one washing machine in your apartment, you should consult with professional installers. And find out how good this idea is.
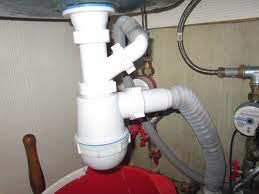
Let's consider a schematic description of connecting the machine to water and sewerage (we removed the washing machine itself from this diagram):
- Half-inch inlet. pipe.
- Machine valve.
- Occasion.The hoses are plastic.
- Pouring water.
- Hose for draining water.
- Water intake pipe
- Drain siphon.
- Sewage pipe for draining water (one and a half inches).
We supply water and install self-tapping valves
 Along with your new washing machine, you also receive plastic hoses. They are needed to connect our household appliances to cold water and sewerage. They are located on the back of the machine. And at the end of one of them (the thinner one) there is a small plastic circle with a thread. It is needed to fix the hose on a special branch of the water pipe.
Also, the machines usually come with a valve for connecting to the pipe. Using it, you can, if necessary, shut off the flow of water inside the washing machine. It is very convenient to use. After all, when the water supply to the machine is turned off, water continues to flow to other parts of the apartment. Therefore, you can use it in the bath and kitchen taps, in the toilet and other places (if your water is piped somewhere else).
If you don’t find a valve in the kit, then you need to purchase one yourself. It is sold in plumbing stores. It is advisable to buy a German or Italian valve. After all, it can serve for years and even decades. Unlike cheap Chinese ones, which can break after a few months. An unexpected valve failure will most likely cause cold water to break through. As a result, you can flood yours, as well as your neighbor’s apartment.
Something as unpleasant as a flood does not evoke pleasant emotions. And it could get you into trouble. For example, reimbursement of money spent by neighbors below on repairs that were damaged due to the flood. Therefore, you should be very careful when choosing a valve.And you shouldn’t save too much when purchasing.
In some cases, you can use a special self-tapping valve. Such a valve can make the necessary hole in a water pipe without shutting off the water in it. Such valves have a special color marking. As well as a threaded thread for connecting the inlet hose of the machine.
The use of these valves is acceptable if there are no various devices for water intake further along the pipe. After all, they may need quite a lot of pressure. And a built-in self-tapping valve can significantly reduce this pressure.
Installation of self-tapping valve
Next, we will look at how the installation of this wonderful item occurs:
- First, you need to screw the plate to the wall surface to install the clamp.
- Then an overhead part with a rubber gasket is placed on it. After this, you need to check whether it is fixed correctly. And after that you can screw it on.
- Next, you need to turn the valve so that it is in the closed position (the position in which water should not flow). It is then screwed into the cover plate. In the part of the valve that will penetrate the water pipe, there is a special cutting surface. Due to which the necessary hole will be created.
- After the valve has penetrated the pipe to the required depth, you will need to tighten the control nut using a wrench of the required diameter. Then you can screw the end of the washing machine inlet hose onto the threaded branch.
Before turning on your household appliances for the first time, do not forget to set the shut-off valve to the open position. This will ensure the water supply to the machine.
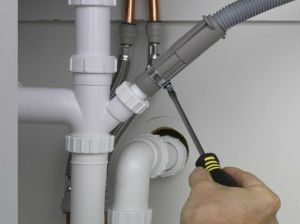
Branches
 Next, we will look at other conditions for properly connecting the washing machine to cold water and sewerage. And let's talk about how to install a siphon for our machine. By the way, if there are no bathroom water pipes near the installation site of the washing machine, then you can connect it to any suitable pipes. For example, those located in the kitchen. To do this, you may need to run a branch pipe to your appliance.
It must be positioned so that the machine can be connected without problems. A special adapter is installed at the end of such a pipe, onto which a hose can be screwed. Please ensure that it contains a water shut-off valve. You can also embed the valve not at the end of the pipe, but at any other section of it. It is better to choose one that is easily accessible. And to which you won’t have to stretch too much. That is, everything needs to be done conveniently. So that, if necessary, you can turn the water off and on without any problems.
Before making such a branch, do not forget to turn off the water in the riser. You may need to contact your housing office for this. If you doubt your plumbing skills, you can call a professional plumber. You can also find it at the housing office or on the Internet. May Google and Yandex help you!
After the pipe and adapter are installed, you need to screw the machine’s inlet hose to it.
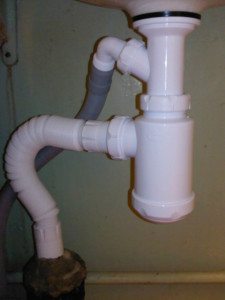
Draining
 This is where the siphon comes in handy! It is installed on the pipe. And it is used to prevent the unpleasant smell of sewerage from penetrating into your home through the water drain connection from the washing machine.Also, when installing the drain hose, it is necessary to take into account the height at which it is located. You can find this data in the documents supplied with the machine. If we could not find specific figures for the permitted height of the drain, then we believe that it should not exceed sixty centimeters from the floor covering.
If there is a sink next to the washing machine, you can connect the drain to it. To do this, you can use a special siphon, to which you can connect both the sink drain and the machine drain. It is also allowed to drain water directly into the sink or bathtub. A plastic hook is included with the machine specifically for these purposes. The end of the drain hose is put on it. And this hook, with a hose, hangs on the corner of the bathtub or sink.
Video in which you will see everything you need to properly connect the washing machine:
Interesting:


Reader comments
- Share your opinion - leave a comment
Categories
Washing machine repair


For buyers


For users


Dishwasher


Add a comment