DIY cabinet for washing machine
 It often happens that the bathroom is very small in size, but you want to fit a lot there, including the appropriate household appliances and various accessories. So, in order not to stumble over various interior items and at the same time have everything you need at hand, you can build a cabinet for a washing machine, thereby partially solving the problem you are facing.
And if you are as inventive as possible, you can also install a dryer above the cabinet, freeing up additional space in your bathroom. It is best if the cabinet is built-in, plus you can build a special triangular rack for it.
What is the cabinet made of?
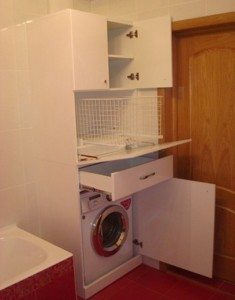
Ideally, your closet should consist of a frame and a drawer located in the very center.
On top you will need to place a second drawer to accommodate the dryer. It is best to construct furniture from specially prepared fiberboard sheets. Then your furniture will be strong and stable. In order not to spoil the idea, contact specialists who will cut them to the dimensions specified to you.
The only thing left for you to do is paint the blanks in the color of your choice.
Assembling the closet
 The first step is to drill holes for shelves in the sides of the cabinet. A five-millimeter drill size will be ideal for this purpose. It is also necessary to make holes at the top, 7 mm away from the edges. This will ensure that the shelves won't crack when you screw the cabinet together.
Now it's time to start attaching the cabinet. This is done using metal corners.After this, all that remains is to glue the parts and secure them by screwing in the screws. You can use M8 machine screws as legs. To prevent the cabinet from swaying or standing at an angle, it is best to screw a sleeve with an internal thread into the board. Only in this case can you at any time adjust the position in which the cabinet will stand like a glove. Cover the cabinet legs with plastic caps to prevent them from scratching the floor.
Now it's time to install the cabinet in the designated place. There is no need to rush this process: since there will be another cabinet on top, you must make sure that the bottom one is level. The final step will be to fasten both cabinets together. First you need to clamp them with clamps and then fasten them with screws. They should not be too large in size, otherwise they will stick out with a sharp end from the back of the board.
Finally, all that's left to do is install the door latch. This is an ideal option for preventing the door from closing at those moments when you don’t really need it. The spring-loaded hinges will not allow her to do this. Such a retainer can be purchased at any household goods hypermarket.
Making a drawer
After the main work is done, you can begin assembling the drawer.
First of all, on its front side it is necessary to determine the place where the handle will be located. To do this, you need to measure the distance vertically and horizontally and make sure that the handle will be installed in the very center. Agree, if at the end of the work it turns out to be shifted to the left or right edge, it will not look very nice.
Once you are done with the markings, you can screw the front panel to the sides.Make sure that its width is sufficient to completely cover the future contents of the box, without leaving any gaps. Now I started to screw on the guides for the cabinet. This requires an accurate eye so that subsequently the fittings installed on the sidewalls do not end up being screwed at different heights.
We build a rack
In order to install the triangular shelving, you will also need precise markings. If the walls in your apartment are even, then you only need to measure the angle, and then make the sides and a couple of triangular shelves of the same size.
If you live in old-type houses, then it is best to verify the accuracy of the dimensions several times.
It is recommended to process the front edges of the shelves using a hand router. If you don’t have one, then you can get by with sandpaper.
After completing the rough work, screw the shelves to one of the sides using the holes made with a drill and screws. Then do the same procedure with the second side. The final stage is securing the back wall. This gives you one last chance to touch up the corners of the cabinet. If you are sure that everything is perfect, nail the wall with nails at a distance of 10 cm from each other.
Interesting:


Reader comments
- Share your opinion - leave a comment
Categories
Washing machine repair


For buyers


For users


Dishwasher


Add a comment