Homemade washing machine
 People living in a bustling city often go to their summer cottages for holidays or weekends. And such a pleasant vacation can be ruined, for example, by a failed washing machine. There is a need to return to the city a few tens of kilometers, buy a new device, organize its delivery to the site. Not everyone knows that you can make a home-made washing machine from improvised means. So you solve the problem, without wasting effort on exhausting trips, and money on the purchase of equipment. We will figure out how to make the washing machine itself.
How and from what is it more profitable to make?
Trying to facilitate the task, the first one will be an attempt to repair the failed equipment. On the one hand, this is correct, but on the other hand, in most cases, you will still have to arrange a trip to the store to purchase replacement parts. If I stood in the country activator washing machine type "Baby", then repairing it is too tedious and economically impractical.
What if there is no opportunity to travel to the city? Do-it-yourself washing machine can be assembled from parts lying around in the country shed, taking some elements from the equipment that has expired. Ideally, the designed product should eliminate the need for welding and turning. Assembly takes several hours.
Washing device assembly
Before you assemble the washing machine with your own hands, you need to figure out what kind of work ahead. It is important to understand whether you can find the necessary parts and details at your summer cottage. The design of the washer is as follows:
As a drive, you can use, for example, an electric motor from the Skillful Hands machine. As a tank - a volumetric enameled pan. The activator and its sleeve must be removed from the failed washing machine.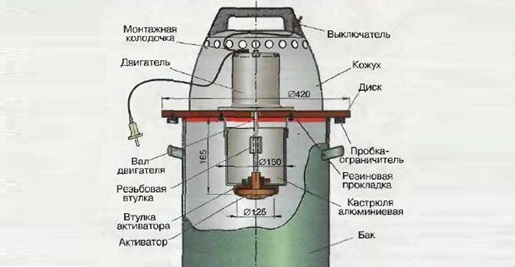
You should make the device itself, which will provide the washing process. To do this, you need to take a plastic disc with a thickness of about 8 mm, the diameter of which will exceed the circumference of the tank used as a tank, by 10 cm. A hole with a diameter of 1 cm is drilled in the center of the prepared circle, where the motor shaft will subsequently be inserted. The electric motor is fixed to the disk with stator bolts, their sizes are perfect in this case.
Between the disk and the engine, it is desirable to put a rubber gasket.
After you need to do the activator. A suitable saucepan is taken and a hole is drilled in its bottom. An activator sleeve is inserted there, which is tightened with a nut from the inside. The activator axis is placed in the sleeve from the outside.
Then you need to connect the activator with an electric motor. The engine shaft at the end has a thread with a diameter of 10 mm. The standard activator is also equipped with a centimeter axis with thread. If there is no finished sleeve of the same size to connect the two axes in the country, you can do the following. Take the M10 bolt and three M10 nuts, screw them onto it. On the resulting structure, fit a steel tube of suitable diameter and roll its ends. Having driven the pipe from the bolt, you get a reliable sleeve of the right size. Half-finished sleeve must be screwed on the motor shaft halfway, the other end - on the axis of the activator.
Thus, the do-it-yourself washing machine is almost ready. There is a tank where water will be poured and linen loaded, as well as a working device that starts the washing cycle. The engine, which, in fact, is outside, it is desirable to cover, as an option - part of the housing from the old vacuum cleaner. The protective cover is attached using special tabs.
It is important to connect the wiring to the motor correctly. Wire connections will be under the “hood”. The power cable is also recessed under the casing, only a small part of it with the plug remains outside.
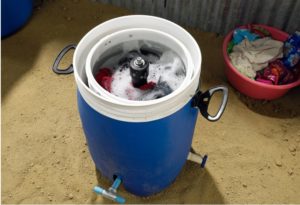
To ensure that the disk is locked in place during the operation of the equipment, 6 stoppers from ordinary plastic bottles should be drilled to its lower part. This will allow the lid not to shift from the center during the operation of a home-made washing machine. Also, the upper part of the tank, in the described example - an enameled pan, is best rubberized. A rubber tube is suitable for these purposes. Cut it lengthwise into 2 parts and carefully put each half on the edges around the perimeter of the container.
How does the machine function?
The course of washing will be as follows. Laundry is placed in the tank, washing powder or liquid detergent is also poured here. Then things are filled with water of the right temperature.
The amount of water and clothes that the electric motor "pulls" are calculated empirically.
The device is immersed in the tank. The plugs located on the bottom surface of the disc are located around the circumference of the tank on the outside. Then you should start the engine. Additionally, it is not necessary to fix a working system in a tank. The revolutions of the shaft of the electric motor will be great, this will ensure high quality washing clothes.
A significant disadvantage of a home-made washing machine in this case will be considered low productivity. Due to the modest power of the electric motor and the small volume of the tank, you can wash about 1 kg of dry clothes at a time, which is equivalent, for example, to five men's shirts. If you load more things, the quality of cleaning will be much worse. To increase the performance of the washer, you can search for a more powerful engine and increase the capacity of the tank.
Interesting:


Reader Comments
- Share your opinion - leave a comment
Headings
Washing machine repair


For buyers


For users


Dishwasher


Add a comment