Repair faults washing machines Virpul
 Currently, mainly Whirlpool washing machines assembled in Italy or Slovakia are present in the CIS market. Italian cars are quite expensive and less common, but Slovak washing machines are available in every household appliance store. Perhaps due to the European assembly, such machines break down infrequently and repair of Whirlpool washing machines requires only one out of 15 owners of such equipment. Nevertheless, it is necessary to study its features, because you never know what!
External signs of typical breakdowns
In any complex technique, especially household appliances, anything can potentially break. If you list all the possible failures of modern automatic washing machines Virpul without exception and describe their elimination, you can write a book about this. Therefore, as part of the article, we will only talk about typical defects, which, according to statistics provided by service centers, are most common.
- Water does not leave the machine after washing.
- Washing programs fail, do not work as they should, or do not activate at all.
- The water drawn for washing does not heat up according to the set program.
- Water leaks during washing from the closed manhole cover.
Note! Serious malfunctions are encrypted in these typical signs of breakdowns, the elimination of which is of paramount importance, since otherwise the Virpul washing machine could break down completely.
Water remains in the machine and does not go away
Probably, it happened to you too, you put the laundry in the drum, put your favorite washing program and go to another room to do household chores. After a while, come, the machine freezes, it has a full tank of soapy water and the washing is certainly not completed. Restart the machine, the story repeats, the washing cannot be completed, since the water does not leave the tank. What to do in such a situation, and what is the cause of the problem? There are three main reasons:
- there is a blockage in the drain pipe or drain filter;
- there is a blockage in the drain hose or sewer;
- the electric drain pump has broken.
But before you begin to find out the cause of the breakdown of your Virpul car, you need to prepare it yourself, namely, turn off and drain the water from the tank manually. Quickly and safely remove all water from the tank through the emergency drain hose.which is located next to the drain filter. It is necessary to substitute a basin or other container under the hose and open the cork and all the water will flow out. Next, proceed to the search for damage, moving from simple to complex.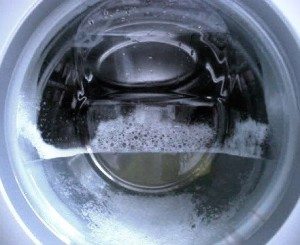
- We put a container or a rag under the drain filter hole and unscrew the cork. We clean the filter from dirt and put the cork in place.
- Gently unscrew the drain hose and clean it of dirt, then screw it into place.
- Check if the sewage is clogged.
The above steps do not involve disassembling the Virpul washing machine, so after performing a “general” cleaning, try restarting the machine. If nothing has changed and the machine still refuses to drain the water, then you have to climb into its body.
Important! In almost all models of Virpul washing machines, to get to the drain pipe and pump you only need to turn the machine on its side and remove the bottom.
To get to the details we are interested in, we perform the following steps:
- take out the powder tray;
- disconnect the machine from the water supply, sewerage and electricity;
- put the machine on its side;
- unscrew the fasteners and remove the bottom;
- take a multimeter and measure the resistance at the contacts of the pump;
- change the drain pump to a new one, if the problem is not in it, then go to the next stage;
- weaken the clamps of the drain pipe and remove it;
- clean from blockages and put in place.
Wash programs do not turn on and turn on, water in the tank does not heat up
It happens that after turning on the washing machine, its control panel seems to go crazy.The display starts flashing, and all the lights and toggle switch indicators echo it. Moreover, the washing program may not be displayed. If you come across a similar, immediately unplug the machine and wait about 1 minute. Then turn on the Virpul washing machine again and if the problem recurs, call the wizard. Here it is in the control board, and it is extremely difficult to repair it with your own hands, it is better not to waste time and effort.
But in case your machine refuses to wash in warm water, then you can not only independently determine the malfunction, but also fix it yourself, without the help of a specialist. Most likely the reason lies in the heating element or thermistor, in any case, you will have to check both elements at once. We proceed as follows.
- We deploy the washing machine with the back wall to ourselves, so that it is convenient.
- We unscrew the bolts and remove the back wall of the machine.
- Unscrew the bracket, which will interfere with the heater.
- In the lower part of the tank we will see two protruding contacts - this is ten. Four wires are suitable for it, two in the middle to the thermistor and two at the edges to the heater, you need to disconnect them all.
- We take a multimeter and measure the resistance of the contacts of the thermistor.
- If everything is in order, measure the resistance on the ten.
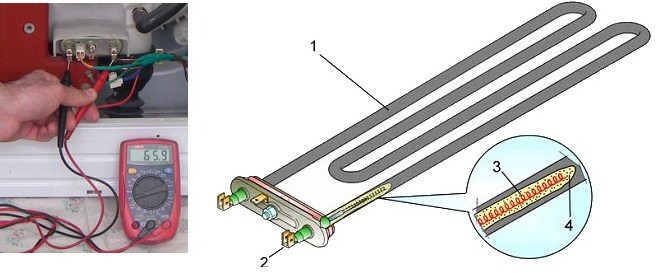
In this case, you are likely to find a malfunction, and you will have to replace the heating element. Usually, when the PETN is removed from the tank, the cause of the breakdown immediately becomes clear, since the surface of the heating element is completely covered with scale. If there is a little scum, then the ten from it will not burn, another thing, if the layer of water stone is more than a centimeter - this leads to a breakdown of the element of the Virpul washing machine. We will replace the ten with our own hands.
- We have already removed the contacts with the wires, now we unscrew the plastic shield.
- Next, unscrew the bolt, which is located between the large contacts of the PETN.
- We take hands on the contacts of the heating element and pull it onto ourselves, if the heating element does not go, try to gently shake it. The rubber gasket will get in the way a bit, but there's nothing to be done
- After pulling out the heater, we remove the gasket.
Note! Experts recommend that you do not install a new heating element on an old rubber gasket, it is better to change it together with the heater, since leakage for this element is the worst.
- We take out the dirt and scale pieces from the hole that has formed, carefully clean the edges, and then insert a new gasket.
- We insert a new ten and fasten it.
- We fasten the plastic shield.
- We connect the contacts with the wires to the thermistor.
- We connect the contacts with the wires to the heating element, put in place the bracket and the back wall.
Water leaks from a closed hatch during washing
If during the washing and rinsing, water leaks from under the hatch of your Whirlpool washing machine, first a little, a few drops, then more and more, then you need to carefully examine the largest rubber gasket in the machine - the cuff. The cuff cannot be overlooked because it encircles the opening of the hatch and serves to prevent water from escaping from the tank.
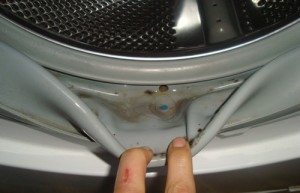 Pay particular attention to the lower edge of the cuff, as dirty water often accumulates there. And if you don’t wipe it, then the rubber of the cuff in this place begins to crack and burst. In the future, it is worth hitting her a little and she is torn. It is impossible to operate the torn cuff, since it will not hold water, it will be necessary to change. To begin, correctly dismantle the old cuff.
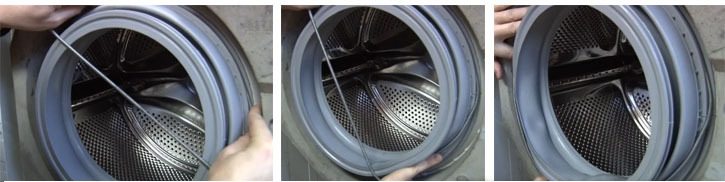
- Open the hatch as wide as possible.
- We take a flat screwdriver and try to pry off a thin wire clamp, which is located on the outside of the cuff and holds it.
- As soon as you manage to pry it, we bring a stronger screwdriver under it and begin to move in a circle until we find a connecting element with a bolt.
- Weaken the clamp and remove it to the side.
- We take the cuff with both hands and pull it out with effort.
Be sure to replace only purchase the original cuff, which clearly fits into the groove of the hatch of this model of the Virpul washing machine, otherwise problems may arise.
 Unpack the new cuff and stuff it into the groove. In this case, you need to do everything carefully and naturally do not use any sharp tools like a screwdriver. As soon as it is possible to put the cuff in place, we put a clamp on it, tighten it. We check that the hatch closes normally, and start the test wash.
Summing up, we note that the Whirlpool washing machines of the European assembly are relatively reliable and there are not so many typical breakdowns. More often, problems arise due to the fact that the user himself does not take good care of his “home assistant”, does not clean hoses and filters on time, does not wipe the cuff, and all this ultimately results in a malfunction. Take care of the washing machine and it will not have to be repaired often!
Interesting:


4 reader comments
Add a comment
Headings
Washing machine repair


For buyers


For users


Dishwasher


When collecting water, water flows from under the powder tray. During initial collection. Turn it off, turn it on again, everything is fine.
I start the program, the water is typed, heats up. and that is all. It just stands and does not wash. The drum does not spin. Even just when I scroll it, it goes tight.
They dropped the car, broke the lid mount, how to fix plastic ears? Help !!!
After the washing starts, the machine stops and the message “contact service” lights up.