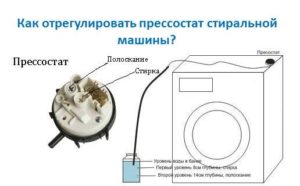
How to adjust the pressure switch of a washing machine
Over time, any element of the washing machine can fail - the rubber seal begins to crack, the heating element stops heating, the water level sensor gives an incomprehensible error. An imperfect system for collecting water into the tank will indicate a problem with the pressure switch. The washing machine will either not receive liquid or be loaded with excess liquid.
Not in all cases the sensor needs to be replaced with a new one; sometimes it may be necessary to adjust the pressure switch. By making an attempt to adjust the part yourself, you will avoid unnecessary expenses on purchasing the element, while at the same time extending the service life of the existing sensor for many years. Let's figure out how to adjust the part responsible for collecting the required amount of water into the tank.
Before opening the pressure switch
After detecting a malfunction in the system, it is necessary to understand whether the pressure switch was really the cause. Carefully inspect the filling system, examine the hose and fitting of the water intake sensor, its transition chamber. The inspected elements should not contain:
abrasions, tears;
deposits from laundry detergents.
If you find dried detergent on the parts, be sure to rinse the components and try to start the machine again. Perhaps these measures will help restore the functionality of the pressure switch.
Next, you should check the stability of the connection of the power supply wiring to the sensor. Perhaps a wire has become frayed or bent. If a defect is found, fix it and check the washer for functionality.
And finally, it is necessary to inspect the contacts of the pressure switch; if they are dirty, they should be cleaned.Then start checking the water intake sensor. For diagnostics, you will need a tube with a diameter similar to the permanent sensor hose. One end of the tube will have to be put on the inlet fitting of the device, and lightly blow into the free second hole. When the sensor is working properly, it makes a clicking sound. If after such a check no problems were found, it is necessary to disassemble the pressure switch.
Adjustment process
It is not necessary to seek the help of professionals to set up the liquid level sensor; repair work can be done independently. It is necessary to strictly follow the instructions below and perform all actions carefully, with extreme caution. To adjust the level sensor of a washing machine, you need to follow the following algorithm:
disconnect the automatic machine from the power supply and water supply;
remove the pressure switch by unscrewing a pair of bolts holding it and carefully disconnecting the wires supplying the part;
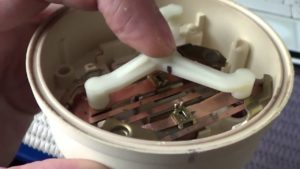
look for special screws designed to tighten and loosen the internal contacts of the device;
remove any remaining sealant from their surface.
These manipulations can be called preparatory; the main work of setting up the pressure switch remains to be done. Next, using the cleaned screws, you need to try to catch the moment of approaching and opening the contacts with your own hands. In this case, you will have to use the well-known “poke method”, since a non-professional does not have special devices that allow you to establish the moment of closure. You need to do this:
turn the first screw half a turn, connect the sensor to the machine, turn on the machine and start the washing mode;
if in your case the required volume of water was not initially collected, but now there is more of it, then the right path of action has been chosen. Unscrew the screw further in the same direction, then fill part of the part with sealant;
if unscrewing the bolt has the opposite effect, turn it in the opposite direction by one or one and a half turns.
The main task when adjusting the pressure switch is to set the optimal parameters for its operation so that the sensor is triggered at the right time and clearly determines the volume of water collected in the tank.
After the screws are screwed to the desired position, be sure to treat them with silicone sealant to prevent subsequent loosening of the fasteners.
Signs indicating a part failure
Many factors can indicate a breakdown of the liquid level sensor.. If the pressure switch fails, the normal operation of the washing machine is disrupted and the machine begins to function incorrectly. Certain signs indicate a malfunction of the device.
The washing mode is activated even when the drum is empty.
The heating element starts to work, although there is no water in the tank. This action will certainly lead to burnout of the heater.
An automatic machine draws “as much water as it wants”, and not the required volume provided for by the washing program.
The washer cannot drain waste water at the end of the cycle.
The rinse mode in the machine does not function.
It is not difficult to independently diagnose a breakdown of the pressure switch; the described signs quite clearly indicate problems with the sensor. However, adjusting the sensor will not help in all cases; in certain situations, it will require complete replacement.
If the adjustment didn't help?
If an attempt to set up a pressure switch with your own hands fails, this does not mean that you need to change the washing machine or urgently call a technician. The most cost-effective option would be to replace the faulty part with a new sensor.
It is important to choose the right replacement pressure switch; be sure to take into account the make and model of your automatic machine.
Installing a new water level sensor will not take much time. It is enough just to remove the broken part, having previously photographed the wiring diagram, and then carry out the following sequence of actions:
secure a working pressure switch in the system;
connect the hose to the sensor tube and secure it well with a clamp;
inspect the resulting connection for cracks, creases, and damage;
connect the electrical wiring according to the previous diagram.
You should not use a washing machine with a non-functioning sensor, this can lead to a serious malfunction of the machine; you must adjust the pressure switch as soon as possible or replace it with a working one.
Then you need to assemble the body of the automatic washing machine, replace the top cover, turn on the washing machine and start the washing program. After replacing the part, the situation should undoubtedly improve.
Ariston AVTF129, the water intake occurs with a stop and scrolling, then there is a constant water intake until the H2O error occurs. I blew it out and checked the hose for seals. The tester calls terminals 1-3, 2-3, 2-4. then maybe? Taking a repairman and a car to a distance for repair is very expensive. I will be very grateful!
 Over time, any element of the washing machine can fail - the rubber seal begins to crack, the heating element stops heating, the water level sensor gives an incomprehensible error. An imperfect system for collecting water into the tank will indicate a problem with the pressure switch. The washing machine will either not receive liquid or be loaded with excess liquid.
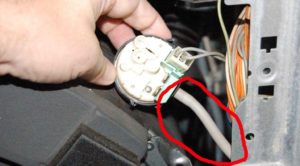
 These manipulations can be called preparatory; the main work of setting up the pressure switch remains to be done. Next, using the cleaned screws, you need to try to catch the moment of approaching and opening the contacts with your own hands. In this case, you will have to use the well-known “poke method”, since a non-professional does not have special devices that allow you to establish the moment of closure. You need to do this:


If the pressure switch is screwed up, you can’t just change it and adjust it
Ariston AVTF129, the water intake occurs with a stop and scrolling, then there is a constant water intake until the H2O error occurs. I blew it out and checked the hose for seals. The tester calls terminals 1-3, 2-3, 2-4. then maybe? Taking a repairman and a car to a distance for repair is very expensive. I will be very grateful!
The length of the tube, longer - more water, shorter tube - less water.