There are several cases where you need to look inside the tank. Most often, this is necessary when the bearings and oil seal, “hidden” in the cast structure, fail. However, the cause may also be cracks in the element, leading to leaks. Whatever it is, you need to act as soon as possible. Let's figure out how to disassemble a non-separable tank without resorting to the help of a specialist.
Removing the tank
The stages of the process of removing an element from the washing machine will be similar for different models of machines. There will be a significant difference only when repairing the “front” and “vertical”; in the first case, you will have to remove the front wall of the case, in the second - the side part. To easily remove the tank from the machine and subsequently divide it, prepare the following tools:
Phillips and flat screwdrivers;
screwdriver;
hacksaw for metal;
drill with a diameter of 3-5 mm;
pliers;
punch;
set of socket heads;
ratchet wrench.
During the process of disassembling the washing machine, it is advisable to photograph all disconnected circuits and connections in order to correctly assemble the machine after repair.
The main stages of work on removing a non-separable tank from the body:
turn off the power to the washing machine;
close the valve responsible for supplying water to the system;
disconnect the inlet and drain hoses from the housing;
remove the top cover of the device; to do this, use a screwdriver or screwdriver to unscrew the fastening screws;
remove the detergent tray from the system;
Remove the bolts holding the main control panel. You don’t need to completely disconnect it from the body; just put the part on top of the washing machine;
loosen the clamp holding the hatch door cuff. Pull out the ring and insert the rubber seal into the machine drum;
unscrew the 2 screws holding the hatch blocking device, pull out the UBL, having first disconnected the power supply;
Unscrew the remaining screws holding the front wall of the case, remove it and put it aside;
dismantle the rear wall; to do this, unscrew all the fastening bolts;
disconnect the wires from the heating element, loosen the main nut and remove the heating element from the socket;
remove the counterweights adjacent to the tank;
remove the drive belt from the pulley, unfasten the power supply wiring of the electric motor.
After all parts and components have been disconnected from the tank, you can proceed to weakening the shock absorbers. Unscrew the suspension springs and remove the tank. Carefully remove the non-separable structure from the body and place it on a flat surface for further DIY repairs.
Stages of work
It is not profitable for manufacturers of household appliances to produce collapsible tanks. In monolithic structures there are no additional bolts and fasteners, and if the same bearing breaks, most users will purchase a replacement tank, paying a lot of money. Not many people know that a washing machine with a non-separable tank can be “defeated” by dividing the cast part into two halves, thereby gaining access to the inside. A step-by-step guide to disassembling the tank when replacing bearings will be as follows.
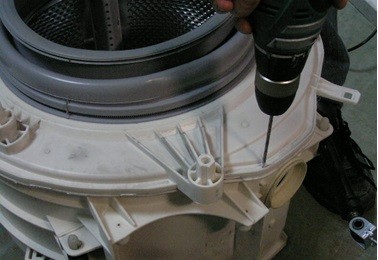
Mark and drill holes on the surface of the plastic housing.
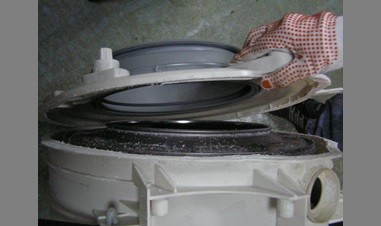
Carefully cut the tank along the marked line.
Remove the drum.
Using a drift or a special wrench, knock out the bearings and install new ones in their place.
Change the seal.
Reassemble in reverse order.
The general outline is extremely simple. However, the work ahead is intricate and labor-intensive, so we will consider each stage in more detail.
Opening the tank
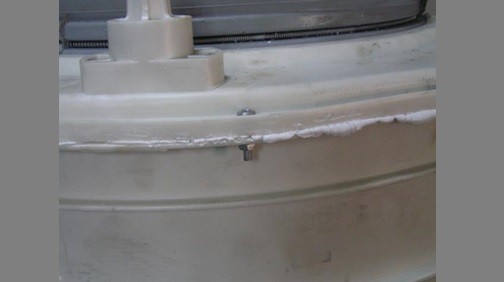
So, the tank is removed from the washing machine body. Wipe it with a clean rag and start marking points around the perimeter of the weld. It is recommended to make holes at a distance of 5-7 cm from each other, no more. A drill with a diameter of 3 to 5 mm is suitable for drilling.
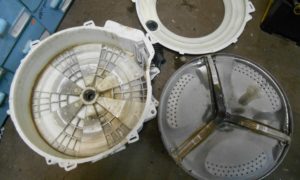
Once you can easily trace the cut line visually through the holes, begin to carefully cut the tank with a hacksaw. At the end of the action you will have two halves. It is in the rear “forecastle” that there will be a drum, bearings, an oil seal and a wheel for the washer pulley.
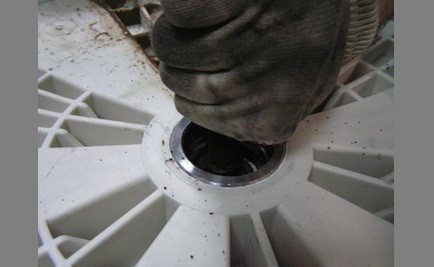
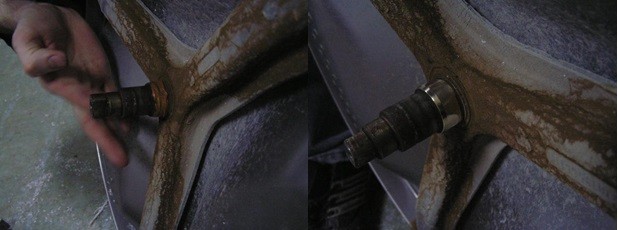
To remove the drum you must first remove the wheel. The screw holding the ring is “situated” with glue by the manufacturer for greater reliability. To remove the fastener, place a bat on it and hit the screw a couple of times with a hammer. The glue will come off and removing the wheel will become much easier. After this, you can safely remove the drum.
The next stage of work involves knocking out the bearings. Take a drift, place it on the inner edge of the bearing, and carefully, tapping in a circle, remove the part from its seat.
The opened drum shaft should be cleaned and treated with special polishing to a shine.
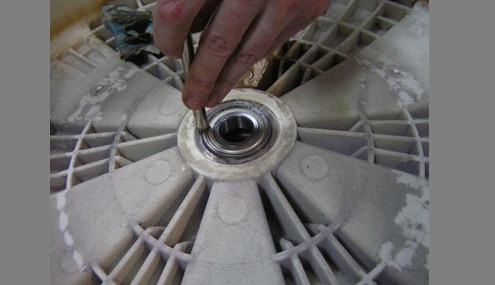
The seat should also be freed from dirt and plaque. Then proceed to driving in serviceable bearings and a new oil seal. Lubricate the installation area with a special moisture-resistant grease, insert the bearing and use a drift to tap along its outer edge.The procedure must be carried out very carefully so as not to damage the new element. When the bearing is inserted all the way, you will hear a characteristic dull knock. We install the second ring on the reverse side in a similar way.
The bearing must be completely in place and rest against the side.
Place an oil seal on the inner bearing, generously treated with special silicone grease. Silicone will prevent moisture from entering the system and increase the service life of new parts.
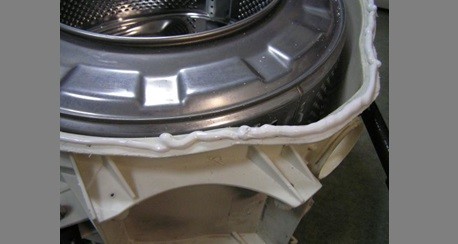
Reassembly begins with installing the drum. Its rod should fit freely into the bearings. Afterwards the pulley ring is attached to the previous place and tightened with a screw. All that remains is to assemble the sawn halves into one whole. Lubricate the edges around the entire perimeter with reliable silicone sealant, then connect the parts of the tank. The previously drilled holes will serve to tighten the halves with screws.
As you can see, it is possible to disassemble a non-separable tank. This method will be much more economical than completely replacing a monolithic structure. Reassemble the washing machine in reverse order and check its operation.
 There are several cases where you need to look inside the tank. Most often, this is necessary when the bearings and oil seal, “hidden” in the cast structure, fail. However, the cause may also be cracks in the element, leading to leaks. Whatever it is, you need to act as soon as possible. Let's figure out how to disassemble a non-separable tank without resorting to the help of a specialist.
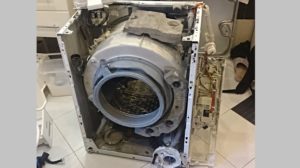


Add a comment