How to disassemble the pump of an LG washing machine?
 If every second person can get the pump out of the washing machine, then disassembling the drain pump of an LG washing machine is somewhat more difficult. Of course, it’s easier to throw out the problematic part and install a new one in its place, but replacement is not always cheaper than repairing it yourself. For those who don’t want to spend money, we suggest learning how to properly “digging” in the drainage device.
Let's dig into the drain pump
You can't fix the pump without disassembling it. Only by getting under the housing can you check whether the impeller rotates completely on the shaft and how well the clamps hold the part. Especially if the blades do not rotate in the absence of visible reasons for stopping (when there is no debris, dirt, hair on the pump). Then the problem that prevents complete drainage is hidden inside the device, and you need to find it. To “open” the pump from the LG washing machine, you need to follow the following algorithm:
- disconnect the part from the volute by removing the fixing bolts;
- press on the body from the side of the drain valve, and then pull it towards you;
- drain the remaining liquid in the pump;
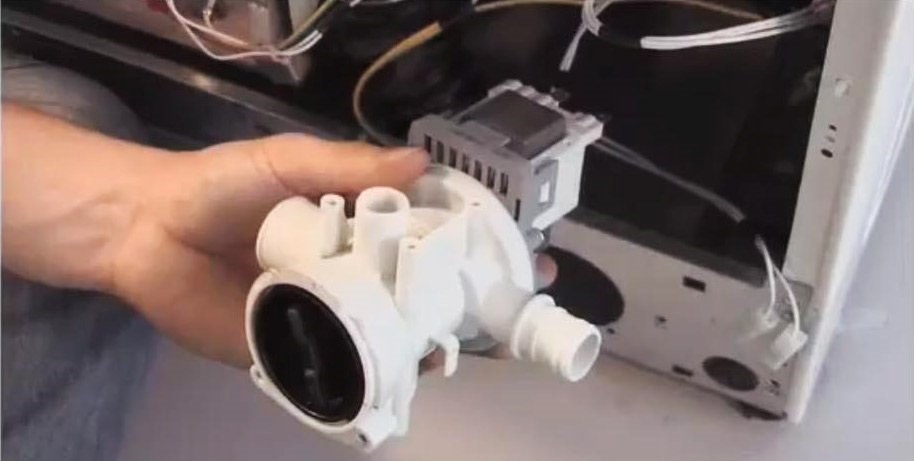
- pry the latched holders from both edges of the case;
- lift the pump away from the coil.
Any pump repair requires thorough cleaning of the internal pump mechanism and adjacent elements of the drain system: volute, seat, pipes, impeller.
Less common, but there are “non-separable” types of pump, which, despite their name, are quite suitable for repair. It is only necessary to apply a special approach to the mechanism. So, let's do it like this: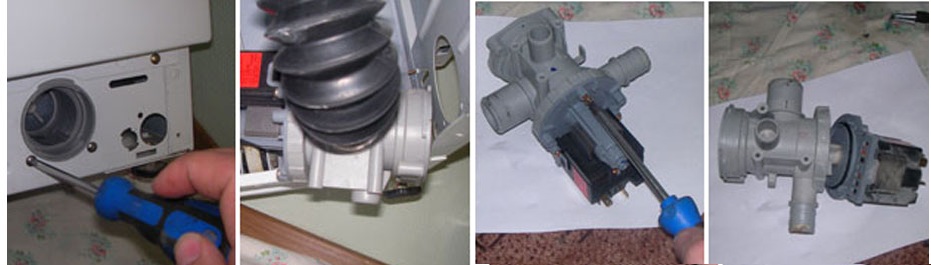
- We put on protective gloves.
- We disconnect the pump along with the impeller, leaving the volute and coil in place.
- Let's examine the detail.
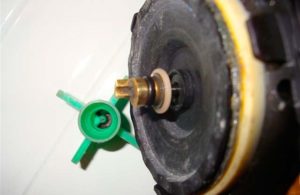
- We take a hair dryer and turn on the lowest temperature setting.
- We direct a hot stream of air to the “shank” - a long tip from the back of the body.
- After 2-5 minutes, pry up the crosspiece with a screwdriver, pulling it out. The “set” with the cross also includes a magnet, due to which the mechanism becomes “non-separable”.
Once the cover is removed, the pump device is completely disassembled. All that remains is to repair the part. To do this, we clean the removed and remaining parts from accumulated debris, remove the magnet from the shaft and lubricate all the bearings (both the removed one and those located at the bottom of the housing) with a special compound. Afterwards we return the pump to its original form. In order for the lid to fit tightly again, you need to press it until you hear a characteristic click.
If after checking it turns out that the pump cannot be repaired, you will have to replace the faulty part with a new analogue. We purchase a pump using the serial number of the device or washing machine and install it in place of the old one. The connection process is identical to the dismantling technique, so there is no point in describing it in detail.
How can you tell if the pump is broken?
It is worth understanding that disassembling the pump yourself is a risky undertaking. To protect yourself from unnecessary costs, you should first make sure that this is really the problem. It is likely that completely different reasons led to the sudden stop of the LG machine. You can eliminate the error by consistently checking all the “sore points” of the drain system.
- We evaluate the noise of the machine. When the drainage pump is faulty, a strong hum comes from the machine, and water does not drain or collect. The complete absence of any sounds should also be alarming - normal noise is moderate at medium volume.Testing your washing machine is easy: just run the fastest cycle and listen to the unit.
If the problem is in the drain pump, the LG self-diagnosis system will display an OE error code.
- Inspect the drain hose. Often, draining is difficult due to a clogged hose, when waste water simply cannot exit from the machine into the sewer. You can confirm your guess by feeling the rubber along its entire length, but it is better to immediately disconnect the pipe and rinse it under the tap.
- Clean the garbage filter. At the first suspicion of a problem with the drain, you need to pay attention to the garbage filter. It is located under the technical hatch cover in the lower right corner of the machine, representing a plastic spiral attachment. Turn the round lid half a turn, pull it towards you and thoroughly clean out all accumulated debris. As a rule, there are always hairs, coins, pieces of dirt and even bra wires on the plastic.
- We are trying to rotate the impeller. Do not rush to return the garbage filter to its place. It is better to immediately check another problematic element of the drain system - the pump impeller. This is a “wheel” with blades, which is located on the pump just opposite the hole for the “trash can”. Using a flashlight, we find the screw and try to check with our fingers whether it rotates freely. If its movement is difficult, then we clean off hair, threads, lint, wire and other foreign objects that interfere with rotation.
To control the troubleshooting process, it is recommended to run a test wash after each test step. If the pump still does not work, you will have to solve the problem with it. We turn off the washing machine, remove the pump from it and begin to disassemble it according to the instructions discussed above.
Interesting:


Reader comments
- Share your opinion - leave a comment
Categories
Washing machine repair


For buyers


For users


Dishwasher


Add a comment