Dismantling the washing machine drum
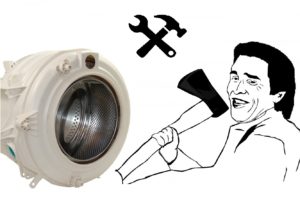 Damage to the bearings of the washing machine is perhaps the most unpleasant malfunction that can happen to a home assistant. The problem is not so much in eliminating the malfunction itself as in getting to the details we are interested in, because for this you will have to disassemble, in the literal sense, most of the machine. The main thing is to disassemble the tank, which is assembled with a drum, and this is not so easy to do. In our article, we will address the issues of disassembling different types of front-loading washing machine drums.
Fundamental rules
 After watching a lot of thematic videos and pictures on the Internet, the user gains an unhealthy self-confidence and begins to believe that he will be able to disassemble the washing machine cleaned along with the drum, and then assemble it back in a matter of hours. In fact, disassembling the tank and the drum is fraught with many pitfalls. If you do not know them, then you can spoil the important part of the "home assistant" so that even the master will not help you later.
When wondering how to disassemble a washing machine drum, you must first get to it, and for this you will have to pull out almost all the parts from the case, since they will interfere with the removal of the tank and drum. How to do this is illustrated in detail in the article. How to disassemble a Zanussi washing machine. Although this publication deals with a specific brand of a washing machine, it is very indicative and allows us to draw analogies with any other brand of a washing machine.
So, what are the rules for disassembling the drum and tank in question? What do you need to remember when doing this job? Let us summarize these rules.
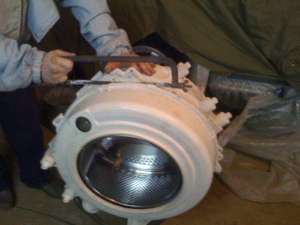
- Remove the drum tank from the washing machine housing very carefully. The tank of most modern cars is plastic and does not tolerate any mechanical influences. When pulling out a tank, take the help of a friend.
- Before sawing a non-separable tank, drill a lot of holes for fasteners with a thin drill across the seam. So you will not allow bias. The more bolts in the circle, the better it will be able to pull off the halves of the tank, and of course, do not spare the sealant.
- It is necessary to saw a non-separable tank precisely along the welded plastic seam, which is clearly visible from the side. In most places, even a couple of millimeters is not allowed.
- When unscrewing the screw that holds the drum pulley, be extremely careful and careful. Without effort, you can’t unscrew it, but by putting extra effort, you will tear off the edges of the head, than add yourself problems.

- To remove the back of the washing machine tank from the shaft, you will have to apply a couple of light blows to the shaft - do not overdo it.
The sticky bearing can be removed using a car puller. It may need to be slightly heated with a blowtorch before removal.
What is required?
To disassemble the tank with the drum of the washing machine, a generally simple tool is required. Most of the required tools are probably still in your pantry, but for some you have to go to the garage, or maybe to a neighbor. What is required?
- A Phillips screwdriver, hexagonal, flat (on some machine models, a flat and Phillips screwdriver are sufficient).
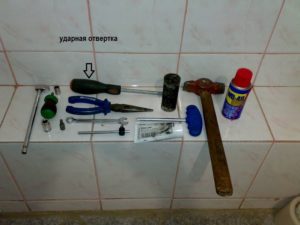
- Small adjustable spanner.
- Heads and spanners (set).
- Car puller designed for dismantling bearings.
- Blowtorch.
- Hacksaw for metal and many paintings to it.
- Drill and thin drills.
- Wooden block and hairpin.
- Weighty copper hammer.
- Nippers and pliers.
Among other things, it will be nice to have WD-40 lubricant on hand. It will help to cope with the fastened fasteners and simplify disassembly. Instead of a blowtorch, you can use a gas torch, but it will give a lower temperature and the bearing may not heat up enough to pop off.
Do not use a blowtorch indoors.It is preferable to disassemble the tank of the washing machine somewhere in the garage or shed, and preferably on the street under a canopy.
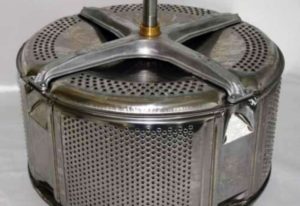
Dismantled tank
About half of all modern automatic washing machines have collapsible tanks. This is very convenient and greatly facilitates the life of the repairmen for washing machines, accelerating disassembly. At the washing machine with a collapsible tank, two halves of this tank are pulled together by bolts. In addition, the joint is either coated with sealant or sealed with an elastic band so that water does not leak out. To disassemble a dismountable tank with a drum of a washing machine you need:
- with the help of a wooden bar, jam the pulley of the drum, the tank with the drum itself must be placed with the hatch down;

- we take a head of a suitable size with a ratchet and try to unscrew the bolt holding the pulley on the shaft;
- we remove the pulley, and then, taking a suitable key, we begin to unscrew the bolts that connect the halves of the tank;
- Having untwisted the halves of the tank, apply a couple of light blows to the shaft and pull off the back of the tank;
- Using a blowtorch or gas burner we heat the bearings and pull them off with a puller.
There are frequent cases when the bearings come off the shaft without problems, so the puller is not required.
Non-dismountable tank
With a non-separable tank, we do much the same as with a non-separable tank. The only difference is that it needs to be cut. Anyone who has done this work at least once knows how heavy, dreary and ungrateful it is. The main problem is that not one handy tool in its pure form is suitable for this work.
- The hacksaw often gets stuck, and the canvas breaks.
- A thin hacksaw is sawing too thickly so that it is then difficult to ensure a tight connection of the halves of the tank.
- The grinder does not fit at all, since the disc can slip off and damage the tank at any time, in addition, working with the grinder is difficult to regulate the depth of cut, and this is a risk of damage to the steel drum.
- The jigsaw is generally suitable, but in some areas you have to work with a hacksaw again.
With regard to sawing the tank, experts advise using a conventional hacksaw for metal along with a hacksaw blade, which must be wrapped with tape with tape at one end to make it easier to hold. You will use such an impromptu file in those areas of the weld where it will be inconvenient to saw with a conventional hacksaw for metal. If after 3-4 hours you can normally cut the tank, consider half the work done, and if the old bearings come off without problems, consider the disassembly was a success.
In conclusion, we note that in order to disassemble the washing machine drum, you must first spend a lot of time to remove it, and only then proceed directly to disassembly. If the tank on your model of the washing machine is not dismantled, you will spend many times more time on disassembling. Be careful and careful!
Interesting:


1 reader comment
Add a comment
Headings
Washing machine repair


For buyers


For users


Dishwasher


Thank you, Vladimir, for the video. Everything is detailed and intelligible.