Do-it-yourself disassembly of the Ariston washing machine
 The Hotpoint Ariston washing machine has stopped working - it needs to be repaired. But to start repairing, you first need to figure out how to disassemble the “home assistant” so as not to harm it even more. Do-it-yourself disassembly of an Ariston brand washing machine, or rather the nature of such disassembly, will depend on the breakdown that occurred. In some cases, you can get by with only partial disassembly, but sometimes you have to dismantle everything down to the screw. Read the article on how to disassemble a Hotpoint Ariston washing machine.
At the beginning
Let's start our story with a standard warning. Remember that only a certified technician from a specialized service center can guarantee to repair an Ariston washing machine. Repairing it yourself may make the problem worse.
However, if you are determined to repair the Ariston washing machine yourself, it would be a good idea to study the instructions for disassembling it. This way you can avoid unnecessary mistakes, save time and money. Where to begin?
- It is necessary to disconnect the washing machine from the power supply, from the tee tap, thanks to which cold water flows into the machine, and from the sewerage system.
Note! The waste water drain hose of the Ariston washing machine can be connected to both the outlet of the sink siphon and the outlet of the sewer pipe. In both cases, it is easy to disable it.
- Next, without disconnecting the inlet and drain hoses, twist them somehow so that water does not pour out of them onto the floor, and fix the ends to the body.
- Using someone’s help, we drag the washing machine to a place where it will be convenient to disassemble it. You will need to lay something under the car so as not to flood the floor with water.
- We take the powder receptacle out of the machine and put it aside.
- We unscrew the drain filter and drain the remaining waste water in the tank. That's all for now at this stage.
Now we need to prepare a simple tool. You will need a hammer, pliers, a 7, 8, 12, 14 mm wrench and sockets, an 8 and 10 mm open-end wrench, a special wrench for removing the counterweight mounts for the Ariston washing machine, screwdrivers - Phillips, flat, hex, lubricant for washing machines, a wooden block , car puller, awl, multi-colored markers, hacksaw. Having collected all the tools, we return to the work of disassembling the Ariston washing machine.
- We approach the Ariston washing machine from the rear wall and, armed with a Phillips screwdriver, unscrew several screws holding the service hatch cover.
- By removing the service hatch, we gain access to many parts: the drum pulley, drive belt, motor, heating element and temperature sensor.
- Now, using a Phillips screwdriver, unscrew the 2 screws holding the top cover of the Ariston washing machine.
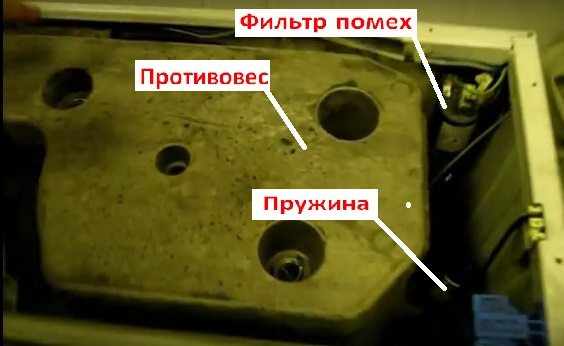
- Under the cover there is a large counterweight that blocks our access to the tank, drum and some sensors, but it is quite possible to get to the noise filter and control panel.
- Carefully place the Ariston washing machine on the left wall, if your model has a bottom, then remove it, if there is no bottom, then even better.
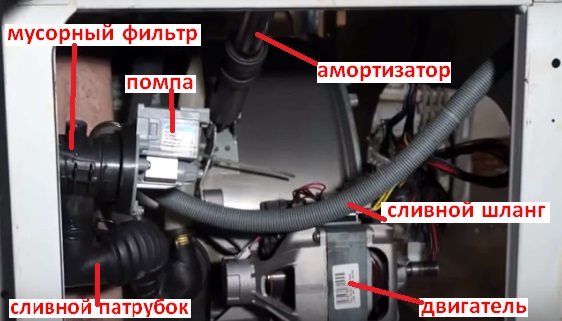
- Through the bottom we can get to the drain pipe, garbage filter, pump, motor and shock absorbers.
- Now let's remove the front panel.We unscrew the two screws located under the top cover of the machine body in the front left and front right corners.
- We unscrew the screws located under the washing machine tray, and then grab the control panel and pull it up - the panel can be easily removed.
What's easy to remove?
Well, we succeeded in disassembling the body of the Hotpoint Ariston washing machine, now we have access to parts that can be removed quite easily, so let's do it.
First, arm yourself with multi-colored markers and mark the wires going to the main modules, so that you don’t confuse anything later, and let’s start working.
Let's remove the drive belt. To do this, we take the large metal wheel, which is called the drum pulley, with one hand and turn it, and with the other hand we take the belt and remove it.
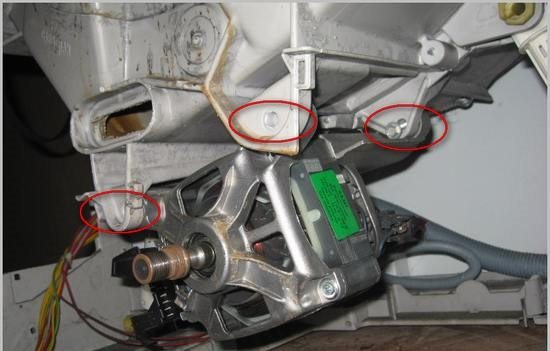
Let's remove the motor. The motor fasteners can be unscrewed through the hole in the service hatch; for this, in addition to the wrench, you will need an 8 mm socket. Having unscrewed 4 screws, we pull the engine out of its seat. Let's remove the heating element. Unscrew the nut that stands between the contacts of the heating element, then press on the nut until the heating element partially falls inside the tank. We pry up the heating element with a flat screwdriver and begin to gently pull it towards ourselves until it comes out. By the way, the heating element is also removable at the Zanussi washing machine.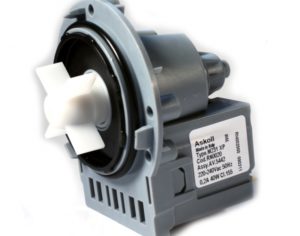
Now it’s the turn of the drain pump. We unscrew with our own hands the screws that are located at the bottom of the front wall of the Ariston machine in the area of the garbage filter. The car is lying on our left side, which means that after unscrewing the screws, the garbage filter along with the pump should fall out of the seat. Next, use pliers to remove the clamps from the drain pipe and drain hose and disconnect these elements from the pump and waste filter. Now all that remains is to unscrew the screws connecting the pump and the garbage filter and separate these elements.
The clamps on the pipes and hoses of the Ariston washing machine are similar to clamps; they must be removed carefully so as not to damage them. If this happens, then you can install regular clamps.
Let's return to the space under the top cover of the Ariston washing machine. There you can quite easily remove the FPS - noise filter. We remove the wires from it and pull the part out of the seat. As a result, we removed everything that can easily be removed from the Ariston washing machine; only problematic elements remained, which are best left untouched unless repairs are required. But if we need to remove them with our own hands and we have nowhere to go, well, we’ll remove them.
We disassemble the non-separable
Disassembling a Hotpoint Ariston brand washing machine generally does not seem difficult, but these machines have two elements that can actually create a problem for a novice master. What are these elements? This is a tank assembled with a drum and counterweights. The tank and drum of the Ariston washing machine are nominally not disassembled, as the manufacturer of these machines intended, but they can be disassembled and then reassembled with the proper skill. But what's the problem with counterweights?
It would seem, what kind of problem could such a simple part as a counterweight create, since it is just a weighting agent screwed to the body of the machine? Not so. The upper counterweight of the Hotpoint Ariston washing machine is screwed with special spring-loaded screws, which don’t even look like screws; rather, they are special fasteners.These fasteners must be unscrewed with a special key; without it, the counterweights cannot be removed with ordinary household tools.
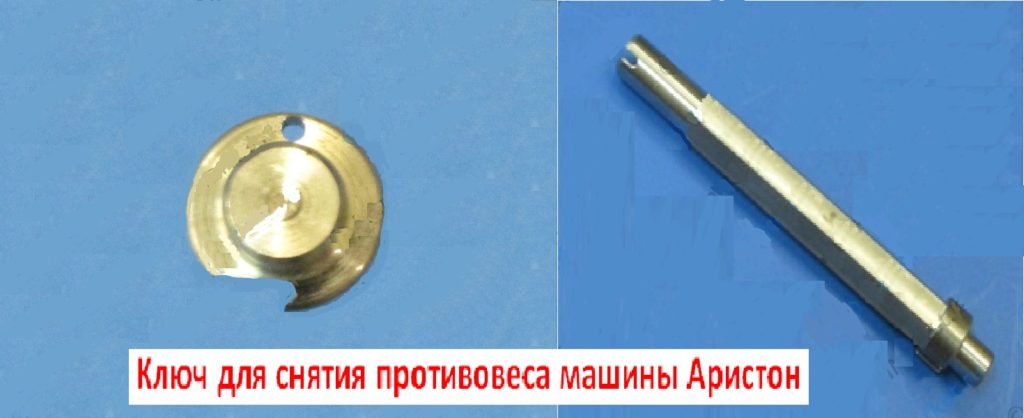
Here's the rub. I would like to remove the tank, but this cannot be done until I pull off the upper counterweight, but how can I remove it without a key? In this case, we see no other option but to go to the workshop and ask them for a key for a while, or pay money to the master who will carry out the dismantling. Do not under any circumstances unscrew the counterweight using pliers or other devices - you will break the fastenings, and then problems will definitely arise.
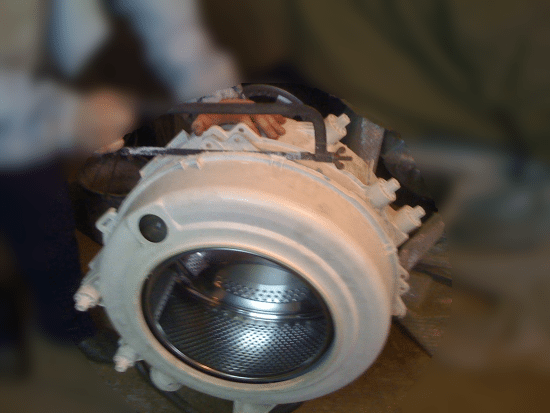
If you have taken out the key and managed to remove the upper counterweight, then you can begin dismantling the tank. To do this, unscrew the racks, call a friend for help, and together, pulling the tank off the springs, pull it out through the upper part of the car body. Next, we will need to cut the tank, remove its halves and put them aside, and then pull the bearings and seals off the drum shaft. You can read about how to do this in the article Disassembling the Atlant washing machine, by the way, the tank of these machines is designed almost the same as that of Hotpoint Ariston brand washing machines.
So, the Ariston washing machine is completely disassembled. Now it can be repaired, or it can be used as spare parts for a new car - whatever you like. We, of course, hope that you disassemble for the sake of repair and everything will work out for you. We sincerely wish you good luck!
Interesting:


3 reader comments
Add a comment
Categories
Washing machine repair


For buyers


For users


Dishwasher


But how to change the UBL? There is nothing about this...
Unscrew 2 screws, remove the terminal, remove the UBL and install the new one in reverse order. Absolutely nothing complicated, you can figure it out even if you hold a screwdriver in your hand for the first time in your life.
Please tell me, some kind of square seal fell out from under the Ariston washing machine, what could it be?