The cuff tore in the washing machine - what to do?
 If water leaks from under the hatch cover of a front-loading washing machine during washing, then there is a problem with the hatch seal. A quick inspection of the large rubber band located around the hatch will reveal damage through which water is leaking. This problem cannot be left alone, but what to do? Replacing a part is quite expensive, repairing it is problematic, and you have to choose “between two evils.” We will try to advise you something useful within the framework of the article.
Glue or change the cuff?
The problem has appeared, water and foam are oozing from under the manhole cover, something needs to be done! On this score, experts speak quite unequivocally - change it. Of course, replacing a broken part is always safer than repairing it. In this case, you must perform the following steps:
- correctly dismantle the old cuff without damaging the edges of the tank and drum;
- find and buy an original cuff that will ideally fit your washing machine model;
- properly prepare the new cuff for installation;
- install the new cuff correctly.
Note! You can, of course, call a specialist who will do all the work for you, but, firstly, he will increase the cost of the spare part, since the order will be produced by his company, and secondly, he will “tear off three skins” for the call and installation. The result is significant repair costs.
You can save a lot and try to seal the cuff, but you need to understand that it will not last long, and you will eventually have to return to the issue of replacing the part. If you decide to delay the inevitable and expect to tape the cuff, you will have to do the following:
- properly prepare the cuff for repair work;
- select tools and materials for work;
- choose the appropriate repair method;
- carry out repairs as efficiently as possible.
How to properly seal the rubber of the hatch?
Let us note right away that simply sealing the cuff of the washing machine hatch will not work. More precisely, it can be sealed, either with superglue, or with a moment, or with “Chinese snot”, but such a repair will last until the first wash. Warm water, washing powder and other chemicals have a very aggressive effect on almost any adhesive, except for silicone sealant. But sealant alone cannot be used. There is one proven way to repair a torn cuff; with its help, you can often achieve a good result. What do we have to do?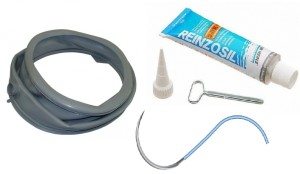
- We take a curved needle, a thin nylon thread and silicone sealant.
- We find the place of the tear and sew it up end-to-end. It is better to sew it up with a football seam.
- We coat the seam generously with silicone sealant.
- We keep the car with the hatch open for a day so that the sealant dries well.
- After this, you can run a test wash.
Important! Please note that after such a cuff repair, it is better not to use washing programs that use water heated to 950C, otherwise there are no operational restrictions.
If within 6 months after repairing the cuff, you do not get around to changing it, then you will need to renew the sealant layer, since over time it still deteriorates. Experts also advise using professional silicone sealant that can withstand high temperatures.
Another problem with cuff repair is the potential difficulty of accessing the injury.Very often the cuff tears in the central groove right along the seam, how can you get to the damage in order to more efficiently sew it up and seal it - the big question! You will have to remove the cuff, sew it up, and then put it back in place. Since you still have to remove the rubber band, maybe it’s better to replace it at the same time?
How to change the cuff yourself?
 How to change a cuffwhat if this all-important rubber band of the washing machine breaks? First you need to find a new, suitable spare part. If we keep in mind some Asian and European models of cars, then it is almost impossible to find original rubber bands on them; you need to look for analogues. In such a situation, it is not a sin to use the help of specialists; the older the cars, the more difficult it is to find a cuff on them.
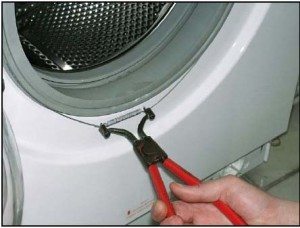
The elastic band has been found, now it’s time to start dismantling the old cuff. First, let's find out whether it is possible to remove the cuff on your model of washing machine without removing the front wall. Carefully take the edge of the elastic from the top and pull it down a little. If you see a thin steel clamp that resembles a cable, it means that the cuff can be pulled out without removing the wall. We do the following:
- use a flat screwdriver to pry up the steel clamp;
- we move along the clamp until we come across a fastening element;
- loosen the clamp and remove it;
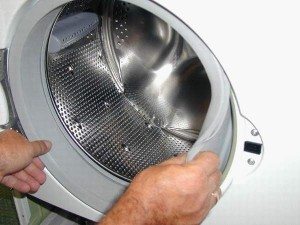
- grab the cuff with both hands and pull it towards you;
- take a new cuff, push it into the groove and put it in place;
- we intercept it with a clamp and tighten it;
- we adjust the rubber band and try to close the hatch; if the hatch closes well, then everything is done correctly.
Note! Do not adjust the clamp or the cuff itself using a screwdriver or sharp objects. The rubber band is easily pierced.
To summarize, we note that repairing a cuff (suturing it up and gluing it) can only be done as a last resort, and even then not for a long time. A replacement should be made as soon as possible. If there is a lot of damage to the cuff, then there is no alternative - it needs to be replaced.
Interesting:


6 reader comments
Add a comment
Categories
Washing machine repair


For buyers


For users


Dishwasher


My cuff tore. We sewed it up and sealed it with silicone sealant. Hole for water drainage. They placed it at the top and cut two holes at the bottom of the cuff. In general, the sealed part ended up at the top. And that's it... just like that.
A piece of elastic on my Samsung washing machine came off from the bottom, exactly in the center. Your comment, Alexander, inspired me. I removed the rubber band, although I had to remove the front part of the machine to do this. I turned the cuff over with the hole facing up, and drilled a couple of holes from the bottom with a screwdriver. So far everything is fine, nothing is leaking...
Hello, the cuff has been turned over, where should I drill the holes and why? The machine started to smell, maybe because there are no holes?
Thank you very much, really cool life hack!!!
How to glue?
Hello. The cuff on the washing machine tore, somehow the laundry got wrapped around the clamp and the clamp tore the cuff. Machine brand Indesit.New, only a month has passed since purchase. Tell me, is it better to change it?