Replacing the plug on the washing machine
 If there is a need to change the plug on the wire of the washing machine, then it is not necessary to rush to the after-sales service. Almost anyone can cope with dismantling and subsequent installation, most importantly, strictly follow the given instructions. The order of actions taken is different for euro plugs and standard plugs, so we suggest that you familiarize yourself with each algorithm up to the control check of the power cord.
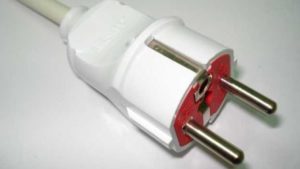
Repair of a euro plug on a typewriter
Before opening and replacing the plug, make sure that it is damaged. To do this, pull out the plug from the outlet and carefully inspect the housing and wires. If there are traces of soot, melting or there is a burning smell, then repair is indispensable. We prepare a knife, screwdrivers, pliers and get down to business:
It is recommended to first identify the reason why the plug burned out so that the situation does not happen again.
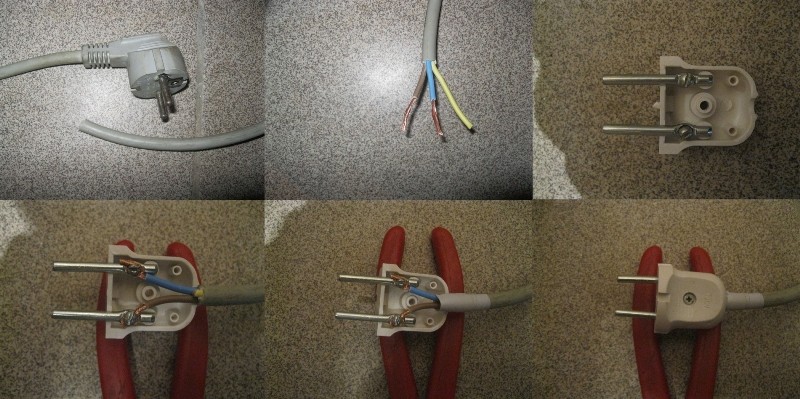
- We cut the old euro plug.
- Remove from the cord the upper insulation layer by about 4-5 cm.
- We clean each wire by 1.5-2 cm.
- We twist the wires and cut them, leaving at least 1 cm of the bare wire.
- Using pliers, bend the ends of the wire.
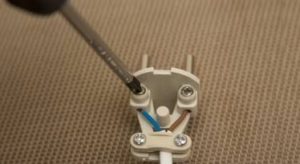
- Inspect the wires. A standard power cord consists of 3 pins: blue or blue is zero, yellow-green is the ground, and black, pink or brown is the phase.
- We connect the wires to the new case, connecting the ground to the central contact, and the phase and zero to the other two (their location does not play a special role).
Next, we clamp the cord with a plastic jumper, which will securely fix it at a given seat. After we check all the clamps again and assemble the plug housing. The final stage will be the twisting of the main screw.
Fix an ordinary old fork
Almost all modern washing machines have euro plugs. But if desired, the European can be replaced with the usual old Soviet-style plug. The same option is to be expected if a ground line is not provided in the living room. The basic procedure will be similar to the previous one, but there are several nuances. The instruction is as follows:
- cut off the damaged plug and disassemble its body;
- remove the top layer of insulation by 5 cm;
- we clean the ends of the conductors at least 1.5-2 cm, excess cuts with a knife;
- bend each core into a ring;
- connect the phase and zero to the contacts, not paying attention to their polarity. If there is grounding in the cord, then it must be cut off - in Soviet outlets there is no landing for the "ground".
Carefully select a new plug, as it must withstand the rated and maximum voltage of the mains and the washing machine.
It remains only to check the reliability of fixation, tighten the housing and tighten the central screw. After connecting to the network, it is recommended to watch for several minutes. If the plug melts, the smell of burning is felt or smoke is coming out, it is necessary to disconnect the electrical wiring and find out the cause of the malfunction.
If the power cord is broken
Most often, a blown or fused plug is only the result of a short circuit, and the source of the problem lies in a completely different one. For example, in a broken power cord. The power cable suffers after being crushed by a heavy object or external damage caused by a hook on a sharp nail or corner. Therefore, we are not in a hurry to disassemble the adapter, but carefully examine the surface of the wire for cracks, bends or burn marks.
Sometimes a cursory external inspection is not enough to detect internal damage, since the insulation layer hides the gap of one of the conductors into two parts.
The easiest way to check the integrity of the cord is to use a multimeter. You just need to find the tester, put it in the "Buzzer" mode and ring the cable. If the instrument detects a current leak, a high-pitched squeak will sound.
If it is necessary to test a chain longer than two meters, then an additional wire should be prepared and included in the general circuit. When there is no spare conductor, there is another option - twist the phase and zero at one end of the wiring. Next, connect the probes of the multimeter to the nearest contacts. This option compared with the first has several advantages:
- it is possible at one time to check for leakage of two conductors connected in series in a single circuit;
- no need to look for a proportionate conductor and build up the circuit.
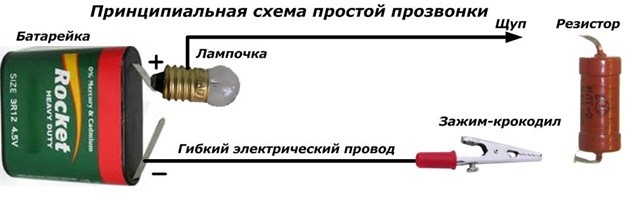
If there is no multimeter at hand, then you can verify the integrity of the conductor using a special home-made universal device. For its manufacture, Ilyich’s 3.5 Volt light bulb, a supply battery (preferably square with a power of 4.5 Volts), two connecting cores and an exciting connector will be needed. We connect all the elements in the following sequence:
- we connect a light bulb to the "plus" of the battery;
- to the “minus" of the battery we connect a flexible conductor with a crocodile clip.
When working with high voltage, remember safety precautions, especially if there is a risk of current leakage.
It is better to first test the resulting device on an already familiar and working part of the network. It is enough to hook the clamp in any place, and if the circuit is assembled correctly and the current flows into the wire, the lamp will light up. In the absence of a glow, we make a logical conclusion that there is a leak or a break in the core.
If there is doubt about the integrity of the cord with the plug or there are obvious signs of melting and burning, urgent measures must be taken. Knowing what to do first and how to make repairs, you can protect your life, health and property.
Interesting:


Reader Comments
- Share your opinion - leave a comment
Headings
Washing machine repair


For buyers


For users


Dishwasher


Add a comment