How to change the bearing in the LG washing machine
 If your “home assistant” starts to make a lot of noise when washing and spinning at high speeds, there is a chance that there is a problem with the bearings. Replacing the bearing on an LG automatic washing machine is at least not very difficult, but rather troublesome. Skillful male hands can very well cope with this work, provided that all actions will be carried out in accordance with the step-by-step instructions proposed in this article.
Getting ready to repair the LG washing machine
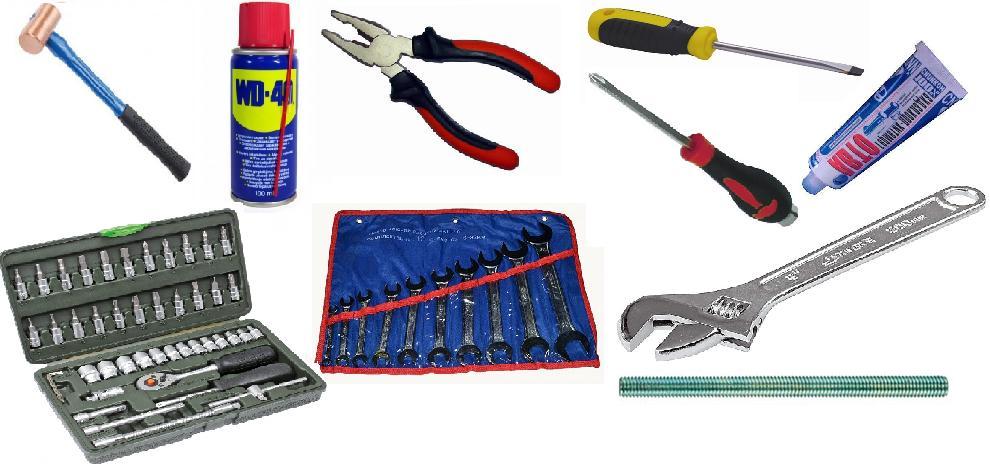
Replacing the drum bearings of an LG automatic washing machine is a job that requires extensive training. The better you prepare, the faster and better you will do the job. Start simple, assemble all the necessary tools, namely:
- a hammer with a bronze shock;
- lubricating fluid WD-40;
- pliers;
- Phillips and flat head screwdrivers;
- adjustable spanner medium;
- set of heads and spanners;
- automotive sealant;
- metal stud about 40 cm long.
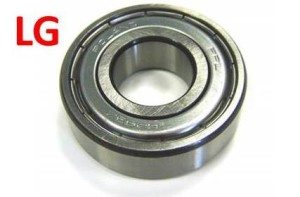
Having prepared the tool, you must decide on the purchase of components, primarily bearings and oil seals for the drum of an LG automatic washing machine. It is not very difficult to determine the place of purchase, it can be a specialized outlet for the sale of spare parts for household appliances or an online store. The main thing is to know what to buy.
Unfortunately, on different models of LG washing machines, they install different components and if you don’t know which ones are in your model, you can easily get confused. Before buying new oil seals and bearings, check the table of accessories for the LG washing machine.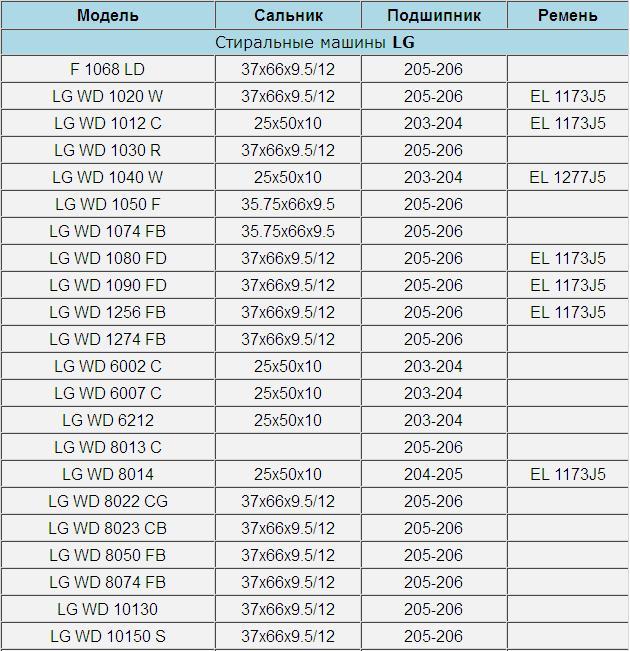
So, components purchased, you can begin to prepare the place. It is very good if you deliver the washing machine for repair to the workshop or garage, where there is a place and special devices that will facilitate the work. But if you decide to repair the machine at home - it does not matter, free up more space in the room so that you can put the machine and spare parts from it and get to work.
How to get to the washing machine tank
The first stage of working with the LG washing machine will be devoted to gaining access and removing the drum. Getting to the drum is not as easy as it might seem at first glance and the first obstacle on our way - the walls and panels of the washing machine. First, remove the top cover, as well as the lower and upper panel.
To remove the top cover, unscrew the two fasteners holding it, which are located in the upper part of the rear wall of the household appliance item. Having removed the self-tapping screws, we pull the lid onto ourselves and slightly raise it - it can easily be removed. Now we remove the top panel, for this we go around the LG washing machine in front, pulls out a powder cuvette, and we find a self-tapping screw in its niche on the side. A few more screws are located above and to the right of the dashboard, you need to remove them all, after which the top panel will be removed.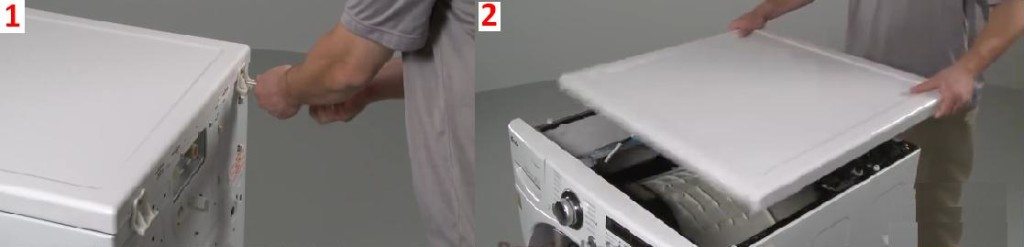
To completely disconnect the top panel with your own hands, you need to carefully unhook all the wires connecting the control panel and the electrical units of the washing machine. Although in our opinion this is not necessary, let it hang, the main thing is to work carefully so as not to hook and tear the wires.
The bottom panel is mounted on special plastic latches, so to remove it, bend alternately all latches with a flat screwdriver. Now you need to remove the front panel of the washing machine. We note right away, just unscrew it and remove it, as the dashboard does not work - the rubber cuff located at the hatch interferes, so you need to remove this cuff. The procedure is as follows:
- We pry a thin wire clamp around the cuff and remove it.
- We use our fingers to catch the rubber cuff and pull it out of the groove (but do not reach it).
- We turn off the sensor responsible for blocking the hatch.
- Unscrew the two screws and remove the sensor.
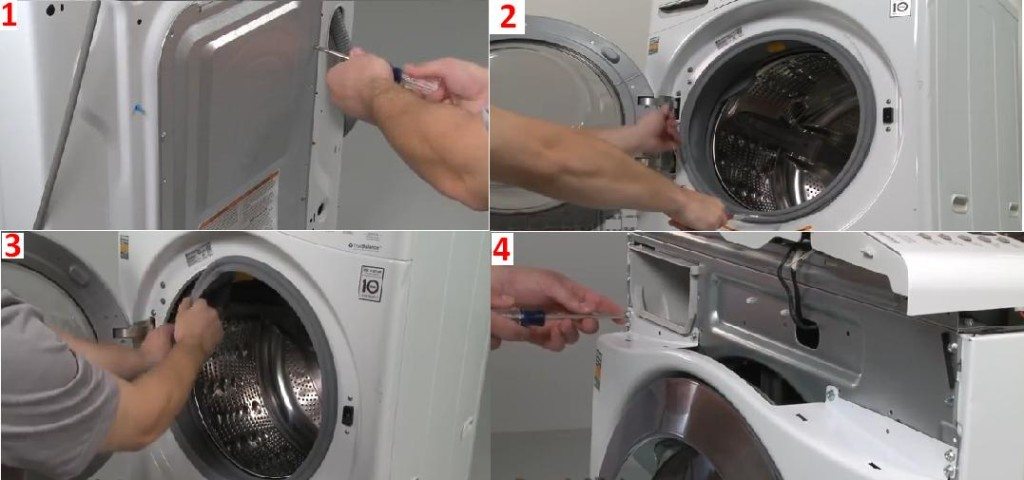
Now the cuff of the front wall of the washing machine does not hold, you can proceed to unscrew the fastenings of the front wall. They are located behind the drain valve, behind the cuvette, in the upper left, upper right and lower right and behind the dashboard. After the screws are removed, the front panel will be removed.
 Now our task is to free the tank from fasteners and wires that prevent it from being disconnected. What needs to be unhooked?
- Fasteners for the filler valve.
- Drain pipe.
- Wires from the heating element.
- Engine wiring.
- Wiring from the priming pump.
- Counterweights (bottom and top).
- Branch pipe from the water level sensor.
- Shock absorber fasteners.
Important! As soon as you unscrew and unhook everything according to the list, the tank will be removed. It is best to pull it out together, one will unhook the springs, and the other will lift the tank and pull it out of the machine body.
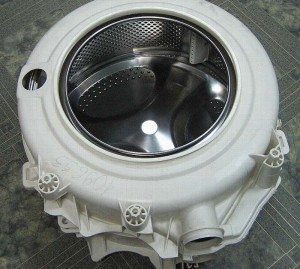
Features of disassembling the tank and replacing bearings
We begin to disassemble the tank of the LG washing machine. First of all, disconnect the fasteners (screws or latches) that hold the two halves of the structure together. Dividing the tank into two parts, we expose the drum pulley and its fastener, which we need to unscrew.
Note! If any bolts do not loosen well, grease them with any grease on hand (preferably WD-40), wait 10-15 minutes and try again.
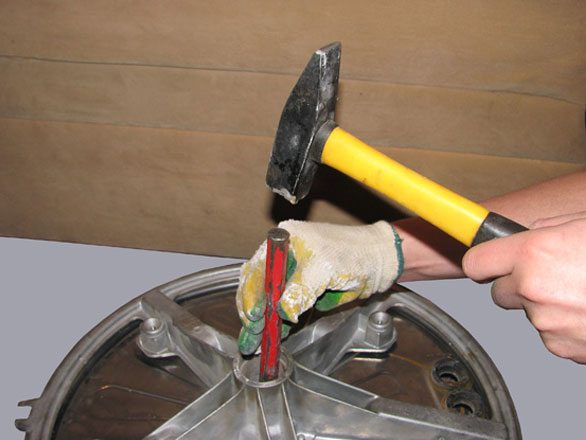
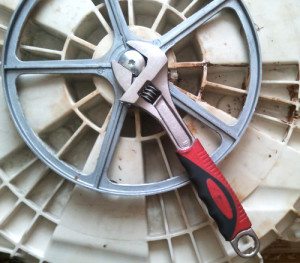 Unscrewing the fastener holding the drum pulley, we carefully pull out the pulley, and screw the bolt into place. This little trick will subsequently help to knock out the drum without consequences for the shaft. Next, we rest the metal stud in the screw we screwed in and begin to hit it with a hammer - our task is to gradually knock the shaft out. In no case can you hammer on a hairpin with considerable effort, this can ultimately turn into an expensive repair!
Having knocked out the shaft with the sleeve, we must carefully inspect them for damage. To better understand how worn the shaft is, it is necessary to fasten a bearing on it and twist it. If there is some play between the bearing and the shaft, the shaft must be replaced. Read more about disassembling the washing machine tank in the article How to disassemble the washing machine tank?
We proceed to the replacement of seals and bearings. We take the back of the drum and pull out the stuffing box in the middle of the hole. To make it simple, you need to take a flat screwdriver and just pick it out of the hole. It’s more complicated with old bearings - they will have to be knocked out carefully. We take our hairpin, we abut it to one side of the bearing, then to the other and with uniform blows of the hammer we knock it out of the hole.
Having removed the bearings from the drum, we clean the hole from chips and oil. A new bearing should only be “planted" in a very clean place. Carefully drive new bearings into the hole to the end. Next, we lubricate the seals and put them in place - the replacement is completed. We perform all the above steps in reverse order to assemble the LG automatic washing machine.
Important! Gathering two halves of the tank, experts recommend smearing the seam with car sealant, for better fastening of parts and tightness of the structure.
What cannot be done when replacing bearings?
Each stage of the replacement of the bearings of the LG washing machine, including the assembly and disassembly of the machine itself, may be accompanied by oversights, which in turn can lead to repair problems. Specialists identified a number of typical mistakes made by beginners who first took up the repair of a washing machine. And so what they do:
- Tear off the wires of the hatch lock sensor when removing the front wall of the washing machine.
- They tear the cuff of the hatch of the washing machine, trying to pull it out, while first forgetting to remove the clamp.
- Damage the pulley if it fails to remove it from the axle.
- Tear off the "stuck" bolts, acting on them too much and not trying to pre-lubricate or heat them.
- Break the wires of the temperature sensor, heating element.
- Tear off the filler pipe with the hose.
- Pressing bearings out of the drum, cause damage to it. Bearing replacement ends with a drum replacement.
Be sure to pay attention to the above errors and never repeat them. And if you are not sure that you can do the repair yourself, contact a specialist, he will do everything quickly and efficiently.
To summarize, we note that changing bearings and seals on an automatic LG washing machine is quite possible without the help of a specialist. But at the same time, keep in mind that, having no experience in such a business, you run the risk of running into an even more expensive repair. As the saying goes one wrong step and ...!
Interesting:
 How to change the bearing on a Samsung washing machine
 The washing machine drum hangs and staggers
 How to disassemble a Zanussi washing machine
 How to change the bearing in an Indesit washing machine
 Replacing the bearing in a Zanussi washing machine
 Replacing the bearing in the Electrolux washing machine
Reader Comments
- Share your opinion - leave a comment
Headings
Washing machine repair


For buyers


For users


Dishwasher


Add a comment