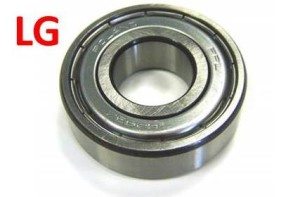
How to change the bearing in an LG washing machine
If your “home assistant” begins to make a lot of noise when washing and spinning at high speeds, there is a possibility that there is a problem with the bearings. Replacing a bearing on an LG automatic washing machine is not very difficult, but quite troublesome. Skillful men's hands can easily cope with this work, provided that all actions are carried out in accordance with the step-by-step instructions proposed in this article.
Getting ready to repair an LG washing machine
Replacing the drum bearings of an LG automatic washing machine is a job that requires extensive preparation. The better you prepare, the faster and better you will do the job. Start simple, collect all the necessary tools, namely:
hammer with bronze striker;
lubricating fluid WD-40;
pliers;
Phillips and flat screwdriver;
medium-sized adjustable wrench;
set of heads and open-end wrenches;
automotive sealant;
metal pin about 40 cm long.
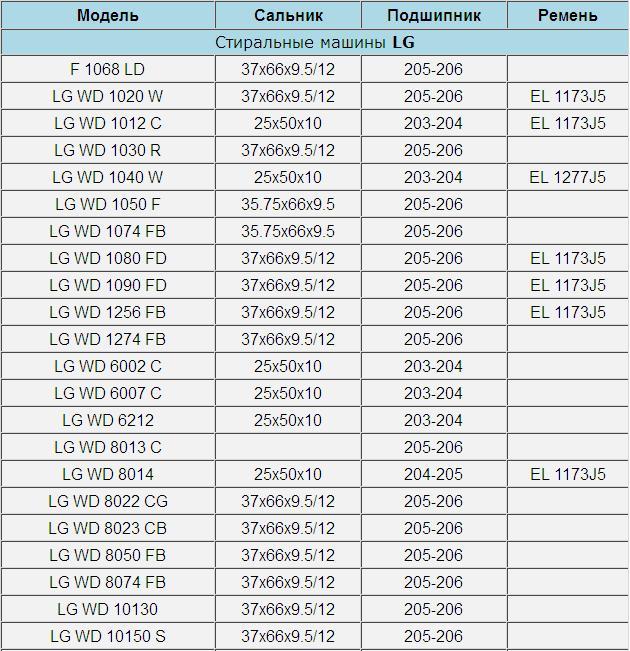
Having prepared the tool, you must decide on the issue of purchasing components, primarily bearings and seals for the drum of an LG automatic washing machine. Deciding on the place of purchase is not very difficult; it can be a specialized retail outlet selling spare parts for household appliances or an online store. The main thing is to know what to buy.
Unfortunately, Different models of LG washing machines are equipped with different components, and if you don’t know which ones are in your model, you can easily get confused. Before purchasing new seals and bearings, check the LG washing machine components table.
So, the components have been purchased, you can start preparing the site. It is very good if you take the washing machine for repair to a workshop or garage, where there is space and special devices that will make the work easier. But if you decide to repair the machine at home, it doesn’t matter, free up more space in the room so that you can place the machine and its spare parts and get to work.
How to get to the washing machine tank
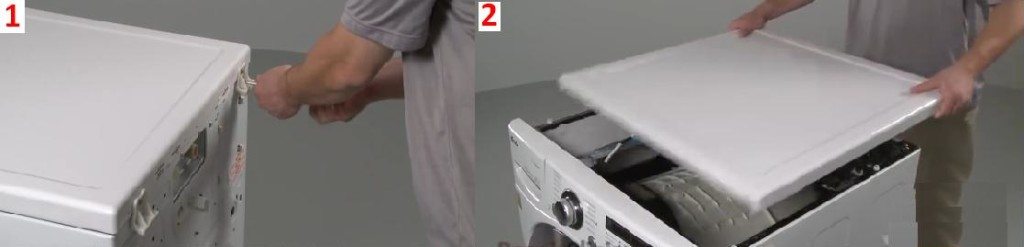
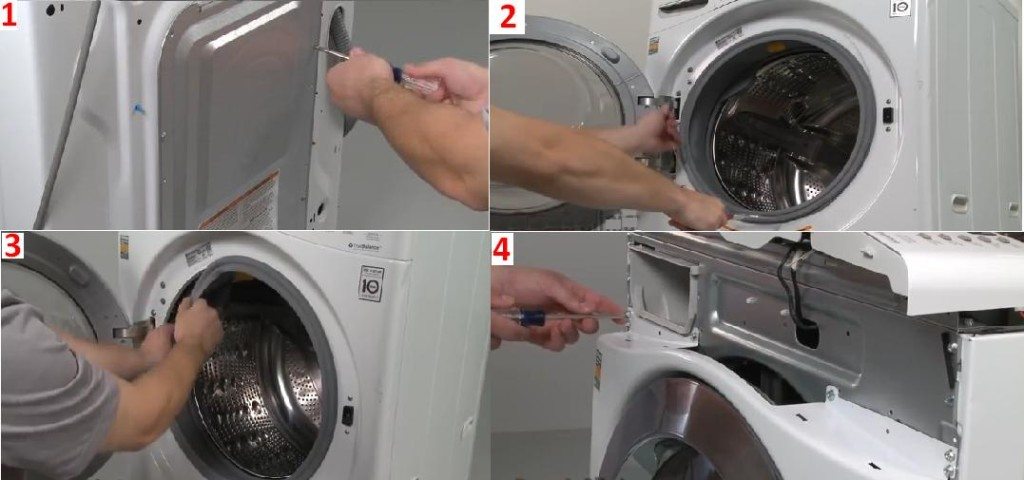
The first stage of working with an LG washing machine will be devoted to gaining access and removing the drum. Getting to the drum is not as easy as it might seem at first glance, and the first obstacle in our way is the walls and panels of the washing machine. First, remove the top cover, as well as the bottom and top panels.
To remove the top cover, unscrew the two fasteners holding it, which are located in the upper part of the back wall of the household appliance. Having removed the screws, pull the cover towards you and lift it a little - it can be easily removed. Now we remove the top panel; to do this, we go around the front of the LG washing machine, pull out the powder cuvette, and find a self-tapping screw in its niche on the side. There are several more screws located on the top and to the right of the dashboard, you need to remove them all, after which the top panel will be removed.
To completely disconnect the top panel with your own hands, you need to carefully unhook all the wires connecting the control panel and the electrical units of the washing machine. Although in our opinion this is not necessary, let it dangle, the main thing is to work carefully so as not to snag or tear off the wires.
The bottom panel is attached to special plastic latches, so to remove it, bend all the latches alternately with a flat screwdriver. Now you need to remove the front panel of the washing machine. Let us note right away that simply unscrewing it and removing it will not work like the dashboard - the rubber cuff located near the hatch is in the way, which means you need to remove this cuff. The procedure is as follows:
We pry up the thin wire clamp that encircles the cuff and remove it.
We grab the rubber cuff with our fingers and pull it out of the groove (but don’t take it out).
We turn off the sensor responsible for blocking the hatch.
Unscrew the two screws and remove the sensor.
Now the cuff does not hold the front wall of the washing machine, you can begin to unscrew the fastenings of the front wall. They are located behind the drain valve, behind the cuvette, in the upper left, upper right and lower right corners and behind the instrument panel. Once the screws are removed the front panel will be removed.
Now our task is to free the tank from fasteners and wires that prevent it from being disconnected. What needs to be unhooked?
Fill valve fasteners.
Drain pipe.
Wires from the heating element.
Engine wiring.
Wiring from the inlet pump.
Counterweights (bottom and top).
Pipe from the water level sensor.
Shock absorber fasteners.
Important! Once you unscrew and unhook everything according to the list, the tank will be removed. It is best to pull it out with two people: one will unhook the springs, and the other will lift the tank and pull it out of the machine body.
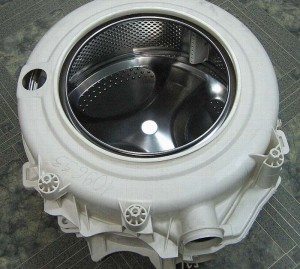
Features of disassembling the tank and replacing bearings
We begin to disassemble the tank of the LG washing machine. First of all, we disconnect the fastening elements (screws or latches) holding the two halves of the structure together.By dividing the tank into two parts, we expose the drum pulley and its fastening element, which we need to unscrew.
Note! If any bolts are difficult to unscrew, lubricate them with any lubricant you have on hand (preferably WD-40), wait 10-15 minutes and try again.
Having unscrewed the fastening element holding the drum pulley, we carefully pull out the pulley and screw the bolt into place. This little trick will subsequently help knock out the drum without consequences for the shaft. Next, we rest the metal pin against the bolt we have screwed in and begin to hit it with a hammer - our task is to gradually knock out the shaft. Under no circumstances should you hammer on the stud with significant force; this may ultimately result in costly repairs!
Having knocked out the shaft and bushing, we must carefully inspect them for damage. To better understand how worn the shaft is, you need to attach a bearing to it and spin it. If there is some play between the bearing and the shaft, the shaft must be replaced. You can read more about disassembling the washing machine tank in the article How to disassemble a washing machine tank?
Let's start replacing the seals and bearings. We take the back of the drum and pull out the oil seal from the hole in the middle. This is easy to do, you just need to take a flathead screwdriver and just pry it out of the hole. With old bearings it is more difficult - they will have to be carefully knocked out. We take our pin, rest it on one edge of the bearing, then on the other, and knock it out of the hole with uniform blows of a hammer.
After removing the bearings from the drum, clean the hole from chips and oil. The new bearing must be “planted” only in a very clean place. Carefully drive the new bearings into the hole completely.Next, lubricate the seals and put them in place - the replacement is complete. We do all the above steps in reverse order to assemble the LG automatic washing machine.
Important! When assembling the two halves of the tank, experts recommend coating the seam with automotive sealant for better fastening of the parts and tightness of the structure.
What should not be done when replacing bearings?
Each stage of work to replace the bearings of an LG washing machine, including assembling and disassembling the machine itself, may be accompanied by mistakes, which in turn can lead to problems with the repair. Experts have identified a number of typical mistakes that beginners make when they first start repairing a washing machine. And so what they do:
The wires of the door lock sensor are disconnected when removing the front wall of the washing machine.
They tear the cuff of the washing machine hatch, trying to pull it out, while first forgetting to remove the clamp.
They cause damage to the pulley if an attempt to remove it from the axle is unsuccessful.
They tear off “stuck” bolts by acting too hard on them and without trying to lubricate or heat them first.
The wires of the temperature sensor or heating element are broken.
Tear off the filler pipe along with the hose.
Pressing the bearings out of the drum causes damage to it. Replacing bearings ends with replacing the drum.
Be sure to pay attention to the above mistakes and never repeat them. And if you are not sure that you can carry out repairs yourself, contact a specialist, he will do everything quickly and efficiently.
To summarize, we note that it is quite possible to change bearings and seals on an LG automatic washing machine without the help of a specialist.But keep in mind that, without experience in this matter, you risk running into even more expensive repairs. As they say, one wrong step and...!
 If your “home assistant” begins to make a lot of noise when washing and spinning at high speeds, there is a possibility that there is a problem with the bearings. Replacing a bearing on an LG automatic washing machine is not very difficult, but quite troublesome. Skillful men's hands can easily cope with this work, provided that all actions are carried out in accordance with the step-by-step instructions proposed in this article.
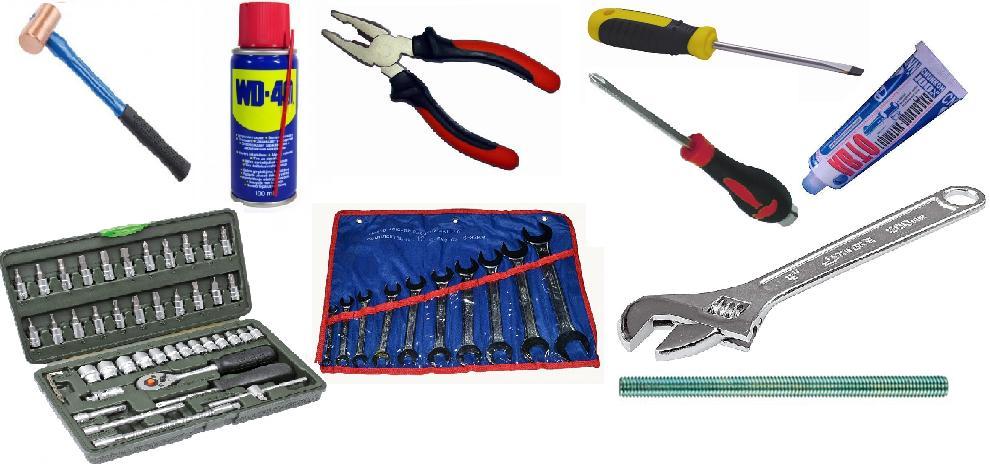
 Now our task is to free the tank from fasteners and wires that prevent it from being disconnected. What needs to be unhooked?
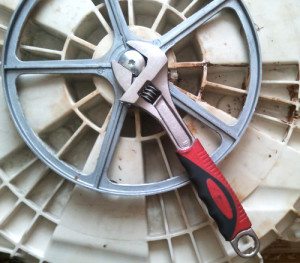 Having unscrewed the fastening element holding the drum pulley, we carefully pull out the pulley and screw the bolt into place. This little trick will subsequently help knock out the drum without consequences for the shaft. Next, we rest the metal pin against the bolt we have screwed in and begin to hit it with a hammer - our task is to gradually knock out the shaft. Under no circumstances should you hammer on the stud with significant force; this may ultimately result in costly repairs!
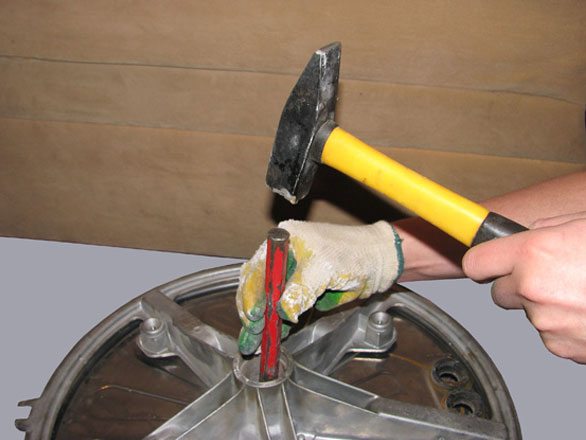


Add a comment