How to install and connect a Samsung washing machine
 When purchasing a new automatic washing machine, the buyer immediately asks the question: is it possible to install the device yourself or is it better to call a qualified specialist? In some cases, the SMA manufacturer prohibits installing the equipment with your own hands, and if this requirement is violated, the warranty card of the washing machine is simply canceled. Therefore, before you start connecting the Samsung washing machine, you need to clarify this important detail with the seller, and if there is no prohibition, feel free to proceed with the installation without inviting a technician.
Let's check the equipment
It doesn’t matter whether you purchase a unit at a hardware store or order an SMA to your home, be sure to check the machine before paying for the purchase or signing the receipt documents handed over by the courier. In the presence of a delivery employee or sales manager, open the original packaging, inspect the case very carefully, make sure that there are no scratches, chips, dents or other defects.
Often, equipment is damaged during delivery, when unscrupulous employees hit it while transporting or lifting it into the apartment. If you find a mark from an impact, peeling paint or something else on the machine, under no circumstances sign up for the unit, but ask for a replacement. If the SMA is safe and sound, you can calmly sign the goods acceptance certificate and release the courier.But remember that you must have the phone number of the store where you purchased the equipment, so that if a breakdown is detected, you can contact an employee and resolve any issues that may arise.
Before connecting the washing machine, plug in the power cord and see if the lights on the digital display and control panel come on, and if the program selector responds to your actions.
Getting ready to connect
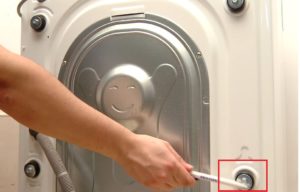 After the delivery employees have been released, you can proceed to the next stage - removing the special transport bolts. You can see them on the back wall of the washing machine. Their purpose is to secure the tank; the bolts do not allow it to dangle during transportation. Until the fasteners are removed, the drum of the automatic machine will not spin. Starting the washing mode with the transport bolts not removed can lead to failure of the SMA.
You can remove them using a regular wrench or pliers. After removing the bolts, plug the resulting holes with the plastic plugs provided for this; these parts are included with the machine.
Attention! Before starting work, carefully read the instructions supplied with the unit. This information will help prevent any incorrect actions that could damage the machine.
Where will we put it?
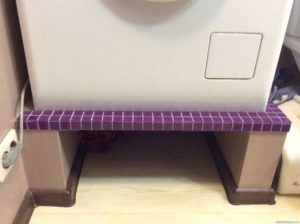 Before connecting the machine to utilities, you should allocate a place for it. In most cases, the location for installing the machine is selected in advance, and even the dimensions of the SMA are selected based on the dimensions of the free space. Therefore, you won’t have to think about it for very long; usually the equipment is installed either in the bathroom or in the kitchen area.
If you purchase a built-in washing machine, you should think about the facade in advance. The door set must match in size, be made in the same style with the surrounding interior and hang freely on the machine’s hinges provided for this purpose.
It is important to pay attention to the floor covering that will be located under the SMA. Ideally, it will be strong and durable concrete or tiles. If there is a plank floor under the bottom of the washing machine, it should be thoroughly reinforced. It is not advisable to place the automatic machine on laminate flooring; if a leak occurs, the coating may swell and will have to be replaced.
Important! When deciding on the installation location, make sure that the hoses are long enough to reach the connection points to utilities.
So, having prepared a level place, realizing that the machine will definitely “fit” into it, measuring the length of the hoses and making sure that they can easily reach the water and sewer pipes, you can begin connecting the washing machine.
Let's start with the electrical network
Under the washing machine, in accordance with safety regulations and SNIPs, it is necessary to install a separate socket of the appropriate voltage. The electrical point must have grounding and special protection against moisture. Modern washing machines usually have a high level of protection against electric shock to the user, but it doesn’t hurt to be on the safe side.
In most models, the length of the power cord does not exceed 1.5 meters, so the outlet should be provided as close to the washing machine as possible. Of course, you can also use an extension cord that has a waterproof bayonet, but this is not as safe as plugging the device directly into an electrical point.
Grounding at the outlet is necessary to prevent small shocks that may be felt due to the small voltage being applied to the body of the CMA. They do not pose a serious danger to humans, but at the same time they are very unpleasant. Therefore, we strongly recommend using sockets with grounding, this way you will protect yourself and protect yourself from unpleasant sensations.
Connecting to the water supply system
In most cases, the hose of automatic washing machines, designed for water intake, is connected to the cold water supply system. Some models provide a connection to hot water, but this possibility is extremely doubtful, and there are few advantages from it. Any washing machine has a heating element (heater), which serves to heat the water to the desired temperature. And the disadvantages of immediately drawing hot water are obvious:
- it is more polluted than cold. Therefore, using water from a hot water supply system is fraught with more frequent filter clogging;
- it is characterized by higher rigidity, and to maintain the quality of washing at the proper level, you will have to use more detergents.
 Therefore, if the manufacturer of your washing machine does not provide the ability to immediately draw hot water, then don’t even worry about it, it’s not very useful.
The easiest way is to connect the equipment to the water supply and sewerage using existing outlet points; this is possible when you simply replace the old washing machine with a new one. In this situation, there is already an insert into the pipe with a valve that allows you to shut off the water supply; you just need to screw a new hose to it. After connecting the inlet hose, all that remains is to open the tap and check the reliability of the resulting connection.
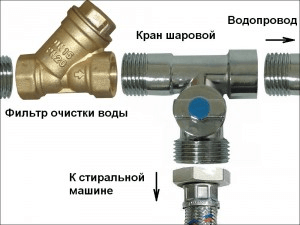
It’s a little more complicated when there are no previous branches to utility networks. Then you will have to make the necessary insert yourself, adapt a tee tap, and then connect the inlet hose. When independently connecting the SMA to the water supply system, it is worth remembering that:
- you need to use the supplied hose;
- the water pressure in the pipe should be from 0.5 to 8 atmospheres;
- it is necessary to provide a separate valve that will turn on and off the water supply to the drum.
One important tip: the tap that allows water to be supplied to the SMA should be kept closed and opened only before starting the wash. This will help avoid housing leaks.
We organize waste water discharge
 Some users do not want to bother with connecting the drain hose to the sewer pipe; they simply lower it into the bathtub or sink, and the waste water pours out there. Of course, this is the simplest way, but completely unaesthetic. It leads to rapid contamination of the surface of the bathtub, sink, and clogging of the water drain; they will have to be cleaned and disinfected much more often.
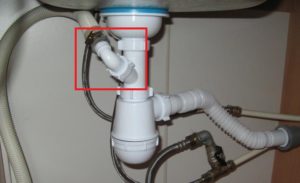
Of course, it is much better to connect the hose to the siphon fitting. Most modern siphons have an additional outlet - a fitting. When not in use, it is closed with a special plug. You just need to remove this plug, insert the end of the drain hose and secure the connection thoroughly with a clamp.
Important! When making the connection, make sure that the water drainage hose has a bend, this will prevent unpleasant odors from the sewer pipe from getting into the washing machine.
Having correctly carried out all the above steps, all that remains is to finally install and adjust the washing machine, and try to start the process. It is better to monitor the very first wash of a new machine throughout its entire duration. If you observe any failure, leakage or other malfunction, you can immediately prevent it. In fact, the process of connecting an SMA is not that complicated, and after carefully studying the basic rules and instructions, you can do it yourself without any problems.
Interesting:


Reader comments
- Share your opinion - leave a comment
Categories
Washing machine repair


For buyers


For users


Dishwasher


Add a comment