How to connect and install an Indesit washing machine
 Buying a new washing machine is half the battle, since the “home assistant” must be properly “arranged”, connected to the electrical network, water supply and sewerage. You can call a service worker for help or handle it on your own. It is not difficult to do this without outside intervention, having a standard set of wrenches, a clear head and neat hands. We will discuss in detail below how to independently connect an Indesit washing machine and install it.
Where should I put the machine?
Logically, the answer to the question about the future location of the new washing machine should have been given before purchasing it. This decision will dictate the need for a removable cover or certain dimensions of the unit. But even without prior thought, it’s not difficult to “set up” a washing machine - the modern equipment of the machines allows you to easily experiment and change the initially chosen location to another. However, there are not many accommodation options.
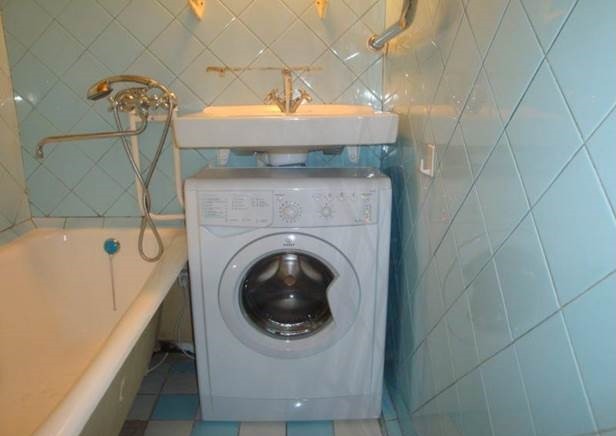
- Bathroom. The most popular and optimal option due to accessible “outputs” to communications and convenient use. The small area of the room does not interfere with installing the machine next to the bathroom: compromises are found with embedding the machine under the sink or purchasing compact “vertical” equipment. But there is a big “minus” - high humidity, which violates the standards for safe and long-term operation.
- Kitchen. Many people choose built-in models to install them in a kitchen unit or place the new unit next to the refrigerator.This is a good choice with fully functioning ventilation, normal humidity and the presence of free space.
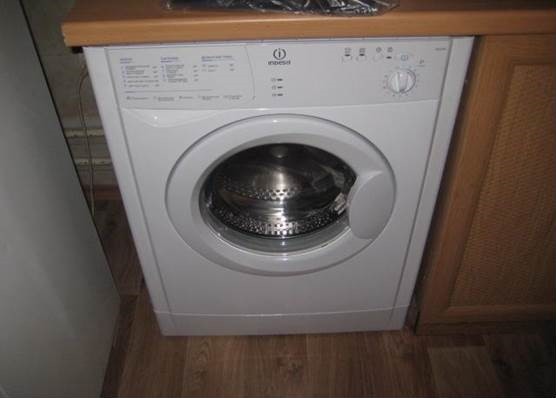
- Hallway and storage rooms. If there are empty niches in the corridors, then they can also be used to place a washing machine. Even better is to “hide” the assistant behind the door or in the closet.
There are also less popular options. Residents of hostels and hotels, for lack of other places, have to install a washing machine in the sleeping or dining area.
It all depends on the capabilities and features of the apartment layout.
The main thing is that the following conditions are met:
- water supply and sewerage are nearby or easily accessible;
- the nearest moisture-resistant outlet at a distance of no more than 1-1.5 meters (this is the average length of the cord);
- the floor does not sag or tilt (concrete or tile is best);
- the door opens freely, and there are no problems with access to the control panel and powder receptacle;
If there are no obstacles to using the washing machine, feel free to plan to add a new “tenant” to the interior. If necessary, supply sewerage to the selected area. After the final decision, we proceed to the next stage - preparation for connection and installation.
Mandatory preparation of the machine
Instructions on how to properly install it yourself begin with clear manipulations: studying the instructions, unpacking, removing the foam frame, film, tape and other devices protecting the body of the machine during transportation. Next in line is unscrewing the transport bolts and filling the resulting “voids” with special plastic plugs. The latter are definitely included in the kit.
And finally, we move the unit to the intended installation location.You should not immediately place it in the set, under the sink or close to the wall - first you need to connect and remove all communications. Residents who love cleanliness can wash the floors in the selected area, since regular cleaning will be difficult in the future. It is recommended to take care of a suitcase with tools in advance.
We organize a drain
To fully connect our machine to the water supply and sewerage system, you need to do two things: organize the drainage, and then the water supply. First, let's set up the drain. There are several variations here: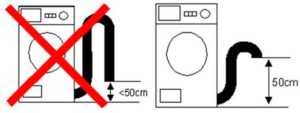
- connect to the drain pipe through the siphon; to do this, we put the hose on the siphon and securely fix it with a metal clamp;
- connect the drain and pipe directly, insert a special rubber cuff into the sewer and plug the washing machine hose into it;
- using a container is the simplest, but not convenient and not aesthetic way, when the hose is hung on a bathtub, toilet, sink or deep basin. Suitable as a temporary or emergency measure.
Note! If the length of the drain hose is not enough to connect to the sewer, it is not recommended to extend it with nozzles - it is necessary to lengthen the supply pipe.
In any case, first study the instructions supplied with the machine. The technical documentation of some models specifies the permissible height of the hose for connection. Most often, the minimum mark is 50 cm from the floor, but it is better to check the figure in the data sheet.
We organize water supply for the machine
The next step is to establish a “connection” with the water supply. A special inlet hose is provided for these purposes. It is important to check its availability in the factory kit immediately, since sometimes it is purchased separately.
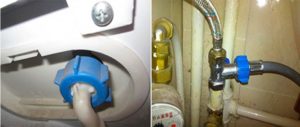
- Find the curved end of the hose and screw it to the washing machine.
- We inspect the water pipe and look for the wiring to the machine (a special branch with a tap or a separate pipe).
- If we don’t have one, we do it ourselves: unscrew the flexible hose and screw in the tee.
- If you need to connect hot water, repeat the steps with the second supply.
No additional keys are needed to tighten the clamps. For plumbing joints, plastic nuts are used, which are tightened only by hand.
If an automatic washing machine is installed in a private house without running water, we choose other options. The first is to connect the inlet hose to a water tank suspended at a height of 1-3 meters. The second is to buy and set up your own pumping station.
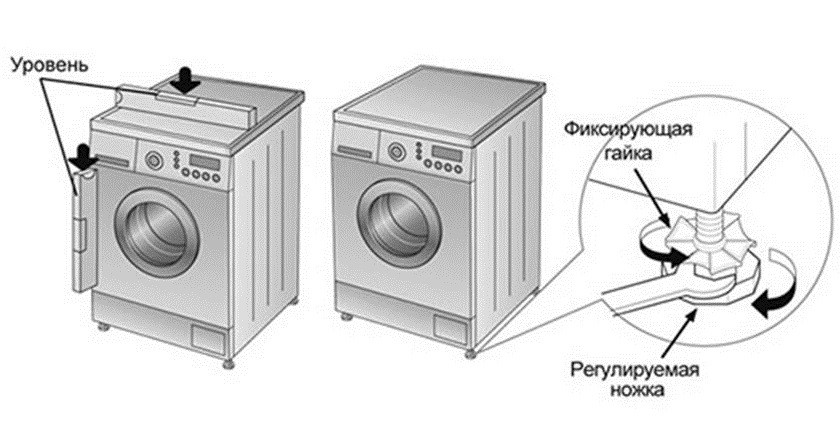
The body must be level
It is important not only to install the Indesit machine, but also to align it with the floor. This is the only way the machine will be stable, which will eliminate strong vibration, knocking and “jumping” around the room. If you ignore this step, even automatic imbalance control will not save you, and the unit will break down faster and require repair.
Leveling occurs with the help of adjustable legs, making straight lines possible even on curved floors. The fitting process looks like this:
- put the building level on top of the washing machine and, using it as a guide, unscrew or screw in the legs;
- we lower our hands to the corners and slowly pump the equipment (if there is no vibration or strong rocking, everything was done correctly, otherwise, we go back and repeat the adjustment);
- tighten the fixing nuts on the legs using a suitable wrench.
The best test is to start the mode at maximum spin. Even at high speeds, the unit should not move independently in space.Special vibration-smoothing attachments, which are sold in service stores and supermarkets, will also come in handy.
Requirements for electrical communications
Before you plug the plug into the outlet and start the first cycle, it is advisable to check that the electrical communications comply with safety standards. It is better to correct all existing errors and risky moments so as not to cause a short circuit or failure in the electronics. The recommendations are as follows.
- Select a separate outlet with a reinforced cable with a large cross-section and an individual output to the machine.
- Do not use extension cords.
- Organize grounding with the appropriate wire in the electrical network or connect an RCD with a cut-off current of at least 10 mA (for the bathroom) and 30 mA for other rooms.
- For bathrooms, use special moisture-resistant sockets with a lid.
- Protect the washing machine system from voltage surges or short power outages and connect a stabilizer to the circuit.
- Make sure that the conductive cord is not kinked or pinched along its entire length.
This completes the installation and connection of the new washing machine from Indesit. All that remains is to run the “empty” mode for at least an hour, without throwing laundry into the drum. This will not only be a test for properly supplied water, timely drainage and uninterrupted supply of electricity. But also preliminary cleaning of the washing machine from factory grease and store smell.
Interesting:


1 reader comment
Add a comment
Categories
Washing machine repair


For buyers


For users


Dishwasher


I am very, very dissatisfied with the purchase of Indesit 51051, a very bad model.