How to unscrew and remove the filter in the washing machine
 A small thing forgotten in the pockets of linen does not disappear without a trace, but settles in a specially provided trash filter. Here, all foreign objects falling into the drum are collected, which must be periodically removed, and the element itself must be thoroughly washed.
Knowing how to unscrew the filter in the washing machine and clean it from accumulated dirt can prevent many problems with clogged drains. But the issue is not always solved by simple loosening, as often the trap tightly “sticks” to the snail and does not lend itself. Below we will understand what to do even in the most advanced case.
How is the problem manifested?
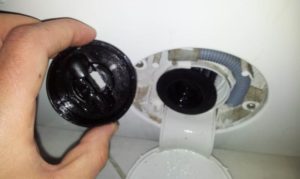
At first, cleaning the filter does not cause difficulties. It is enough to pry the drain hatch located at the bottom of the front side of the housing and unscrew the plastic part with a round top. The main thing is to be prepared for the fact that the water remaining after washing will pour out of the freed hole and have time to substitute a container or a rag under the stream.
Note! Manufacturers recommend cleaning the drain trap at least 1 time in 2-4 months.
But not all owners of washing machines comply with the rules of operation. Therefore, often after opening the hatch, users are faced with a “blocked” filter. These are the following situations: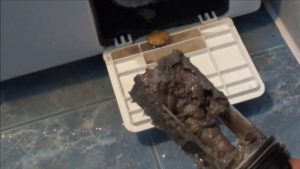
- the handle of the lid does not turn, and it seems that it is welded to the body;
- the handle scrolls, but not to the end, and stops at half or a quarter of a turn;
- the part was twisted out, but still could not be removed from the hole.
Most often, the filter is blocked by objects accumulated in it: pile, wool, hair, paper, children's socks and other small objects. Particularly dangerous are long hairs that are wound around the walls of the part and the impeller of the pump. Another reason is excessive scale on the thread of the trap, which has the effect of superglue. All this often occurs if more than 6 months have passed since the last cleaning.
What to do to remove the filter?
If you can’t unscrew the filter in the usual way, you should pay attention to other ways. But before the direct dismantling, it is worth preparing. First of all, disconnect the washer from the mains and block the water, and after that we cover the surrounding area with rags and prepare a container for collecting water. Then proceed sequentially according to the following instructions.
- Cooking pliers or pliers.
- We catch the handle of the filter plug.
- Carefully try to unscrew the filter.
Do not push with all your strength - you must act carefully and not break the spare part.
 If it does not twist, we change tactics: we tilt the machine case backwards by 45 degrees so that the body can lean on the wall. We squeeze a hand into a fist and knock on the filter several times. It is highly likely that blocking debris, bones from a bra, coins or hairpins will budge and make it easier to twist.
When the previous options do not work, we turn to the most complex and effective way: to clean the filter from the other side - through the hole for the pump. To do this, you have to get to the snail itself and remove the drainage pump. Knowledge of the device of the machine will be required, so if you are unsure of your strengths, it is better not to experiment and turn to service technicians. If the upcoming manipulations are not intimidating, follow the instructions below.
Snail and pump recovery methods
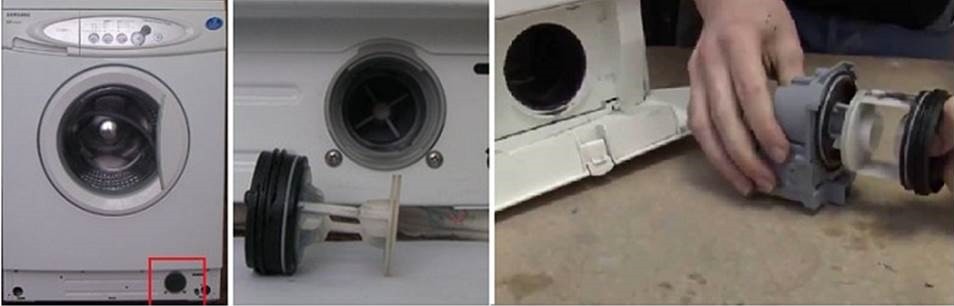
Before cleaning the filter through the snail, you must find the pump. Its location in various modern washing machines can vary greatly depending on the type of load and the manufacturer. And knowing where the pump is located, you can save time on its removal. It is best to refer to the factory instructions and on the page with the description of the internal device to find the center of the drain system. If there is no manual at hand, we will orient ourselves in the manner described below. So, owners of frontal machines will have to choose from three possible options.
- Through the bottom. For many washers, the bottom is missing or easy to remove. In such cases, the easiest way to get to the cochlea is to tilt the unit body back by 45-60 degrees and find the pump immediately after the filter.
Important! This method is not suitable for Bosch models due to the presence of a metal strip at the bottom that secures dampers, and for those machines below which there is an Aquastop sensor designed to protect against leaks.
- On the back. If the drain pump is located closer to the back wall, then it is better to disassemble the washer from this direction. For example, this is the case with machines from Ardo, Indesit, BEKO and Haier. To do this, just push the machine away from the wall, unscrew the four screws and remove the panel.
- Front Owners of frontal Bosch and Siemens often have to get to the pump through the front panel. This method is the most time-consuming and will take a lot of time. First, the top of the unit is dismantled, for which two rear holding bolts are twisted. After that, loosen and remove the external clamp on the cuff and thread the sealing gum into the drum. We also disconnect the dispenser, control panel and wiring UBL. Next, close the door tightly, release the four screws and remove the front wall. Finding a pump is not difficult - it will be right behind the filter.
For washing machines with a top load of laundry, the procedure for cleaning the garbage can be much easier. Here the pump is located at the location of the filter: to which of the sides - left or right - the trap is closer, that panel must be opened. We unscrew a couple of screws and push the removed wall to the side. Once the desired pump has been detected, you can get down to business:
We strongly recommend that you first take a picture of the pump and all the wiring to simplify the reassembly and connection process.
- disconnect the power wires from the part;
- we move a deep container under the pump or lay rags to avoid a flood;
Attention! It is forbidden to take out the filter immediately after the end of the next cycle, as hot water can seriously burn yourself!
- using pliers or pliers, remove the clamp from the drain pipe and disconnect the tube;
- we clean the glass through the vacated hole, removing objects that prevent the filter from being removed, at the same time we “check” the trap itself: if it has been unscrewed, we stop and collect the machine back, otherwise we continue disassembling;
- we disconnect the drain hose from the snail by loosening the corresponding clamp;
- we unscrew the screws holding the pump and carefully get it together with the snail;
- We inspect the pump and, having pressed the latches by turning the casing counterclockwise or by unscrewing three screws in diameter, we unfasten the glass.
It is enough to carefully clean the empty glass from dirt and debris. Particular attention is paid to threads, wool and hair. After the drain filter should unscrew easily and quickly. All that remains is to open the trap and remove all foreign objects, dirt and scale from it.
Alternative solutions to the problem
It is not always possible to pull out a sticky drain filter even after removing the pump. In such cases, the main reason lies in the thick layer of scale or in sodium deposits due to hard water. Removing them is much harder than removing debris and dirt.
But this is not a reason to buy a new washing machine. There are several alternative methods that will cost several times cheaper.
- Dissolve lime. It is best to get rid of limescale with citric acid. To do this, put 1-2 tablespoons of “lemon” in the drum and start a short cycle at a water temperature in the range of 40-60 degrees.If by that time the pump has already been disassembled, it means that we soak a glass with a filter in the same solution in the proportion of 1 tablespoon per six liter bowl. Do not forget that water should not be higher than 60 degrees, otherwise the rubber seal will suffer greatly. It does not hurt to weight parts so that the plastic case does not float to the surface within 1-2 hours. As soon as the time is up, we take it out, wash it under cold water and try to free the trap from the cochlea using any of the methods described above.
- Break the filter. If the trick with citric acid did not work, then you will have to act more strictly. We take pliers or wire cutters and carefully break off the fragile plastic of the trap body. Then we unscrew the remains and delete the entire part as a whole. The main thing is to be extremely careful and not damage the snail. Even a small crack will lead to leaks.
Attention! Without knowing the internal structure of the machine, you can easily damage the wiring, pump or other important parts of the washing machine, which will seriously aggravate the situation.
- Remove filter with snail. There is also a quick option - to break out a glass with a filter. The unsuccessful execution of the previous method will lead to the same end. This method is the most expensive, but it has an indisputable plus - replacing both elements of the drainage system ensures no leaks and a low chance of clogging.
If the problem was not solved in a “peaceful” way and a part had to be broken out, then it is necessary to replace unsuitable elements. There is a new filter and a pump snail in specialized stores according to the serial number of the existing washing machine. True, the more replacement parts are required, the more expensive the repair will cost.
Therefore, it is recommended to adequately assess their knowledge, capabilities and experience. And with the slightest doubt, misunderstanding of what to do, do not rush or experiment, but seek help from a service center.
Interesting:
 Cleaning the filter in an Ariston washing machine
 Cleaning the filter of a Candy washing machine
 DIY repair of the LG washing machine pump
 The bone from the bra got into the washing machine
 Do-it-yourself cleaning the drain pump in the washing machine
 Flowing water from the bottom of a Samsung washing machine
Reader Comments
- Share your opinion - leave a comment
Headings
Washing machine repair


For buyers


For users


Dishwasher


Add a comment