Error E08 on Kandy washing machine
 It is impossible to imagine modern life without household appliances. But often it breaks, which forces us to go beyond our comfort. And, unfortunately, Kandy washing machines were no exception. They are characterized by error E08, which occurs at the beginning of the wash. At this moment, the equipment stops working, the hatch is blocked, and the laundry ends up in a kind of imprisonment. How to behave in such a case, what does this error mean, and how to prevent expensive repairs? We decided to tackle these questions in today’s article.
Checking the tachometer and engine
Unfortunately, the attached instructions do not include a detailed description of error E08. It only contains information that it occurs when the motor tachogenerator breaks or when it shorts out. It can also occur when the engine fails, and less often when the control module breaks down. Based on the information provided, first of all you should check the functionality of the following parts:
- motor;
- tachometer;
- control module.
Verification requires compliance with a certain algorithm. At the first stage, the motor with the tachogenerator is removed, and then the following steps follow:
- disconnecting the machine from power;
- removing screws from the rear panel;
- dismantling the panel itself;
- removing the drive belt with simultaneous tension and rotation of the pulley.
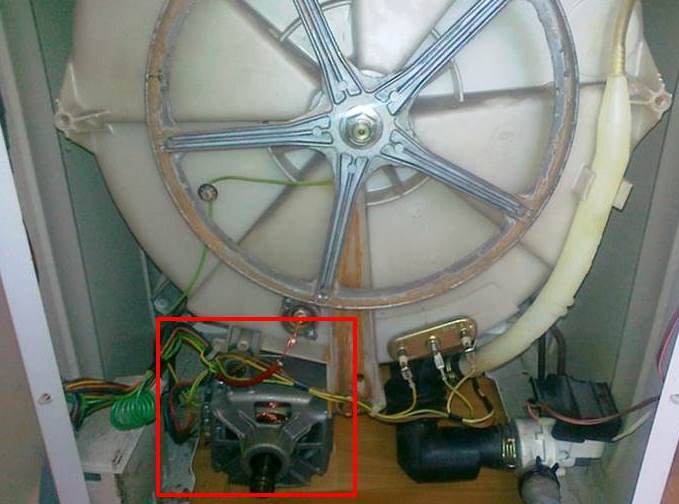
Then you should remove the engine. To do this, it is recommended to put marks on the wires coming from the motor in order to prevent difficulties during connection. Then we unscrew the bolts that hold the engine and remove the latter from the housing.Now we inspect the Hall sensor in the machine: strong vibrations could lead to loosening of the fastening or loosening of the contacts. In such a situation, you only need to tighten the mounting bolts and restore the connections.
If this is not the problem, you will need to check the resistance of the tachometer. There are two methods for this.
- Setting the tester to resistance determination mode. It is necessary to release the wire connectors and remove them from the sensor contacts. Then the probes are adjusted to the contacts to check the resistance. The normal range is considered to be from 60 to 70 ohms.
- Switching the tester to voltage detection mode to understand whether current is being generated or not. To check, probes are applied to the sensor contacts while the engine is cranked. If the values change (approximately 0.2 Volts), then the part is in working condition.
It is imperative to check the wiring for integrity, because Often it is this that leads to breakdown of the tachogenerator. And if the part is in a faulty condition, it will need to be repaired or completely replaced.
If the breakdown has not yet been identified, you should start checking the motor. At the starting stage, we check the brushes, and if it turns out that they are worn out, we replace them.
You can purchase this part in specialized stores, or use the “made to order” service. To do this, you can enter the required query into the search engine and find the organization you need.
So, using a multimeter, we check the wiring supplying the tachometer and the motor for breakdown. If no breaks are found, you will need to check the rotor and stator resistance.Then we check whether there is a current leakage to the housing, followed by testing the turn-to-turn short circuit in the winding. A breakdown means that the engine cannot be repaired due to the high cost of repairs, and the best option would be to install a new engine.
Control board check required
With your own hands, you can only conduct a superficial inspection of the module for damage and burnouts. Other methods of checking can only be carried out by a specialist who, if any breakdowns are detected, with error E08, will immediately repair them. For a visual inspection, you should disconnect the machine from the network and perform the following sequence of actions:
- removal of the dispenser tray;
- unscrewing the front panel mounting bolts;
- unlocking the plastic latches with a screwdriver and removing the panel from the body;
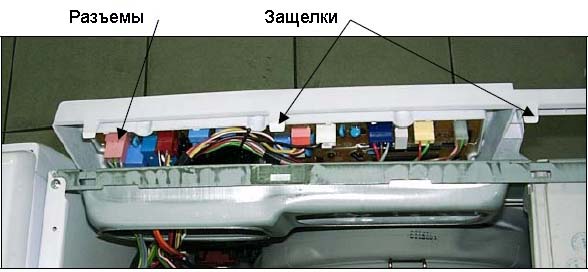
- behind the panel is the main unit. Take a photo of it to record the location of the wiring;
- Sometimes, in order to reach the board, the block latches must be released.
Afterwards you will need to conduct a thorough inspection of the board. If there are burnt spots on it, this means that you should call a specialist for repairs. Some details can be fixed with your own hands. We prepare a soldering iron and purchase a replacement part.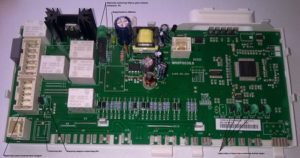
- Capacitor. It plays the role of a stabilizer, and to replace it you only need to solder the purchased part to the positive electrode. In order to understand where it is located, you will need to use a tester.
- Resistor. Checking the functionality of this part is also used by the tester. For 1st order parts, the optimal values are 8 Ohms and an overload of 2 A. But for the second order it is 3-5 A, and the resistance will depend on the frequency of the module.Deviation from the norm is a reason to replace the part using a soldering iron.
- Thyristor block. To check it, negative voltage is measured. The indicator cannot exceed 20 V. Sometimes the filter of the unit burns out, the repair of which consists of cleaning the cathode.
- Trigger. To check functionality, you will need to measure the voltage at the input. The optimal value is 12 V, and for the trigger resistance is 20 Ohms. To replace, you will need to use the same soldering iron.
If you manage to identify the burnt part, unsolder it and take it to a specialized store. The seller will select a similar spare part for you, and you can safely solder it in place of the old one. Just be careful not to damage the tracks leading to the part.
The integrity of the soldering may be compromised due to vibrations during operation of the equipment, which is why it issues fault code E08. Therefore, it is necessary to ensure the stability of the equipment during washing.
Specialists know what to do in the event of a breakdown and how to properly troubleshoot problems. When starting a DIY repair, think about whether you can do it yourself. If you don’t have the skills to work with a soldering iron, turn to the professionals!
Interesting:


3 reader comments
Add a comment
Categories
Washing machine repair


For buyers


For users


Dishwasher


Pumping out the excess through the filler neck is interesting to watch. In general, this is done through the hole for the probe. Through the neck only for the most perverted.
Hello, what if the Kandy machine has a touch screen? How can I replace the sensor?
It's strange why the description shows an LG electronic module?