DIY installation of a Siemens dishwasher
 Siemens dishwashers represent German quality, but in order for such machines to work well for many years, it is necessary to correctly select a place for them and connect them to communications. In this case, the instructions for a specific car model are the first assistant. Even specialists sometimes need to look there, not to mention people who decide to do the installation themselves. In this article we will talk about the features of installing Siemens brand dishwashers; these nuances are few, but they are of great importance.
Features of the selection of components
With the standard installation procedure for a Siemens dishwasher, you can easily use the set of components that come with the machine. But according to installation experts, in about half of the cases non-standard solutions are required, for which you have to purchase additional components. For example, if the inlet hose of a particular dishwasher model is not equipped with an aqua-stop valve, then it will have to be purchased separately.
Be careful! The “aqua-stop” valve for a Siemens dishwasher must be taken either original (from Siemens) or from Bosch dishwashers, but it is not suitable for some Siemens models.
Original components are always more reliable, they will definitely fit, but they are also a little more expensive than substitutes, so it’s up to you to decide what to choose. If you want to save a little money, choose your spare part more carefully. If the length of the standard inlet or drain hose is not enough for you, and you decide to purchase a longer one, then it is also better to take an extended hose from Siemens.
The problem is that this manufacturer, when developing specific models of dishwashers, did not unify many elements, which is why they have hoses with an unusual diameter and non-standard fasteners. This is perhaps the main drawback of dishwashers from Siemens; otherwise, they are reliable, practical and technologically advanced. To install a Siemens dishwasher to the water supply and sewerage system you will need:
- water inlet hose;
- water drain hose;
- shut-off valve (with two, three or four outlets);
- filters;
- gaskets;
- adapters.
This is a common kit that is used for typical water and sewer connections, but other parts may be required. By the way, this is what the instructions for some Siemens dishwashers say.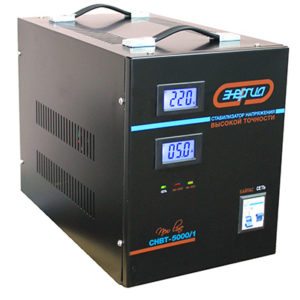
- Pressure reducing valve. If the pressure in your water supply system is higher than 1 MPa, then in order to avoid leaks, hose ruptures and other troubles, a pressure stabilizing valve is installed.
- Electric stabilizer. The dishwasher is connected to the electrical network through it if there is a regular voltage drop in such a network or, on the contrary, an increase - this is an option to protect the dishwasher and other equipment.
- Additional hose and faucet with filter for connecting to hot water. Some models of Siemens dishwashers have the ability to connect to hot water supply, but there may not be an additional hose; it will have to be purchased separately along with a faucet, filter, adapters and gaskets.
About the installation location and its dimensions
We have decided on the components for the Siemens dishwasher, now installing a dishwasher in the countertop and furniture. Even when installing an ordinary dishwasher in furniture, many difficulties can arise, and a separate conversation about the Siemens machine. Let's look at the recommendations of experts regarding the organization of space for a dishwasher and its size.
- If you are preparing a place for a fully built-in or partially built-in dishwasher
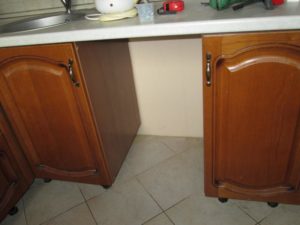 car, first carefully measure the model you have chosen. Do not trust the size information given in the specifications. Measure each protrusion, in addition, allow for a margin of distance from the walls of the niche to the machine body on the left 2 cm, on the right 2 cm, on top 1 cm.
 - Figure out in advance the installation of fasteners for the facade and a metal sheet to protect against steam (if any), after connecting the communications it will be inconvenient.
- Strengthen the floor under the Siemens dishwasher; almost all models of machines of this brand do not like unstable surfaces, unlike, for example, the same brand Bosch. It is also advisable to level the floor, although Siemens are well stabilized and tolerate surface curvature of up to 70 and more.
For your information! In general, before installing a dishwasher, washing machine, refrigerator or all appliances together, it is better to solve problems with the floor, level and strengthen it seriously and for a long time - this will extend the life of each appliance.
- You should not organize a place for a Siemens dishwasher further than 2 m from the connection to the water pipe and the sewer pipe. The point here is not only the length of the hose, but also the fill valve and pump. If the distance is large, the pump will work much less, and so will the valve.
Connect to water and sewer pipe
If the work on organizing the space was successful and you are convinced that the specific model of dishwasher fits into the niche you prepared, you can continue installation. The next stage of work is connecting the dishwasher to the water pipe and sewer pipe. There are two options for connecting a Siemens dishwasher to the sewer system, the first involves connecting the drain hose to the siphon, the second to the sewer pipe directly. The first option is used more often, so we will consider it.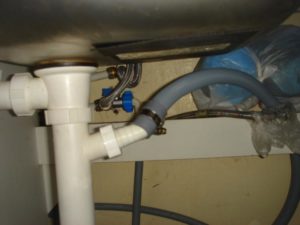
- First you need to install a special siphon with a side outlet under the sink. It is specifically designed to connect the drain of a washing machine or dishwasher.
- We seal the threads on the siphon outlet with FUM tape. The fumka should be wound not along the thread, but against it, it’s more reliable.
- We screw the drain hose to the siphon and move on to the next step.
Next, you need to connect the inlet hose to cold water. First you need to unscrew the sink faucet inlet hose from the pipe. Then you need to screw the tee valve onto the pipe, not forgetting to seal the connections. We screw the mixer inlet hose onto the tee on one side and the cleaning filter on the other. We screw the aqua-stop valve to the filter along with the dishwasher inlet hose. We screw the other end of the hose to the thread of the dishwasher fill valve and that’s it - the job is done.
Note! When installing a filter that purifies tap water, do not forget about it. In the future, clean it at least once every 6 months, and if there is a significant amount of sand and other dirt in the water, once every 2 months.
Final stage of work
Now all we have to do is connect the power cord to the outlet and put the dishwasher in place.Please note that you can only connect your dishwasher to a separate, moisture-resistant outlet. Do not connect the device through a tee, extension cord or adapter. It will be great if you bring out a copper wire with a cross-section of at least 2 mm for the socket, in good insulation, install a difavtomat and a voltage stabilizer.
Remember! Working with electrical communications requires skill and some knowledge; if you do not have this, do not experiment - it is life-threatening! Contact a specialist.
After connecting the power cord to the outlet, test run the Siemens dishwasher in strict accordance with the instructions, without loading dirty dishes into the appliance. After completing the test program, if the Siemens dishwasher does not generate errors, then you can begin to operate it.
To summarize, we note that installing a Siemens dishwasher yourself is not much more difficult than installing any other dishwasher. The main thing is to remember and take into account the nuances described in this text, and everything will work out as it should!
Interesting:


1 reader comment
Add a comment
Categories
Washing machine repair


For buyers


For users


Dishwasher


I want to purchase a Siemens SR 64E003 PMM. Please tell me, is it attached to the kitchen façade from the top or the side? Or maybe both?