Homemade honey extractor from a washing machine
 A novice beekeeper has no choice. There is no money to purchase the entire set of necessary equipment for the apiary, and we have to somehow get out. For example, you can make your own honey extractor from parts of a washing machine, so that when it’s time to pump out the first honey, you’ll be fully equipped. We will talk about how to do this in this publication.
Preparing the washing machine parts
Most novice beekeepers cannot boast of a large number of bee colonies. Their household will consist of 10-15 “boxes” - no more. This is exactly the amount that a person with very little experience can handle. There are a lot of nuances in this matter, and a lot of work will need to be invested until the golden stream of the sweet product rushes from the drain hole of the honey extractor into the flask.
At the very beginning, you will have to think about what necessary equipment to purchase and what to make yourself. The beauty of beekeeping is that much of what you need to do can be done with your own hands, although it will require a lot of time and labor. Here, for example, is a honey extractor. This necessary apiary device consists of three main elements:
 large capacity, which should accommodate the rotating subframes, their base, as well as the drive mechanism;
- the drive mechanism itself, which consists of bevel gears, handles and a rotating base for the subframes;
- subframes that must move freely from side to side.
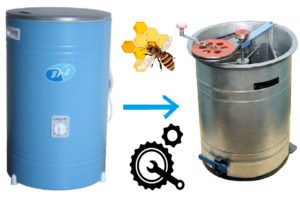
The question arises, how can an old washing machine help us? But here's the thing: old washing machines have fairly large washing tanks made of high-quality Soviet stainless steel. And stainless steel, as you know, is a material that is resistant to oxide and is easily washed off from various contaminants. So we will turn the washing tank into our homemade honey extractor.
The drive mechanism and subframes will have to be made from other available materials: wire, parts of agricultural machines, etc.
Additional materials and tools
To make a homemade honey extractor, you will need not only a washing tank from an old Siberia or Alma-Ata type washing machine, but also other important parts. In order not to be unfounded, let's list them and also show them in the drawing.
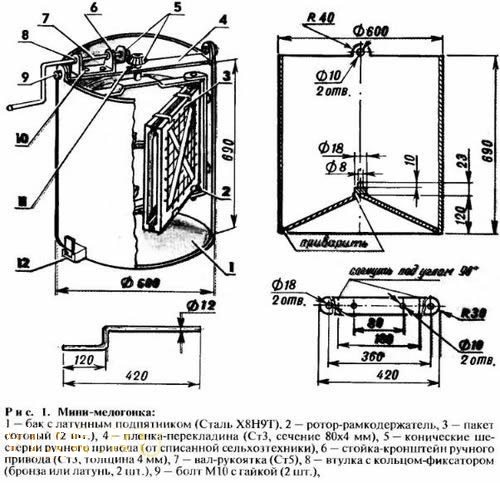
- Steel beam made of metal 4 mm thick and 80 mm wide. The length of the part will depend on the diameter of the washing tub. Holes are drilled in the edges of the part, and then these edges must be bent.
- Drive mechanism bracket made of metal 4 mm thick and 80 mm wide.
- Handle for turning a manual drive mechanism made of bent steel rod.
- The base holding the subframes is made of steel strips 2 mm thick.
- Two subframes, which are made of thin steel strips and wire
- Two bevel gears - side and central. The central gear is larger than the side gear.
- Shaft for central bevel gear. It is better to use a carbide steel rod of suitable diameter as a shaft, since it will experience quite heavy loads when you operate the honey extractor.
- Gate for releasing honey.The shutter is made of a steel plate, which is screwed to the bottom of the honey extractor, blocking the hole for discharging honey.
All of the above parts can be obtained or made for a small fee in a locksmith workshop of some agricultural enterprise.
Now let's say a few words about tools. In addition to the standard set of tools that are in every garage, we need a vice, an anvil, sledgehammer, blowtorch, drilling machine, grinder and welding with stainless steel electrodes. In general, nothing special, but it’s difficult to do without the services of an experienced locksmith.
Fixture assembly process
A homemade honey extractor is very easy to assemble. You can twist it with your own hands in 20-30 minutes, but only on the condition that all its parts are made and fit perfectly together. First, we’ll make stretchers for the honey extractor.
First of all, let's decide on the dimensions of the subframe. It should freely accommodate a housing frame measuring 435x300 mm. When making a subframe, we will focus specifically on the body frame, and a store-bought frame that is smaller in size will definitely fit.
Taking into account the protrusions, the length of the housing frame can reach 470 mm.
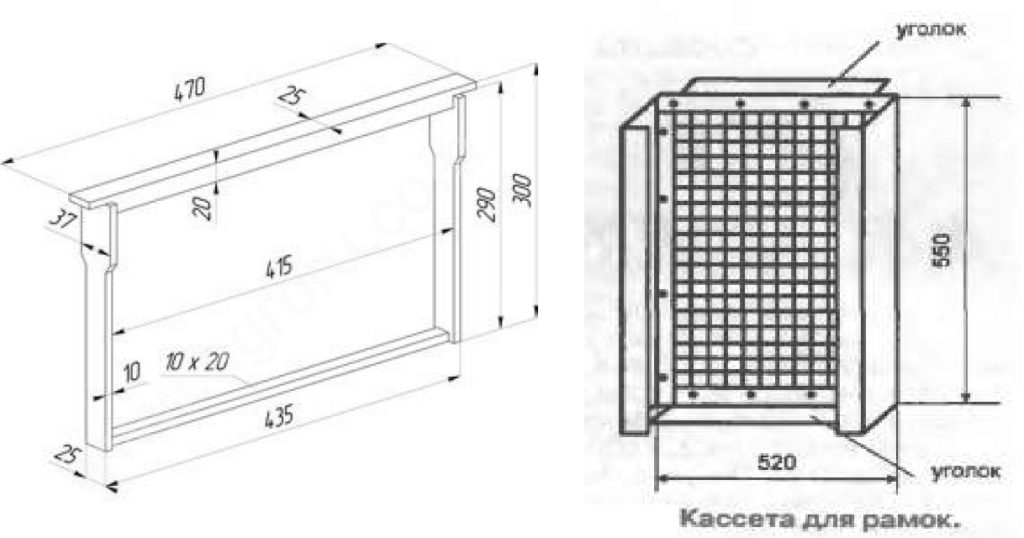
From a metal corner and wire we twist a subframe 520 mm wide and 550 mm high. If you are sure that you will strictly use frames of standard sizes, you can slightly reduce the dimensions of the subframe, but it is better not to do this. So what do we do?
- We take two stainless steel strips 1 mm thick and 520 mm long, and then two more strips 550 mm long, fold them into a rectangle and twist them together with bolts (can be welded).
- Using a thin drill, you need to drill many small holes around the perimeter of the rectangle, and then, as shown in the figure above, stretch the wire mesh (take stainless steel and non-oxidizing wire).
- We make a second wire mesh, and then take 2 strips of stainless metal 1 mm thick and 40 mm wide and bend 2 channels from it.
- We fasten wire mesh between two channels, and we jam one end of the resulting subframe by welding a steel strip.
To prevent the subframe meshes from deforming under the influence of centrifugal force, you need to weld one strip of metal across them.
- We screw two steel brackets from one edge of the subframe directly onto the channel - one on top and the other on bottom. We will need them later to attach the subframe to the rotor, which in turn we will immerse in the honey extractor.
- We make the second subframe in exactly the same way as the first. Then we put both self-made stretchers aside.
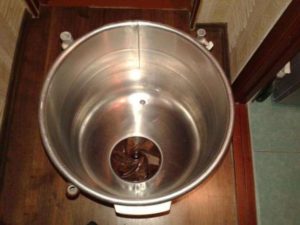
Next we need to work on the container for the honey extractor. The washing tank, of course, can well play the role of the basis of a honey extractor, but in its bottom there are quite a lot of unnecessary holes that need to be sealed tightly. We install patches from stainless steel sheets, take a stainless steel electrode and weld all unnecessary holes. Then pour water into the tank. If the tank does not let water through, then everything is in order.
The next stage is organizing a drain hole for honey. Since we have welded all the unnecessary holes in the bottom of the honey extractor, we will have to make a new hole with our own hands. We take a drill and a step drill and drill a hole in the wall of the tank at the very bottom of the honey extractor. Hole diameter – 25 mm. Insert the rubber O-ring into the hole.
Now we take a rectangular steel plate and drill a hole in it. We drill a hole of the same diameter just above the drain hole of the honey extractor. We “mount” the plate on a bolt with two washers (on the inside and outside of the honey extractor). The plate needs to be bent slightly so that it can be moved to the side in case you need to open the drain.

Next, we bend the crossbar of the honey extractor. For it, we took a strip of metal 4 mm thick, so you will have to use a blowtorch to heat its edges and use a hammer and anvil to bend them at a right angle (or almost at a right angle). First you need to drill holes in the edges of the crossbar for an M10 bolt.

We drill two more holes for M10 with an indent to the middle of the part as shown in the figure above. And you will also need to drill two holes so that you can fasten the drive mechanism bracket with your own hands, but this can be done later, so to speak, “on the spot.”
A hole must be drilled exactly in the center of the crossbar for the central gear shaft. The diameter of the hole will be slightly larger than the diameter of the shaft.
Now we place the crossbar in the middle of the tank hole, dividing it exactly in half, and mark the places where we will make mounting holes in the walls of the tank to install the crossbar. Next, we drill holes in the tank and screw the crossbar. After that we do the following.
- We take a steel pin (the future shaft of the central gear) and cut threads at its ends.
- We insert the pin into the central hole of the crossbar, put the central bevel gear on top of it and secure it with a nut.
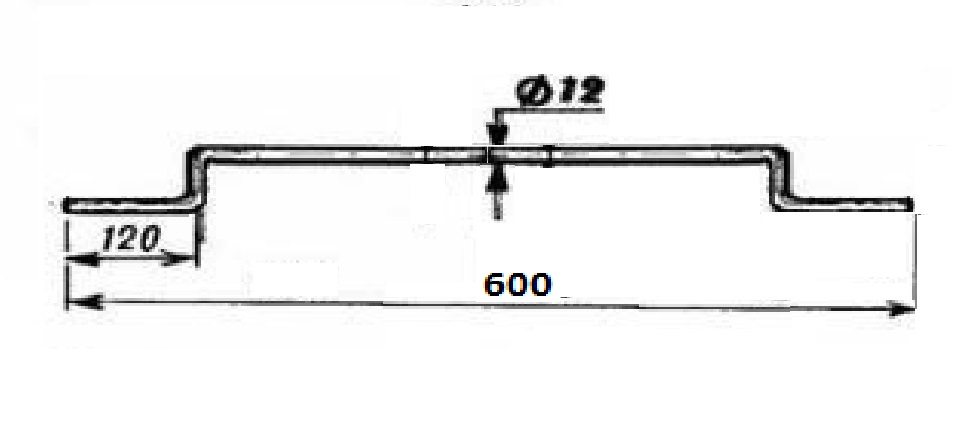
- On the bottom of the stud we put a rotor bar made of a 4 mm strip of metal, according to the drawing presented below.Strip width 15-20 mm.
- We fasten the bar with a nut and a locknut. At the edges of the rotor bar we drill holes for the frame pins. We make the studs from thin steel rods 570 mm long. The ends of the rods need to be threaded.
- We make a straight strip 600 mm long and 15-20 mm wide. At the ends, just like the curved plank, we drill holes.
- We insert the pins into the brackets of the subframes and at the same time thread them through the holes of the upper and lower bars of the rotary mechanism of the honey extractor. We fix the structure with nuts and locknuts.
We have a honey extractor with a rotor and subframes that can be freely moved and turned over in one plane. Why do we need this? First of all, reversible stretchers allow frames to drain more efficiently.
The fact is that when we insert the frame into the stretcher and begin to rotate the honey extractor, the honey, under the influence of centrifugal force, begins to fly out mainly from the honeycombs, which are located on one side of the frame (on the side of the honey extractor wall). The honeycomb on the back of the frame remains full. To empty them, you need to turn the stretcher with the frame so that its honeycombs, still filled with honey, face the wall of the honey extractor. After this, we spin the rotor 100-150 times and dry the frames completely.
The honey extractor is almost ready. Now it's up to the drive. We will use a manual drive, although there are also electric honey extractors, which we will talk about later.
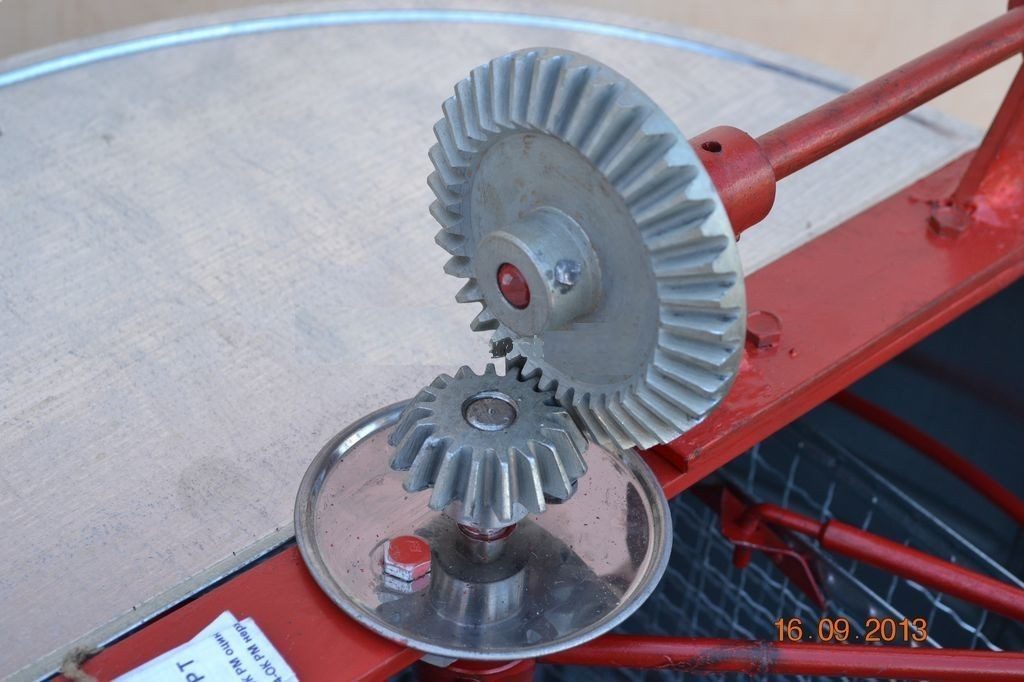
We screw the drive mechanism bracket to the crossbar. We pass a curved axis-handle through the bracket, on which the thread must be cut in advance. We put a gear on the end of the handle axis and fix it with nuts on both sides. The gear should sit so that its teeth lie between the teeth of the central gear. The manual drive mechanism is ready!
You can wrap electrical tape or put on a rubber casing on the other end of the handle axle to make the handle comfortable to use.
Do you need an electric drive?
Now a few words about what a homemade electric honey extractor is. In this case, it is still the same honey extractor, only instead of a handle it has a motor with a shaft. Many ordinary people will say: how convenient it is, they say, it’s such a relief not to turn the handle of the honey extractor, but to press the button and wait until the honey extractor itself pumps out the honey. In reality, everything is more complicated than it seems at first glance.
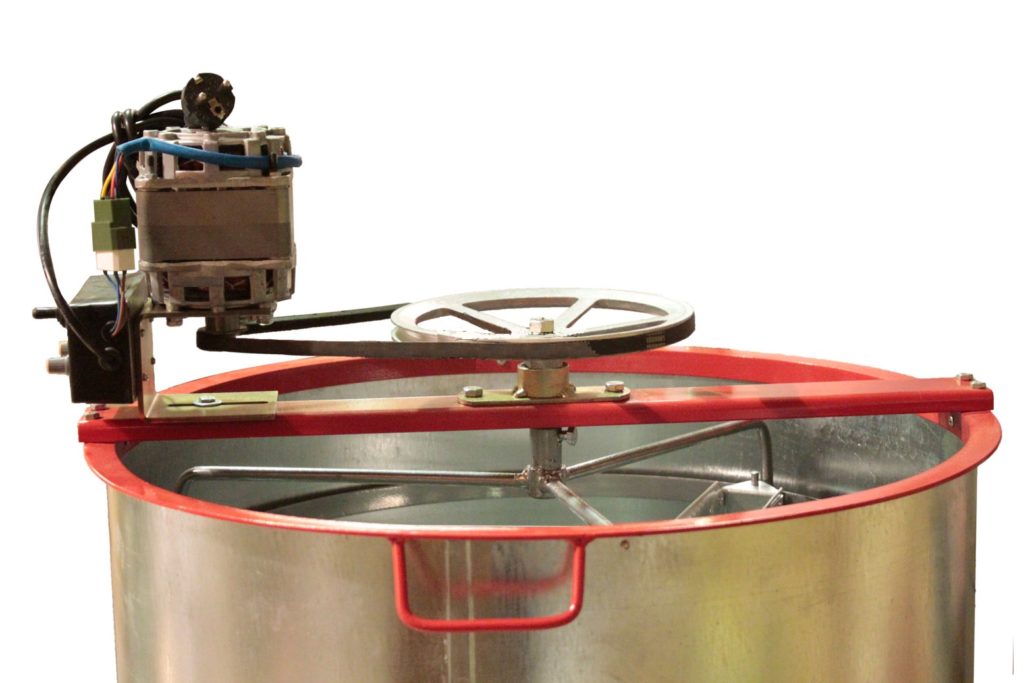
A homemade professional honey extractor with an electric drive, like the one shown in the picture above, has more than just an engine. It is equipped with an electrical control unit, with which you can very conveniently regulate the rotor speed, and this is very, very important. Even professionals, using an electric honey extractor, often break the frame without having time to reduce the speed of the rotating rotor in time, let alone beginners.
Imagine the picture, you have only 10 hives and you need to pump out a hundred store frames. You unseal the honeycomb caps of the first batch of still warm frames and place them in the electric honey extractor. You accelerate the rotor to full speed in order to deflate the frames faster and better, but in the end you break them all. Broken frames are not suitable for reuse; they either need to be sent to the smelter or for restoration (restoration is not always possible). As a result, you get a problem out of the blue.
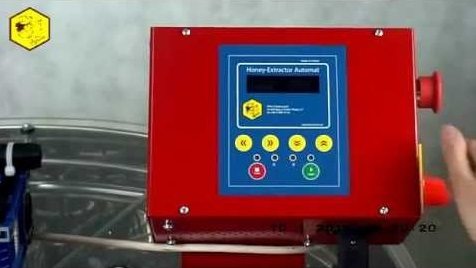
To control the speed of honey extractor rotors in large industrial apiaries, electronic control units with a pre-developed and embedded program are used. Such modules themselves decide when to increase speed and when to slow down, so the frames remain intact.
Here it would not be amiss to remind novice beekeepers that the frame emptied of honey is put back to the bees and if there is a “bribe” they immediately begin to fill it with honey again. If instead of a deflated frame you substitute a frame with foundation, you will still have to wait until the bees pull it away, and this is precious time, which ultimately turns into a loss for the beekeeper.
What is simpler is a manual honey extractor, where you can pump honey by carefully controlling the rotation of the rotor. Not a single frame will be damaged and no losses will be incurred. At the same time, scrolling through a hundred frames will not overwork you. Conclusion: if you have a small apiary, use a manual honey extractor - an electric one for owners of large apiaries (from 50 “boxes”). Well, if your “hands are itching” to somehow use the motor from the washing machine, read the article machine made from a washing machine engine, it will definitely give you useful thoughts.
In conclusion, we note that for a novice beekeeper there is nothing better than a homemade honey extractor made with your own hands from parts of a washing machine. Firstly, such a honey extractor is relatively simple to make, and secondly, it will cost relatively little. Well, certainly cheaper than those sold in special stores for beekeepers. So don’t be lazy, take the drawings, get out the old washing machines and go ahead, apply the necessary perseverance and hard work and you will succeed. Good luck!
Interesting:


Reader comments
- Share your opinion - leave a comment
Categories
Washing machine repair


For buyers


For users


Dishwasher


Add a comment