How to make a feed cut from a washing machine with your own hands?
 Not everyone knows that you can not spend money on a feed chopper and make feed cutting from a washing machine on your own. It will take a couple of hours and a minimum of materials, but the resulting device will allow the farmer to quickly prepare feeding without unnecessary effort and expense. You should not experiment - the following is a step-by-step instruction with explanations and recommendations.
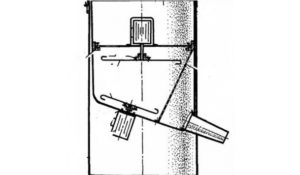
We make a container and a feed ejector
First of all, it is necessary to disassemble a used washing machine. For work, you only need an engine with a shaft and a tank, so we remove the back panel and get the motor first, and then we get to the drum. Please note that the main capacity of the machine must be made of stainless steel. Further steps to create an electric feed cutter look like this:
- thoroughly clean the container by removing scale, rust and dirt;
- behind the tank, we outline a hole commensurate with the motor shaft, and carefully make a slot;
- we drill three more holes for fasteners from the edges - 2 equal and one smaller;
- bend the sheet of iron, forming a half-funnel, which we attach to the drum for further discharge of feed.
It is better to pre-clean the motor to increase its service life.
Preliminary marking can not be neglected, otherwise it is easy to drill too much or violate the proportions. We pay special attention to the quality of fixation - all bolts and screws must be tightened securely. At this, the main stage in the manufacture of homemade products ends, and the improvement of the design begins.
Making the cutting element
No knives at the bottom of the chopper can not do. They are attached to the motor shaft with reliable fasteners, and the diameter of the blades should be only 1-2 cm less than the existing tank. In total, two cutting elements must be installed on the feed cutter:
- The first is located at the very bottom and has the shape of a propeller, the blades of which bend by 2-3 mm. He is responsible for tossing the feed placed in the container and pushing the pieces out.
- The second knife should be narrower and sharper. You can buy a new copy, or cut it out with your own hands from an old saw.
In order for the feed cutter to grind the feed faster, it is necessary to sharpen the blades thoroughly and control their blunting during operation. It is not superfluous to bend the knives a little for increased productivity. Particular attention is paid to reliable fixation.
We make the supporting part
After the base is ready, you need to think about the support. She will perform a stable metal structure on 4 "legs" that looks like a stool. You can make such a "foundation" by welding together the elements of the iron profile or twist the building corners with screws. A drum with knives is screwed on top of the stand.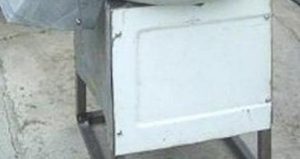
The main thing is that the support does not swing, stands level and is able to withstand the upcoming load. Otherwise, the accelerated motor will cause vibration, and the structure will fall along with the feed. From above it is desirable to install a cover that will prevent the loss of vegetables and greatly save feed consumption.
At the finishing stage, we check the quality of the fasteners and do a test run by connecting the former washing machine to the mains. If the motor is working, and the support can withstand the power of the feed cutter, then you have managed to make a feed chopper yourself.
Interesting:


Reader Comments
- Share your opinion - leave a comment
Headings
Washing machine repair


For buyers


For users


Dishwasher


Add a comment