How to disassemble a Zanussi washing machine
 Almost any repair of the Zanussi washing machine is associated with its disassembly, because the vast majority of the details are hidden inside the case. It is clear that far from complete disassembly is not always required, often it is enough to just remove the top cover or back wall and now, a broken part is already in front of your eyes. But what to do if repair of a crosspiece or bearings is required or even worse it is necessary to change a tank? In such cases, repairs can only be made by completely disassembling the Zanussi washing machine. How to do this, let's figure it out!
Which tool do you need?
We will not “beat around the bush”, but immediately proceed with the preparation, because disassembling the Zanussi washing machine with a 5 kg drum does not work “with the condo”. First we need to collect all the necessary tools. There should not be any problems with this. It is good enough to rummage in the garage, delve into the pantry, and all you need is:
- a set of screwdrivers (you can screwdriver with a set of heads of various configurations);

- a set of keys (you will need various keys, including ring keys);
- a screwdriver with a set of heads (mainly 7 and 8 mm);
- pliers (large and small);
- small pliers;
- bearing puller;
- ticks;
- WD-40 fluid
- hammer;
- awl;
- markers of several colors.
As you can see, the tool is simple, you can get all this without difficulty, so further discussion of this issue is pointless. The only thing I would like to note is to take only high-quality tools. By unscrewing the fasteners with Chinese keys, you most likely tear off their edges and then add work to yourself. If there are no normal keys, ask your neighbor for the time of repair or buy Soviet keys from junk workers - you will not regret it.
We get into the washing machine
It would seem that it’s easier to get into the body of the Zanussi washing machine and see what is located there, to study, so to speak, its structure in practice. But it was not there. The case of old washing machines of this brand is disassembled quite tricky.
The top cover can be removed without any problems, take a handle with an 8 mm head, unscrew the two bolts, take hold of the cover, shift it a bit towards you, and then up - nothing special. But the removal of the rear wall of the Zanussi machine is not true. The housing of the Zanussi washing machine has one serious feature - it does not have dismountable side walls. What does it mean?
For washing machines of most brands, the housing device requires five or six elements:
- top cover;
- bottom;
- back wall;
- front wall;
- left side wall;
- right side wall.
Note! Some washing machine models do not have a tray or a lid covering the bottom of the housing.
At the Zanussi washing machine, the device is unusual in that the case of this “home assistant” (except for the top and bottom) is disassembled into two large halves:
- front wall, half of the left wall and half of the right wall of the housing;
- back wall, half of the left wall and half of the right wall of the housing.
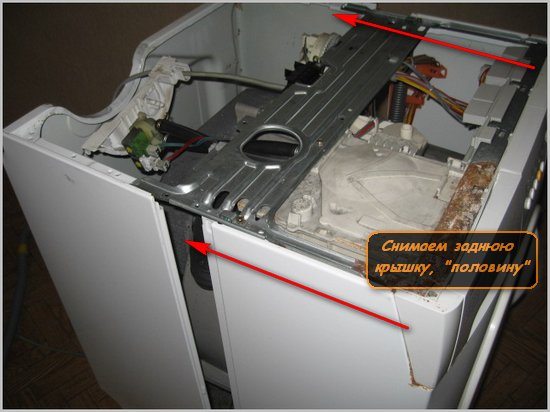
To get to most of the necessary parts, for example, an engine, drive belt, drain pipe, we need to completely remove the rear half of the housing. How to do it?
- We drag the Zanussi washing machine to where it will be convenient to work with.
- We turn off two or three (depending on the model) screws that are located in the lower part of the rear wall of the housing.
- Remove the top cover of the machine as described above.
- Now we examine the side walls and find plastic plugs on them. With the help of an awl we pull off the plugs.
- We find screws under the plugs and unscrew them.
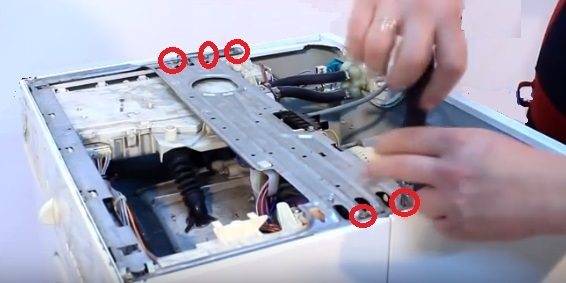
- Go to the top of the case. If you look into the upper part of the case without a cover, then a rather large metal plate providing a stiffener will immediately catch your eye. At the edges of the plate we find the screws holding the back of the case, they need to be unscrewed.
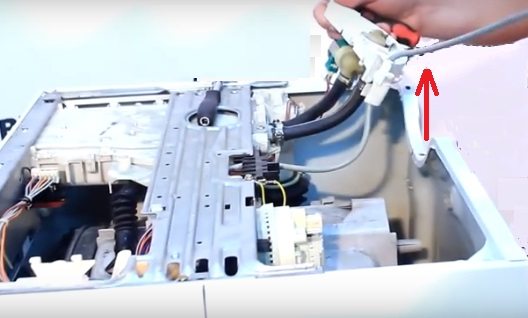
- The last element that prevents us from removing the back of the housing of the Zanussi washing machine is a plastic mount. A bulk valve with two nozzles is installed on it. No need to remove the nozzles, pull off the entire mount, gently prying the plastic latches with a flat screwdriver.
- Now we just have to go around the washing machine at the back and pull the back of the case towards itself, it should move and move back. We remove the back of the case, and our eyes open a picturesque view of the insides of the Zanussi washing machine.
To move the back of the chassis faster, swing it from side to side.
Dismantling the main components
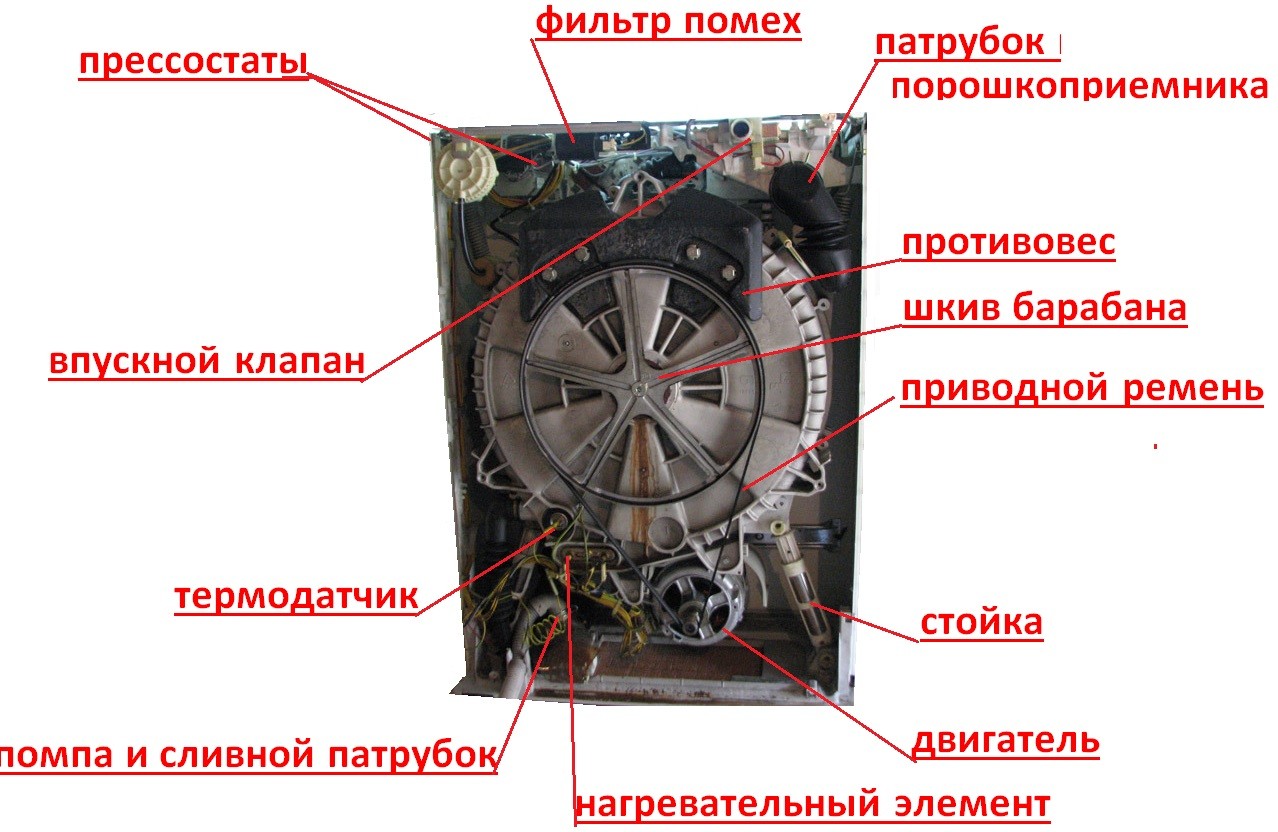
Having removed the back of the Zanussi washing machine, we greatly facilitated the task of removing its main components. Now we can unscrew and pull out a lot for repair, and nothing will hurt us. What parts are freely available?
- Drum pulley and drive belt.
- Rear counterweight
- The engine of the washing machine.
- Anti-vibration racks.
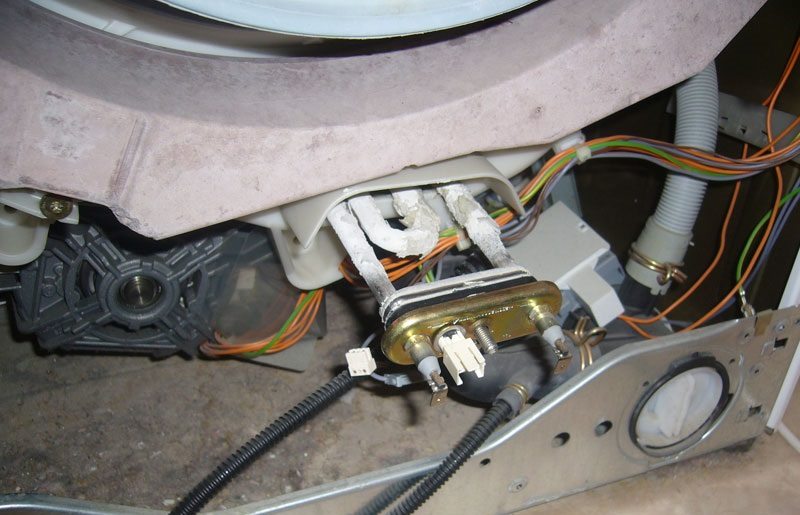
- Heating element (ten).
- Temperature sensor.
- Intake valve with nozzles.
- Drain pipe and pump.
- Two pressure switches.
- Noise filter.
- Watering pump (used to force the injection of water into the tank while washing things).
We begin the next stage of disassembling the Zanussi washing machine with the fact that we remove the wires from the heater (it is located under the drum pulley), the engine, we pull out the temperature sensor from the tank. Next, remove the wires from the pressure switches. They are located in the upper left of the machine and pump housing, which is located at the bottom left. Remove the wire from the inlet valve. After that, we will do a very useful thing, unscrew the rear counterweight, so that later it would be easier for us to pull the washing machine during the repair. He holds on 4 bolts.
Attention! All the wires you remove must be marked with multi-colored markers and paper tags so that you don’t confuse anything later. After all, the device electricians of a Zanussi washing machine may seem complicated to a beginner.
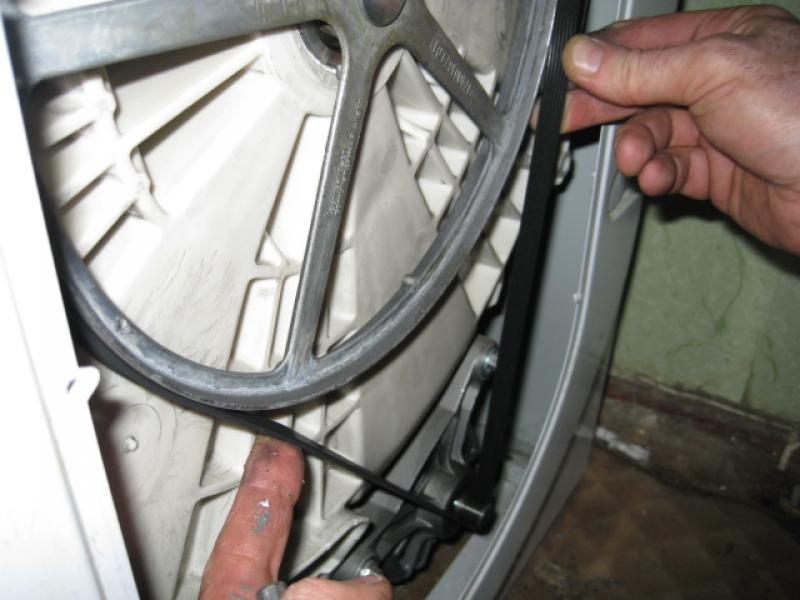
Remove the drive belt. With one hand we hold the belt, and with the other we rotate the drum pulley. The belt will easily come off. Remove the clamps from the pipes and pull them off. We take a handle with an 8 mm head and unscrew the two bolts that hold the Zanussi washing engine in front, and then unscrew two more screws from the back. Unscrewing the fasteners, hold the engine from the bottom with one hand, and the second lightly beat on its pulley - the motor will be removed.
Now we take out the heating element. Unscrew the nut located between its contacts. Press lightly on it, and then take the heater by the contacts and very carefully, swinging it to the sides, we begin to pull on ourselves. It is important here not to break off one of the contacts, otherwise you will have to change the ten.
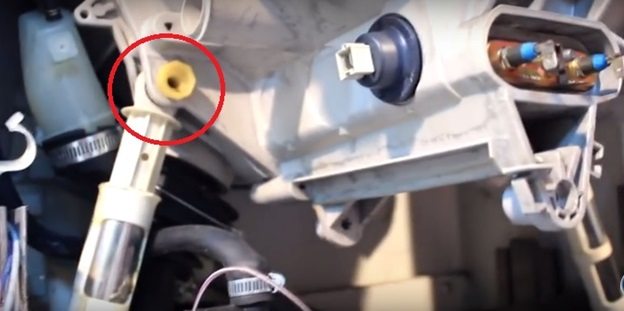
Next, remove the rack. On the one hand, they rest on a kind of plastic rods, and on the other, on a regular screw. To remove the stem, it is necessary to take the head by 14 mm, put your hand on the stem and put the head on its latch. After that, you need to grab the front of the rod with pliers and pull it towards you, holding the tank - the fastener will pop out. Unscrew the rack from the bottom and remove it to the side. With the second rack we do the same.
We pull out the pressure switches from the grooves, remove the clamps from the filler pipes and remove them together with the filler valve. We turn off the watering pump, disconnect the hose from it. Now let's look into the car body through the top. On the upper wall of the tank we see a small nozzle-boot, we carefully pull it out. What's next?
- We go in front. Open the hatch of the Zanussi washing machine. We take a hand by the upper part of the rubber cuff of the hatch and slightly pull it towards ourselves.
- Then we pry a plastic clamp with a flat screwdriver and swipe in a circle until we find the latch. Disconnect the latch and remove the clamp.
- Since we have a Zanussi washing machine with watering and a large load, it means that at the top of the cuff there is an entrance to which the watering pipe is connected. Again, take the upper part of the cuff and pull it over.
- Remove the pipe clamps and the pipe itself.
Next, again go around the car behind and unscrew the noise filter. Now in the case there was only a tank with a drum, suspended on two springs, in front of the control panel, trash filter, UBL and the sunroof. Sunroof locking device and the hatch itself can be easily removed, you can read about it in a special article, so we won’t dwell on this in more detail. Anyone can unscrew the trash filter, but difficulties can arise with the control panel.
How is the control panel removed? We go around the washing machine in front, we take out the powder receiver from the niche. Unscrew the screws located behind the tray. Unscrew two more screws above the panel. Next, gently pry the control panel with a flat screwdriver and remove it.
Be extremely careful, the bundle of wires fits to the control panel, they can not be torn off.
Having removed everything that is possible, and having studied, during the disassembly, the device of the Zanussi washing machine, we left the washer body with a tank and a drum suspended on two springs. If we want a complete disassembly, we need to remove the tank from the springs, and then take it apart.
Complete disassembly
Using the help of a friend, remove the tank from the springs and pull it out of the washing machine. To do this together is very simple, but alone you can tear the navel. Turn off the front counterweight and remove it. We put the tank with the hatch down on a flat surface so that we have full access to the drum pulley. Next, we perform the following actions.
- Lock the pulley so that it does not scroll. This can be done in any convenient way, for example, as shown in the picture.
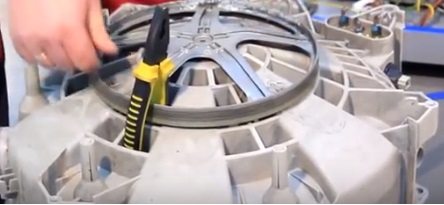
- We take a hex screwdriver and try to unscrew the bolt, which is located in the center of the pulley. If this does not work out, you can lubricate the bolt, then wait a bit and try again. Unscrewing the bolt, try not to break the hexagon.
- We take our hands on the pulley of the drum and, swinging it from side to side, pull up.
- Having removed the pulley, we need to disassemble the tank body into two parts.
Note! The two halves of the tank body of the Zanussi washing machine are pulled together with long screws, so its tank is considered collapsible.
- We take the screwdriver and head by 8 mm and, in turn, unscrew all the screws holding the two
 halves of the tank together. As soon as you remove the screws, the tank will be sorted out.
We easily managed to remove the front of the tank, but the back is still securely fastened to the drum through bearings, which in turn are mounted on the shaft. They must be removed with the tank. We take an old unnecessary screw that fits into the thread of the shaft (from where we unscrewed the bolt holding the pulley) and twist it there. Next, we substitute a wooden block and apply light blows to the screw through it with a hammer until the back of the tank comes off the bearing.
As a result, the back of the tank remained on the sidelines, and we still had a drum at the back, which has a cross and a shaft. He is wearing a bearing and an oil seal. What follows is the most difficult.
- We hammer the puller grips under the bearing.
- We create tension by gradually twisting the thread of the puller.
- Generously fill the bearing with WD-40 grease.
- We are waiting for 30-40 minutes.
- Slowly unscrew the thread further and remove the bearing, and then the oil seal.
To summarize, we note that the device of the Zanussi brand washer does not seem so complicated as to trust its dismantling to the master. You can disassemble such a washer yourself if you carefully study the instructions given in this article. The design of Zanussi machines may vary slightly depending on the model, but these differences are not significant. Some models of the machine, a little more drum loading on some model, there is no injection and the like. All this does not hurt you to study the instructions, and disassemble your first Zanussi typewriter "by the cog". Good luck
Interesting:


18 reader comments
Add a comment
Headings
Washing machine repair


For buyers


For users


Dishwasher


Good morning, I would like to know, but can I take apart the Zanussi tank without removing it completely?
No, it won’t work out.
How to remove the door bracket on the Zanussi 3102 washer?
It is fastened with rivets. Try to cut the ends protruding inward with the help of pliers. Then knock out the remains of the beard from the outside to the inside. If it doesn’t help, they drilled these rivets outside, they are soft.
Good day! Zanussi FE 1024N 2006 After a few minutes of operation, it turns off. Can you tell me what is the reason?
How to remove the pump with drain pipe in ZWI 1125?
Good day!
Tell me how to remove the control unit (front panel)?
Tell me, how did you remove the control unit?
How to disassemble the hatch on Zanussi ZWS685V to replace the lock? 2 rivets are flooded and that’s it.
Cool master! Thank you, everything is clear. Thank you They did it.
Where is the drain filter in the Zanussi ZWF71243W? Thank.
Tell me how to remove the programmer from Zanussi TA833V (vertical download)?
Good day. Help me please!
Advise how to remove the tank from the Zanussi FLS-1083 Pr.N.914204001 (1999). Her case is not separable, i.e. only the top cover is removed and that’s it. I had to remove all the wiring, board, etc. in order to maximize the passage for the tank. But to remove the counterweights is not possible. Even if you manage to unscrew the bolts, then the space inside the case is not enough to remove the front pr-weight, and it is all around the circumference. Through the top alone - no way. There is no one to help.
Is it possible to put it on its side and free it from the shock absorbers and springs? Will the sidewall crush?
Hello, my daughter broke the plastic with the lock, the lid was open, the Zanussi TA 1033 V with top loading. Can I fix it myself?
Hello, on a washing machine with a vertical loading, a shaft broke on the left side (at the junction with the drum). I think to weld it back, is it real? A very laborious process - to get a drum out of a plastic casing?
Why does the drum hammer during spinning? Model FL904NN Zanussi.
The lock of the door lock is locked. There is no water in the machine, everything works, the washing was restarted. Zanussi F 505.
Good evening. Tell me how to remove the hose completely from the Zanussi 1025 vertical loading machine, if there is a pump mount on one side and the tip is thickened on the other. The hole does not go broke like. Help