How to change the cuff of a washing machine?
 If your washing machine has served you faithfully for a long time, then you should not be surprised if its hatch cuff is damaged or has a hole. The cuff is needed to prevent water from flowing out of the washing machine during washing and from getting either inside or outside the device. That is, to ensure that water remains in the tank during all operations.
Why can the cuff get damaged?
- As already written above, the reason may be the long-term use of the machine. Absolutely any parts of household appliances have their own safety margin. And with regular and long-term use they can fail.
- The cuff is made of rubber. This material may become unusable with excessive use of certain detergents that are added for washing.
- During operation of the machine, contact may occur with some internal structural elements. That is, friction about them. This friction can cause holes in the rubber.
- Friction can also occur on solid elements of the items being washed or on large items such as shoes, clothes that use a lot of metal parts, etc.
- In addition, sometimes fungus can appear on the rubber surface, which deteriorates its quality over time.
- You can also easily damage the cuff if you carelessly load and unload laundry items.
How to remove the hatch cuff?
 In some washing machine models, the design provides the ability to change the cuff without removing part of the body. For others, it is necessary to remove the front wall. All repairs do not require any special skills. Everything is done quite simply.However, do not forget to be careful, especially when installing a new cuff. Before we get started, we need to make sure that your new replacement part is identical to the one we want to remove.
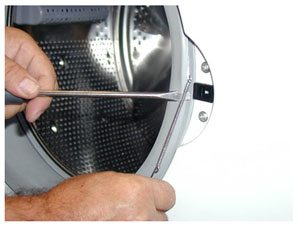
After we have checked the identity of the cuffs, we proceed to remove the old one. First we need to remove the fixing clamps. The outer part of the cuff is recessed into a special opening in the outer wall of the case. There it is secured with a clamp. This clamp can be made of either plastic or metal (wire). In order to remove the plastic clamp, you need to grab the part where the latches are connected and pull in your direction. To remove the wire clamp, you need to unscrew the screw or pry the spring with something flat.
Next, we need to find the mounting mark on the cuff to be removed. She marks the required location in relation to the washing machine tank. Only correct installation will help avoid leaks.
If you were unable to find this mark, you can indicate the location of the cuff to be removed using a marker.
This action will help us navigate the correct location of the new cuff. After we have found the mark (or made it ourselves), remove the second clamp and remove the cuff.
How to install a new cuff?

Before starting installation, let's prepare the place. To do this, thoroughly clean the required surface from any dirt. Then you need to apply a soap-water solution to the installation site. This way we will make it slightly slippery. This will make installation easier.
Next we will need to put the cuff on the tank. This part of the job can be quite difficult for some. During this process, it is important to remember the correct position of the cuff relative to the tank.And don't forget about our marks. Let's match them with the marks on the tank. Now we need to put the cuff recess on the tank. To do this, take it from the inside with your thumbs and pull it in a circle. We prepared the edge using a soap and water solution. Therefore, everything should go like clockwork.
There may be some difficulties during the replacement process. The following often happens: when pulling the cuff, when most of it is already in place, its edge may fall out. To solve this problem, we can continue to put on the cuff at both ends at the same time. And so on until the very end.
We put on the clamps
 Next, we first put on the inner and then the outer clamp. If the first one is adjusted with a screw, then loosen it to the desired diameter of the clamp. Then we install the clamp on the cuff and fix it by tightening the screw. If the clamp is on a spring, then you will need to tinker with it a little longer. We will need to secure it at the initial tension point. In order to finally fix it, we will use a screwdriver. We insert it all the way into the locking opening. Then we put the spring on our tool, pull it back and insert the clamp into place.
On those machines that were purchased a long time ago, in order to fix the clamp, you need to use round nose pliers. Using this tool, the hooks are separated and connected, which create the necessary tension on the clamp.
After installing the inner clamp, we just need to secure the outer one. This is done in the same way as with the first one. Therefore, we will not describe it.
When our cuff is installed and secured with both clamps, all we have to do is check the tightness of our washing machine. To do this, select the rinse mode and start the machine. After a few minutes, add water.Then we tilt the machine and inspect the bottom, floor and the cuff itself for leaks. If we did everything correctly and the cuff was in good condition, then we will not find any traces of water. Congratulations to you!
And in order to make this difficult process more understandable, I suggest watching a video on how to change the cuff of a washing machine:
Interesting:


3 reader comments
Add a comment
Categories
Washing machine repair


For buyers


For users


Dishwasher


what to do if the front cover of the washing machine cannot be removed? And the cuffs need to be put on.
This can't be true.
ARDO A1000X