How to change a bearing in a washing machine
 How do you know when a bearing in a washing machine needs to be replaced? It makes noise, creaks, knocks while washing clothes. These unpleasant sounds can get worse over time. And if you don’t replace the damaged part in time, it will be more difficult to do so later. In addition, the knocking can eventually turn into an unbearable noise. If you do not change this spare part at all, then soon the machine will completely fail. And its repair will be extremely expensive. The best option is to immediately replace it with a new one if a bearing malfunction is detected.
Bearings can fail when using the washing machine for a long time. They also break due to water ingress. Water leakage causes corrosion, which damages the part. Leaks occur due to the fault of the seal. It has a limited shelf life. And it often begins to leak fluid after 5-7 years of operation. The oil seal is located next to the bearings. And every time the bearings are replaced, it is customary to change it too.
Replacing a bearing yourself is a very difficult and not at all quick task. Therefore, before you take it on, you need to decide whether you are ready to do all the necessary work with your own hands? If the work is too complicated, then it is better to call a professional craftsman. All the work, along with the new part, will cost you about a third of the cost of a new washing machine. Of course, prices on the market for household appliances and their repair may vary. And the price given here is approximate.
If you decide to do all the work yourself, then this article will help you.And for those who perceive video better, we advise you to immediately go lower and find the entire repair process in video format.
Required tools and parts
For this task we will need to almost completely disassemble the washing machine. And naturally, we will need tools. What exactly do we need?
- Pliers.
- Screwdrivers (slotted and Phillips).
- Special screwdriver with various attachments.
- Round nose pliers.
- Set of keys of various sizes.
- Waterproof sealant.
- Chisel (blunt).
- Rubber hammer.
- Large regular hammer.
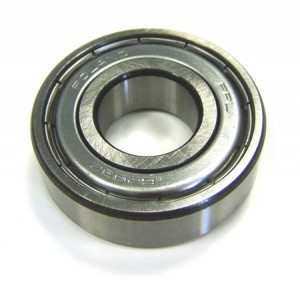
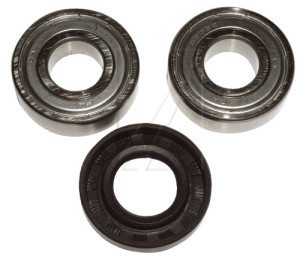 We also need an oil seal and bearings. They can be purchased at various services and specialty stores. If you do not know any such organization, then simply type in Yandex, Google or another search engine: “Buy bearings for a washing machine”; it is better to add the name of your city to this request. For example, “buy bearings in Moscow.” In the search results you can find companies that sell parts. Tell them the brand of your machine. After which they inform you about the cost of spare parts. As a last resort, you can first remove the old parts, and only then select exactly the same new ones.
We disassemble the washing machine
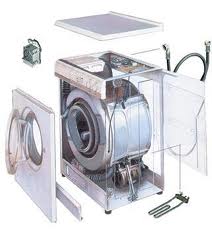 First we need to remove the upper part of the case (cover). It is secured with two screws from the back. After you have unscrewed them, you need to slide the cover towards the back of the case. And we take it off. Then remove the machine dispenser completely. In some models, to remove the dispenser we need to press the latch. Next we need to remove the control panel. To do this, unscrew the fixing screws. The panel can be carefully placed on the side of the case.
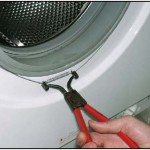 Next, open the hatch and remove the outer collar of the cuff. Clamps are different. Some can be removed with pliers. Others can be removed using a slotted screwdriver. When the clamp is removed, we need to separate the cuff from the front of the body and tuck it inside the machine. This way she won't bother us.
Then unscrew the lock. It is secured with two screws. We twist them and put our hand inside between the cuff and the wall 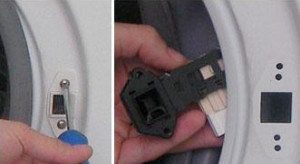 We separate the locking device from the inside of the machine wall. We remove all the remaining fastening elements and remove the front part of the case. We’ll also remove the back part of the case in advance, so that we don’t have to mess around with it later.
Then we disconnect the dispenser hopper with the pipe from the machine tank. To do this, we need to remove everything that is in the way and loosen the clamp. We put everything away where it won’t get in the way. Next we need to remove the counterweight (if it's on the front). If it’s behind us, then we’ll get to it too and definitely take it off. Typically the counterweight is bolted in place. We will unscrew these bolts using a screwdriver.
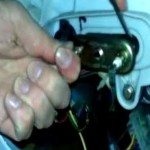 Next, we approach the heating element (heating element). For most models it is located at the back. Some have it in the front. Before removing it, we’ll take a photo of the wires so that we can connect everything in the right order later. Then remove the heating element mounts. More often it is attached to one nut. We loosen it and press in the screw. Then use a flat object (for example, a screwdriver) to pry it up and take out the heating element.
After this, remove the pipe that is attached to the tank. We have already learned how to disconnect the clamps, so we can do it without any problems. Then we remove any wires that may be attached to the tank.
 We approach the machine from behind and remove the drive belt. Next, disconnect the connector of the wires leading to the machine motor.Then we twist the screws that secure the engine. Then we take out the engine by pulling it in our direction.
Then we tighten the screws that secure the shock absorbers. And we separate their lower parts from the wall of the car. All that remains is to remove the springs. And the tank can be taken out. All this should be done carefully so as not to drop the tank.
We disassemble the tank and change the bearings
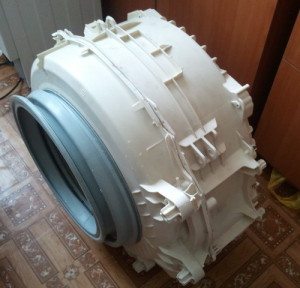 Now we can put the removed tank on the table. It will be more convenient to continue disassembly there. The rubber from which the cuff is made may deteriorate during further work. Therefore, it is better to remove it. But first, it’s worth marking its position with one or more marker strokes. Next, remove the remaining clamp and pull out the cuff.
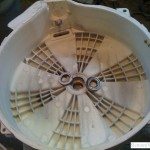
We place the tank so that it is convenient for us to remove the pulley. The pulley is attached to one bolt. It needs to be unscrewed. After the pulley is removed, we need to recess the shaft inside the tank. Try doing it with your hands. And if that doesn’t work, then a rubber hammer will help us. Then we disassemble the tank into two parts. They are most often secured with latches and/or screws.
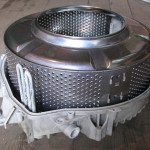 Once we have separated the parts of the tank and taken out the drum, we need to inspect the spider, shaft and bushings. If the machine worked for a long time with broken bearings, then there is a possibility that these parts could be permanently damaged.
For example, a crack may appear on the crosspiece. The shaft may deteriorate so that the new seal will not hold water. The shaft may get play. And in this situation he will not work for long. If any of these damages are noticeable, then repairs will require additional investments.
But let’s hope that you didn’t delay starting the repair and that everything on your machine is more or less intact. We will clean the bushing and shaft from scale and various dirt that may have appeared there.They must be processed very carefully so as not to leave any residue and to bring them to an absolutely smooth state.
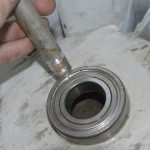
 After this we will remove the bearings. To do this we need a hammer and a blunt chisel. We take the part of the tank in which the bearings are located and knock them out using these tools. They should be knocked out carefully so as not to damage the tank. One master I knew did this on his knees. So he prevented the possibility of the tank breaking from below from too strong a blow.
Usually the seal also falls out with the bearing. If it does not fall out, then remove it. We carefully process the mounting points of the bearings on the tank, remove dirt and anything else that may be there. Next, they should be treated with the lubricant “Litol-24”.
Next we just have to assemble the whole machine. After assembly, we carry out a test wash to ensure that the new bearings work properly.
By the way, if during the disassembly process you take photos on your phone or camera, then you can make the process of reassembly easier for yourself. It is necessary to photograph all those parts that in your opinion will be difficult to assemble.
And for those who want to watch the entire process of disassembling, assembling and replacing bearings on video, we have prepared a special video. It is made in English, but if you repeat all the steps after the master, then there should be no problems. And so, let's look:
Interesting:


35 reader comments
Add a comment
Categories
Washing machine repair


For buyers


For users


Dishwasher


I delayed repairing the bearing; the car was operated in such conditions for a long time. As a result, the master came, dismantled the car, took the drum and took it to his workshop, saying that he had torn his back carrying all the tools with him. Now he calls and says that the bushing is worn out (by 2/3), and he doesn’t do such work, no one in our city changes bushings anymore, this is a plumbing job, etc. and so on. There is no reason not to believe him, because... In fact, for six months we used a car with a wildly noisy bearing.
Question: does it make sense to repair the bushing or immediately buy a new unit?
If you have a good turner, it makes sense to repair
As an option, you can buy the part of the tank in which the bushing is located - new or used.
Or you can also find a turner and bore the bushing in the tank, and then insert an insert there that will repeat the internal diameters of the “original” bushing. The whole issue comes down to money, if the town is small, salaries are small, buying a new machine will cost 20 tons, and fixing the old one will take a week or two of fuss, but pay a ton to the turner and that’s all.
Well done, it’s a pity that the tanks in modern cars need to be cut
Nothing has ever broken in our machine, it’s been plowing for 10 years, it’s even strange. True, we try to take care of it, we clean it, dry it, and add calgon when washing it.
We also wash with Calgon to soften the water, but it has a bad effect on the operation of the machine. Although many more factors need to be taken into account so that the machine does not fail.
Calgon is a scam, I’ve never used it, I disassembled the machine, everything inside is fine (except for the bearings).
We have the same story. We never use Calgon. very rarely, once or twice a year, we use citric acid, and only for the sake of prevention. but the bearings have come to an end...
Citric acid is good, but replacing the crosspiece is even better. It is made of aluminum alloy, which decomposes very well from lemon juice.
How much does it cost to change drum bearings?
In Vladivostok from 5500 with bearings and oil seal, and if you change it yourself, you can buy the cheapest imported bearings and oil seal. Why the cheapest bearings? Because if the seal leaks, any bearing will fail!
Is the price the same for both collapsible and non-dismountable tanks?
If it is not dismountable, no one will officially change the bearings. Only private craftsmen will undertake this, and not service centers. And only without a guarantee.
2 bearings 6205 and 6206 cost me 550 rubles + 280 rubles for the oil seal. Washing machine LG f1022ndr direct drive
Is it some kind of special seal?
When buying a machine, you need to carefully look not only at the company’s “warranty”, “reviews” (since some of them are paid for and do not always correspond to reality). But also maintainability just in case. You should not buy a machine with a non-separable tank (since you will have to change the entire tank or change the machine), you should not buy LG and Westel machines because on the axis where the bearing seal is located there is spraying which is erased from using powder without Calgon, which leads to corrosion and subsequent the oil seal is scuffed, and accordingly water begins to get into the bearings and the khan machine. It can only be treated by replacing either the tank or the tank cross (does not depend on the model of the machine).
It is worth taking machines for which you can get parts. Which are unified with other models of the same manufacturer. Also, it is worth taking machines that have a tank shaft without coating; these machines last a long time and without problems with bearings and tanks.
What kind of specialists are talking nonsense about LG washing machines? I’ve been using this brand for 12 years without Calgons, absolutely nothing bothers me, the drums in LG are dismountable, the crosspieces are bolted and easy to change... install branded Korean bearings, original oil seals, crosspieces and your “skis” will work for another 20 years!
Why are you talking? I have LG wd80150s. This machine is already 14 years old. All my friends have already replaced two cars. And for the first time in 14 years, my bearing made noise. I hope to get away with replacing it. Before you throw anything at the fan, think: people are reading you.
Tell me, does the Candy CSBL 75 machine have a collapsible tank?
Hello. I learned a lot of useful things.
Zanussi TA833v car, it looks like the bearing is failing.
Is it worth the bother? And what type of machine do you recommend, or rather the brand?
Good afternoon . Which model do you recommend?
Our Zanusi is 13 years old and it looks like the bearing is failing. Is it worth repairing or what?
Zanussi 16 years old - the bearing failed (the drum was moving up and down and there was a hum) I had to take the whole machine to a mechanic - I decided to disassemble it myself and in the end change only the bearings and the oil seal, everything else is fine - so I think it’s worth changing the bearings just to check everything else - the cuff on the door (if it’s torn 4,500 rubles, if the shaft is worn out or the seat in the housing - also about that) I first calculated at 14 thousand. For now it costs 1.5 thousand rubles - 300 x 2 - bearings 280 rubles - oil seal and about 500 rubles - oil seal lubrication (30 g) can be done cheaper myself, and also the work is 3 -3.5 rubles.
Kandi 15 years old the bearing on the engine is noisy. Is it possible to operate the car? The mechanic said he couldn't change the bearings on it. What to do, please advise.
Good afternoon Thank you very much to the author of the article! Thanks to you and people like you who share information online, I changed it myself, the repair cost 800 rubles. Masters take 3500 min.
Bearing 6205 and 6206 + oil seal.
Thanks again for the article!!!
My machine's drum stopped during the spin cycle and won't spin. Could there be a problem with the bearing?
I need dimensions of seals and bearings for the Indesit iwsc5085 washing machine
What bearings does Atlant SMA 50С102 have?
The new Siemens machine worked for less than a year. The tank hummed during the spin cycle. Disassembled. Large bearing with rust. Water passed through the seal, this is the quality of current technology.
My washing machine made a noise. I bought new bearings, but I can't get the drum out to install them. What to do in this situation?
My advice to you is that if you decide to change the bearings in your washing machine yourself and have had little to do with hand tools before, don’t do it. It’s better to find a specialist by recommendation.
And after purchasing household appliances, before plugging the plug into the socket, I disassemble and lubricate the bearings. And there was not a single case where the bearings were lubricated. Sometimes the lubricated separator is barely noticeable.
The Indesit machine has been in operation for 4.5 years. Now it's buzzing. It just howls when it revs up. The drum must be hard to turn. What is this? Bearings? And how many of them do you need? 2? And the seal?
LG, 18 years old. The bearing made noise. I decided to repair it myself. The tank is collapsible. It was hard to get out. Placed it on 2 stools. And he knocked it out with a hammer through a piece of wood. Then there is another problem - the bearing cannot be removed from the shaft.
VD processed and on the road. 2 car repair shops removed this bearing. Thanks for the free one. But the problem is that the oil seal is in the trash; replacement is understandable, but the shaft underneath is simply terrible. Crosspiece to be replaced 3.5 thousand.
There was no time to look. Sanded with sandpaper for 2 hours and removed 0.8 mm. Polished it (to a C grade).A new standard oil seal fit and assembled. It worked (by the way, the heating element was broken. We washed it with cold water and apparently it was fine). I think a year is enough for 2 seals. And then change the crosspiece. Now it all sounds nice. But I lost my nerves normally and had about 12 hours of uneven time.
You read and oh...ah.
The good old Oka has been running for 50 years!
Both work clothes and more “delicate” underwear, everything fits perfectly! And there are no hemorrhoids, in the entire history two leather belts were replaced, until they installed one from a VAZ2108... the belt has already served for 25 years.