How to connect a compact dishwasher yourself
 The interest in compact dishwashers among owners of small apartments with small kitchens is quite understandable. But you also need to understand that buying a compact dishwasher is only half the battle; you need to install and connect it correctly. Installation of a compact dishwasher includes: choosing a location or its organization, preparing communications and selecting suitable components, taking into account the installation features. It is not as simple as it might seem at first glance; you need instructions with explanations. This is what we will offer.
Good place for equipment
Even before buying a compact dishwasher, you need to figure out where to put it, otherwise it may turn out that in a small kitchen you won’t even find room for a small machine. What criteria must this place meet?
- It must be accessible so that you can freely approach and load the dishes.
- The location should be fairly close to sewer and water pipes, as well as an electrical outlet.
It is recommended to place the machine no further than three meters from the pipes and no further than one meter from the outlet.
- The installation site should be prepared not at the expense of the usable space, the kitchen, which is used in some other way. For example, you should not place a dishwasher on a small countertop that is used for cooking; the placement of equipment should be as rational as possible.
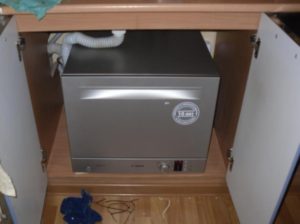
What places are we talking about? Where should I put this machine so that it performs its functions perfectly and does not bother anyone? Let's give examples.Firstly, the machine can be placed under the sink, where it will fit perfectly. Communications are close there and it’s convenient to get there. Besides, she won't bother anyone there. We wrote more about how to put the machine there in the article Compact under-sink dishwashers.
Secondly, the dishwasher can be placed on a free cabinet, if available. Thirdly, the machine can be hung on special mounts directly above the sink or table. This is generally an ideal place, since this way the dishwasher will not bother anyone at all and will always be freely available.
When choosing a place, you will have to use your imagination, since everyone has their own kitchen, with its own characteristics, including architectural ones. There are no universal solutions.
Consumables, tools
To connect a compact dishwasher yourself, you need to prepare thoroughly. Purchase all consumables and prepare the necessary tools. Now we will provide a list of everything necessary to install the dishwasher on a special shelf. We specifically chose just such a complex example for clarity. So, we will need the following components to equip the place:
- The strongest microwave rack (they come unassembled, so it will need to be assembled and hung);
The design load of these shelves is quite large, quite enough to accommodate a compact dishwasher. The main thing is that the dimensions of the shelf coincide with the dimensions of the dishwasher body.
- two dowels for attaching the shelf to a concrete wall;
- rubber pads that will need to be placed on the shelf.
 Our dishwasher, like any other, will have to be connected to the water supply and sewerage system, but this is easy to do only if everything is ready there. If there is no way to connect the machine to a water pipe or siphon, you will have to purchase additional components and organize everything. What do you need?
- Faucet with three standard ¾ outlets.
- Filter with mesh (flow-through, coarse).
- Sealant for threaded connections (Tangit Unilok type).
- Plastic or metal clamp for the drain hose.
- Siphon with a special side fitting for the drain hose of a dishwasher or washing machine.
Usually, almost all modern siphons have such a fitting, but if you don’t have one, then you need to purchase one. And if there is also a washing machine in the kitchen, you will need a special siphon, which is equipped with two fittings. You also need to take care of the tools in advance. Take a drill with a hammer drill and a screwdriver, they will be useful for attaching the shelf. Also take some pliers and a set of open-end wrenches to assemble the shelf. To connect the dishwasher directly, you will need a small adjustable wrench, pliers and a screwdriver.
Also keep in mind that if there is more than 1.5 meters from the place where the dishwasher is connected to the pipes to the installation site, the length of the standard hoses will not be enough. You will have to buy adapters for extension and additional hoses: inlet and drain.
Installation instructions
Stop preparing, it's time to get to work. We assemble the shelf according to the instructions that came with it. We check that all fastenings are reliable and free of defects. Our shelf must be strong. We drill holes in the wall, hammer plastic dowels into them and screw our shelf.We make sure that the shelf is securely fastened to the wall, lay a rubber backing on it and try to place the dishwasher on it.
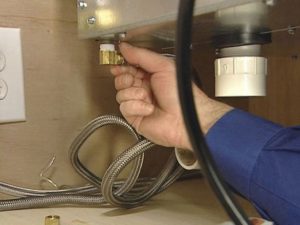
Now we prepare the connection points for the dishwasher to the sewer and water supply with our own hands. First, we turn off the cold water in the house, and then disconnect the pipe line leading to the faucet in the kitchen with the supply hose. We install a tee tap on it so that the outlet on which the tap is located remains free. We screw the filter to this free outlet.
Tighten the threaded connections carefully and do not forget about the sealant. It should be wound against the thread.
Next, install the siphon and you can start connecting the dishwasher. First, stretch the drain hose to the siphon fitting, put the end of the hose on this fitting, securing the connection with a clamp. We screw the inlet hose to the free thread of the flow filter, which we previously screwed to the outlet of the tee tap. We check the connections so that they do not drip and carry out the first test of our new “home assistant”.
So, in general, we figured out how to connect, as well as how best to install a compact dishwasher. If you have all the tools and components, everything can be done effortlessly in 30 minutes. But don’t rush; in your case, the main thing is not speed, but quality. Check everything several times before moving from one stage of work to another. Care in this matter is very important. Good luck!
Interesting:


Reader comments
- Share your opinion - leave a comment
Categories
Washing machine repair


For buyers


For users


Dishwasher


Add a comment