How to connect the motor from a washing machine (motor)
 If you still have a washing machine motor, you can figure out how to use it. For example, you can make a sharpening machine out of it. If you attach a special attachment in the form of a round sharpening stone to it, you can sharpen knives, scissors, an ax and other tools.
You can also use an electric motor from a washing machine in construction. For example, when creating a foundation for a future house, you can make a “vibrator” out of it, which will be useful when shrinking the concrete solution. It can also be used for other purposes. The engine can rotate various attachments and set in motion any mechanisms.
Using your imagination and skills in such matters, you can come up with a wide variety of ways to use an electric motor. And of course, when implementing any use case for this motor, you will need to connect it.
How to connect the electric motor of a modern washing machine?
If you need to connect the electric motor of a modern washing machine to an alternating voltage network of two hundred and twenty volts, then you should take into account the features of this part. Their features are as follows:
- They do not need a starting winding.
- You don't need a starting capacitor to start.
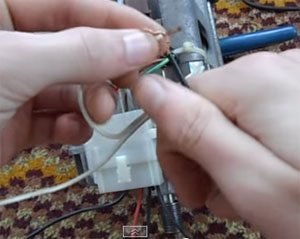
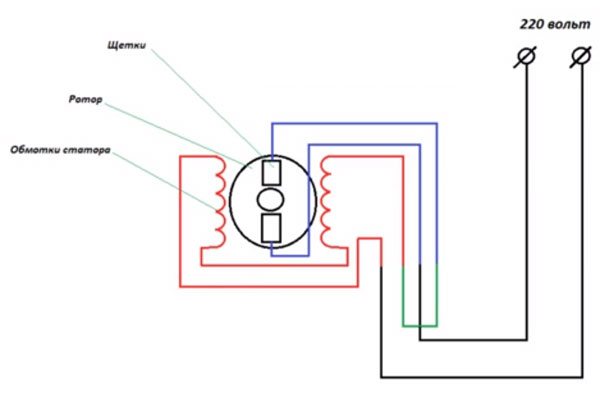
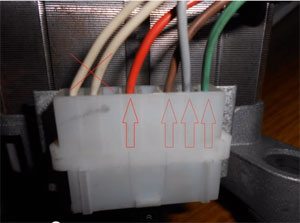 To start, we need to properly connect the wires on the engine. We will not use the two white wires that are located on the left. They are necessary to measure the speed of the electric motor. The next one in order is the red wire. It goes to the stator winding. Behind it is a brown wire. It is also directed to one of the stator windings.The gray and green wires are connected to the motor brushes.
In order to present the connection diagram to you more clearly, we have prepared the following diagram:
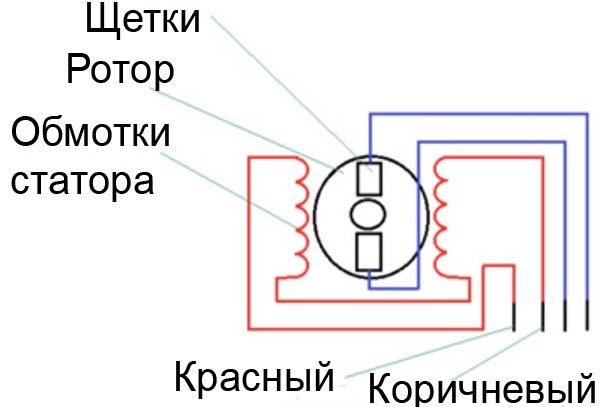
We will connect one 220 volt wire to one of the winding terminals. On the next one we will connect one of the brushes. We connect the second 220 volt wire to the remaining brush of the washing machine motor. So, as shown in the diagram below:
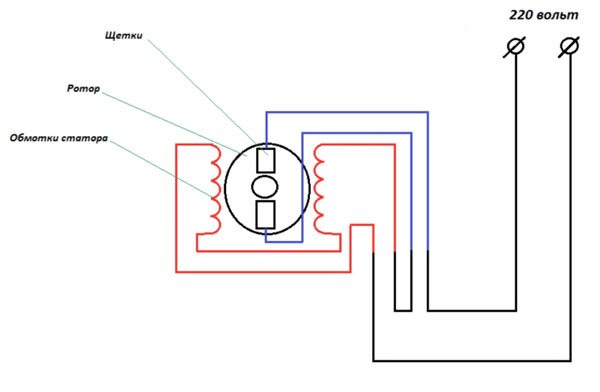
After this, you can turn on the engine to the 220 network and check its performance. If you did everything correctly, you will see how the moving part of the motor rotates and hear the noise of its operation. If everything went well, then the engine is ready for use. By the way, with this connection it moves in one direction. What needs to be done to change the direction of rotation? See diagram:
As you can see from the schematic display in the figure above, in order to change the direction of rotation we needed to swap the connections of the motor brushes. After reconnecting the engine, check its performance again by connecting it to a 220 volt network.
By the way, in order to make your work easier, we decided to add video instructions. Which describes the entire process of connecting the motor from the washing machine to electricity.
The method of connecting a motor from a modern machine in this article is based precisely on the material presented in this video. Therefore, let’s thank the author of this video and watch it very carefully:
How to connect the motor of an old car?
Connecting a machine's electric motor correctly is not so easy. But if you know how to do it, then it won't cause problems.
First we need to find two output pairs. In order to understand where they are, we can use a multimeter (tester). Let's select one of the winding terminals and connect the tester probe to it. With the remaining probe of the multimeter, we will check the other leads to find the paired one.
This way we will find the first pair. The two pins that remain form another pair. Now we need to understand where the starting and working windings are. To do this you need to measure the resistance. The starting resistance will be greater.
Scheme
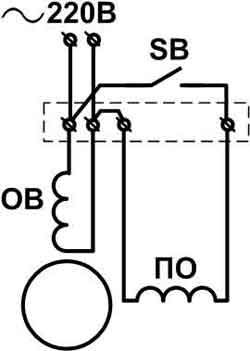 And so, we have already found the working and starting winding. Now we can connect the motor using the schematic diagram that you see next. The diagram shows:
- PO – starting winding. It is needed in order to create an initial torque in any direction.
- OB – excitation winding. It is also called the working winding. It is needed to create a magnetic field of rotation.
- SB – switch (button) for short-term switching on of the software to an electrical network of two hundred and twenty volts.
If there is a need to change the direction in which the motor will rotate, you will need to swap the software pins. With such a change, the direction of rotation will change to the opposite.
When you test connect and start the engine, do not forget to take care of your safety and the safety of those around you. Be sure to secure the motor. This will prevent strong vibrations and unnecessary movements.
We hope that this post helped you cope with connecting the washing machine motor yourself. Keep reading our site and have a nice day!
Interesting:


27 reader comments
Add a comment
Categories
Washing machine repair


For buyers


For users


Dishwasher


Everything would be fine, but the motor from the ARDO has 8 outputs, 4 of them are from the stator, and what should we do???
2 of them are thermal relay, 2 are stator
Thank you so much!!! that you help electrical enthusiasts.
Thank you very much, this is a very useful diagram!
Super article! Everything is very clear, exactly the same engine started on the first try
Thank you. 10 points. I would like to see the connection diagram using a speed sensor. Thanks again
if there is such a possibility
email engine from standard Atlant machine .8 leads
Thank you. 10 points, how to reduce engine speed?
How to reduce the speed of an asynchronous motor from a washing machine. Thank you, Evgeniy
Can I dig up a speed controller somewhere?
Very useful information, most importantly everything is clear. Thank you
Everything is available. Thanks for the info. I especially wanted to mention the word “resistance”, I smiled. )
The starting resistance will be greater.
Sorry, but it doesn’t sound like something electrical, resistance is true, but not more, but vice versa. Mislead people.
Thank you very informative 5+
Visually, intelligibly. Thanks a lot.
Simple and brilliant!
Connected email. washing machine motor, now I want to resume the function as before, how do I get to the right wires for the machine to work???
I have a motor in rewind, 24 slots step 5-7, tell me what the winding diagram is, everything is burnt!
What is the connection diagram for stator windings with parallel connections?
Hello. I have two motors from different models, and they each have 5 pins. What to do?
How to connect if there are 9 wires?
Thanks Bro!
And if the engine is connected in parallel and the speed controller is connected to the collector circuit, will there be a significant drop in power?
The motor from the Ardo tl800x-1 washing machine has 9 pins, 4 pairs of different colors and one black. Does anyone know how to connect?
Motor MIELE 606\2, only the stator has 8 leads. 2 thermal relays, 2 tachogenerators. How to connect?
If the pinout consists of 9 wires, then look carefully: there are two brushes, two wires are visible. Two on the frame in the center are a Hall sensor (not needed), two are a thermal relay (not needed). And three wires from the stator winding side. Left and right (needed). And the middle one is the central one (not needed). And then, as the author of the video did! Good luck :)