Instructions for washing machine Vyatka Katyusha 722r
 So, the Vyatka Katyusha washing machine was delivered to your home from the store in its original packaging. And of course, I want to open it and test it as soon as possible, but there is no need to rush in this matter. First, carefully read the instructions for this washing machine, and only then perform any manipulations with the equipment. Well, if you are too lazy to read the factory instructions, look at its abbreviated version, which we provided in this article.
Installation, adjustment and connection
To begin, carefully open the package and remove the washing machine. There is no need to tear the box, please be careful. Next, you need to remove the transport elements. In the picture below you see a schematic image and a brief description of the procedure for removing these elements.
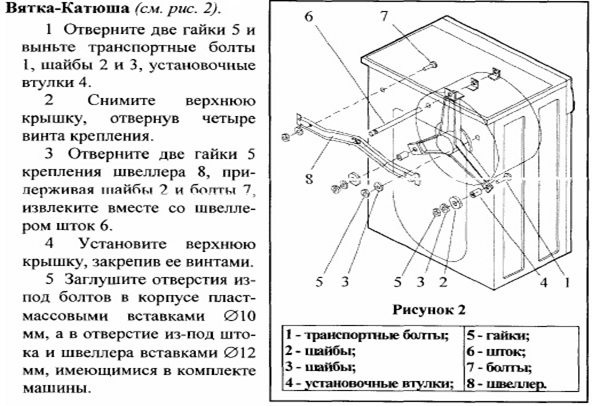
Thanks to the transport elements, the drum cross is securely fastened and cannot rotate while the washing machine is being transported.
After you unscrew all the above parts, you need to put them in a safe place so that later, when you need to transport the machine, you can return them back. Now we need to drag the Vyatka Katyusha 722r machine to where it will be permanently located. By the way, the place for such placement should be prepared in advance:
- the floor is strengthened and leveled (at least relatively);
- any carpeting has been removed, instead you can lay anti-vibration mat;
- there must be service communications (water supply, sewerage, electrical outlet) in the immediate vicinity of the machine body;
- there should be a gap of at least 1.5 centimeters around the body of the machine, the gap between the bottom of the washing machine and the floor should be about 1 cm.
Once you can properly prepare the area for the washing machine, you can drag it there and begin leveling it. The washing machine body must be installed strictly level, the difference is allowed no more than 2 degrees. To level the body, you need to tighten the legs of the machine. To do this, you must first loosen the locknuts on the legs, and then unscrew the legs to the desired height. It is necessary to ensure sufficient clearance between the floor and the body, and most importantly, level the machine, otherwise it will produce more noise during operation.
Next, you can begin connecting the machine. The instructions indicate that to connect a Vyatka Katyusha washing machine, a separate electrical outlet with grounding is required. It is powered from a 1.5 square meter copper wire. mm or aluminum per 2.5 sq. mm, and this socket must be protected automatically. We will plug the power cord into the outlet last, first we will connect the machine to the water supply and sewerage system. How to do this is described in the article Do-it-yourself installation and connection of the washing machine.
Elements of the machine and their purpose
Before you start using the Vyatka Katyusha washing machine, you need to learn about the purpose of all its most important elements. This is especially true for control panel elements, because you need to know how to use its knobs and buttons. So, let's list and briefly describe the most important external elements of the washing machine, with which the user directly interacts constantly.
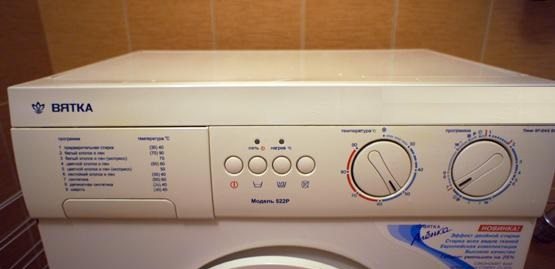
- Hatch door with locking mechanism and handle.The hatch door reliably isolates the drum during washing so that water does not spill out of it. To ensure that the door closes well, monitor the condition of the hatch cuff and the locking device.
Be careful with the door handle; on the Vyatka Katyusha washing machine it is quite flimsy.
- Powder tray. A special drawer where detergent is placed before washing. In some cases, it is permissible to put detergent directly into the drum.
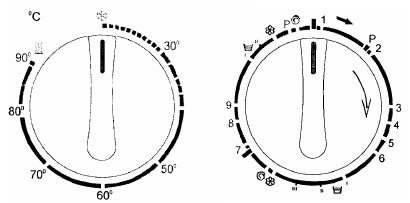
- Program selection knob. It is located on the control panel on the far right side. Using this handle, you can select any of the washing modes presented.
- Handle for regulating water temperature. Located next to the program selection knob, its name speaks for itself.
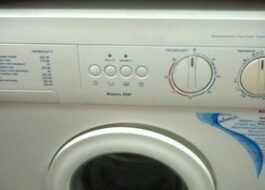
- Buttons. There are 4 buttons located immediately behind the handles. The first button on the handles allows you to turn off the spin, the second activates the half-load mode, the third allows you to pause the wash, and the fourth turns the machine on and off.
In addition to the indicated elements, there are two light bulbs on the control panel of the Vyatka Katyusha washing machine. One indicator notifies the user that the machine is turned on, and the second indicates that heating is occurring.
Installation of a bin for detergents
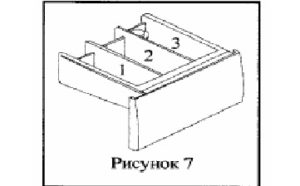 The powder receiver of the Vyatka Katyusha washing machine is designed extremely simply, and it looks like most automatic machines. This is a rectangular retractable drawer, opening which we can see that the internal space is divided into 3 compartments:
- the first compartment, counting from left to right, is necessary for soaking the laundry; if soaking is not planned, there is no need to pour powder there;
- the second compartment is for the main wash, where we pour the powder most often;
- the third compartment is used for any special additives, from simple “blue” to high-quality conditioner.
Before putting the powder into the hopper, make sure that there is no detergent left in it from the previous wash.
Before and after washing
Immediately before washing, dirty laundry should be sorted by type of fabric, color, degree of soiling, etc. Separate the amount of laundry so as not to overload the machine drum. Each item must be carefully inspected so that nothing is accidentally left in your pockets. If there are poorly sewn buttons or holes, the item needs to be repaired. Some items will need to be turned inside out; if the laundry has zippers, they will need to be zipped.
When sorting laundry, be sure to look at the labels. They contain information that will tell you how to properly wash this or that item. Do not load too little laundry into the machine, but you also do not need to put too much, optimally from 1.5 to 3 kg with a maximum load of 4.5 kg. Having sorted the laundry and put it in the drum, you can start washing.
- Close the hatch door tightly.
- Pour the powder into the tray and close it.
- Press the button furthest from the powder receptacle and turn on the washing machine.
- Set the temperature and select the required program. As soon as the program is selected, the wash will begin immediately.
- As soon as the program selection knob is turned to the “stop” position and the hatch is unlocked, you can remove the laundry.
After washing, be sure to turn off the power to the machine and turn off the water. Use a dry cloth to wipe the inside of the detergent bin. You also need to wipe the hatch cuff, the inner walls of the drum and the front panel if droplets of moisture have gotten on it.Do not close the hatch after washing; in general, the hatch should be kept closed only during washing; in all other cases it should be kept open.
Well, we have retold the basic information contained in the original instructions. If factory instructions are required, you can find them below the text of the publication. We hope you find what you are looking for. Good luck!
Interesting:
Reader comments
- Share your opinion - leave a comment
Categories
Washing machine repair


For buyers

For users

Dishwasher




Add a comment