Manual for washing machine Indesit WISL 102
 The instruction for the Indesit WISL 102 washing machine is written in great detail. It covers the most varied nuances of operating the “home assistant” of this brand, but not everyone wants to read it in its entirety. Moreover, the vast majority of users either do not open it at all, or read only 1-2 sections. We decided to prepare an abridged version of the instructions, which highlighted only the most important thing. We hope in this case, you will read it to the end.
About the installation location and connection
If you previously had a washing machine and you purchased the new Indesit WISL 102 instead, then there will be no problems with the installation location and the connection. But if you purchased a washing machine for the first time, you should equip a place for it in accordance with the following requirements.
- The place of installation of the washing machine should be free of interior items and there should be a convenient approach.
- Opposite the hatch of the washing machine should not stand anything.
- Within 1-1.5 meters from the machine body there should be points of connection to all necessary communications.
At the connection point of the washing machine, the following must be equipped: a moisture-proof electrical outlet, a tee tap embedded in the water pipe, a siphon with an outlet for the drain hose.
- The floor under the car body must be smooth and strong, mats, carpets, carpet and so on should not be laid on it.
- The gap between the machine and surrounding objects must be at least 1 cm. Between its rear wall and objects - 10 cm.
Proceed to connect our new machine. In the washing machine Indesit WISL 102, the instructions from the manufacturer describe this process in quite some detail, so that we restrict ourselves to the general procedure. And if you want to learn more about the nuances of such a connection, read the article DIY installation and connection of a washing machine.
First, we remove the transportation bolts, plug the holes for them, and then drag the washer to a previously prepared place. We align the case, disconnect the inlet hose from the fasteners, insert the sealing rings and screw one end of this hose to the machine's water inlet, and the other to the tee tap. Make sure the connections are tight enough.
Next, connect the free end of the drain hose to the siphon outlet. The drain hose must not be connected to a preload, it is necessary to arrange a bend so that sewer odors do not penetrate the washing machine and a "siphon effect" does not occur. With the connection to the power supply, everything is simpler, we insert the plug of the power cord into a power outlet and you can make a trial run.
Dispenser device
The powder tray of the Indesit WISL 102 washing machine has a rectangular shape, a convenient protrusion for which you can take to remove it and push it back. There are 4 compartments, 3 of which are stationary and one mobile, removable. What is the purpose of these compartments (numbering from left to right)?
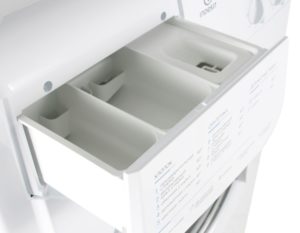 The first compartment is needed for soaking. For the indesit WISL 102 washing machine, the instruction calls its pre-wash compartment. In principle, this is one and the same, only our option is clearer.
- The second compartment is used for the main wash. Everything is simple here, I wanted to wash it as usual, poured powder into the second compartment and wash it to my health.
- The third compartment is needed in order to pour air conditioning there. From the air conditioner things will be soft, pleasant to the touch, in addition, they will exude a magnificent aroma.
- The fourth compartment is not constantly in the dispenser. It is installed, if necessary, directly in the compartment at number one. This compartment is needed in order to activate the whitening mode.
For the WISL 102 machine, the instructions for use indicate that compartment No. 4 should not be left inside the dispenser during washing, unless you intend to turn on the bleaching mode. In other cases, it will interfere.
How to start a wash
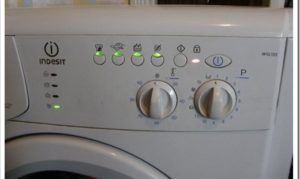 For the WISL 102, the operating instructions describe the launch of the "home assistant" as follows. First, turn on the machine. If all the indicators light up for a couple of seconds and then go out, and the power-on lamp blinks, then everything is in order, the machine is ready for operation.
Next, load the laundry. By the way, the first time you need to wash without laundry, so that the inside of the machine rinsed from factory dirt, well, then everything is as usual. With the mode selector, we determine the washing program you like. Turning the “Temperature” knob, we set the desired water temperature. Open the dispenser and add the powder, if necessary, pour also the conditioner. Further, the "key to start" in the sense of, click on the Start button, and, as they say, you can wait until the machine does the rest for you.
Car wash
The washing machine automatic machine of the Indesit brand is too useful a technique in the household to just throw it at the mercy of fate. For her, like for any other equipment, you need to monitor and care, otherwise sooner or later she will let you down.
- After washing, take a dry cloth and wipe all the rubber bands, the inside of the hatch door, the inside of the drum and the powder receptacle. There should not be excess moisture.
- At the end of washing, do not lock the "home assistant". At least the first 2-3 hours, the hatch and dispenser must be open for ventilation.
- When you finish washing, always turn off the water and unplug the power cord from the outlet for your own safety.
- At least occasionally rinse the powder tray, the trash filter and the flow filter of the filling valve. About, how to clean the filter in an Indesit washing machineread in the article of the same name.
Well, here we have set out the shortest version of the instructions for washing this model. We hope that its provisions will be clear to you, and you won’t make typical user mistakes, so you won’t have to repair the machine. Good luck
Interesting:


Reader Comments
- Share your opinion - leave a comment
Headings
Washing machine repair


For buyers


For users


Dishwasher


Add a comment