After repairing a non-separable tank, you need to think about how to put it back together, that is, put the drum in place and seal the tank. More precisely, you need to glue the halves of the tank so that this unit again turns into a waterproof monolith. To achieve this, you not only need to know what to glue with, sealant or something else, you need to know how to glue, and ordinary people and even some craftsmen have problems with this. Let's look at this issue in more detail within the article.
Why gluing?
Manufacturers of automatic washing machines, for example Indesit or Ariston, put a “real pig” on the craftsmen by making the tank of their equipment non-separable. It is understood that the user must change this entire unit of the washing machine due to bearings or some other small detail. In Europe, anyone can do such nonsense, but in our country they will repair the unit anyway, and the fact that it is non-separable is unlikely to stop anyone.
As a result, the repair will be carried out, but the problem will be how to restore the tank after such a repair, because in order to get to the key parts we needed to saw it in half. The first thought is to seal the tank with sealant. But the sealant, no matter how good it is, will not provide sufficient structural strength. Conclusion: in order to reliably connect the two halves of a plastic tank, you need to twist them with bolts and nuts, and seal the gap between the halves of the tank with sealant, ensuring water resistance.
Experts advise not to skimp on sealant. After all, you must admit, it would be a shame to re-disassemble the washing machine tank and re-glue it if the junction of its two halves leaks.
If you are interested in more detailed information on how to implement DIY washing machine tank repair, read the article of the same name on our website. It describes in detail, including, disassembling the tank and its further assembly.
Overview of adhesives
We have, in general terms, figured out why to seal the tank and drum of a washing machine with sealant. Now let's decide on the question of what sealant to use. Some users do not see this as a problem, noting that almost any modern sealant is good enough to provide reliable waterproofing and there is no need to look for something special for this. Let us beg to differ with this statement. It is important to consider that:
during operation, the tank and drum are subject to severe vibration;
the tank will either heat up or cool down;
Water will be poured into the tank, in some cases under pressure, which will also affect the sealed connection.
So you shouldn’t take idle tales into account. After all, it is much more effective to simply go to the store with the firm intention of buying a suitable sealant to glue the tank and drum of the washing machine. And after the repair, do not regret anything, and do not redo anything.
It is first necessary to study the list of the most suitable compositions that experts have identified for us.
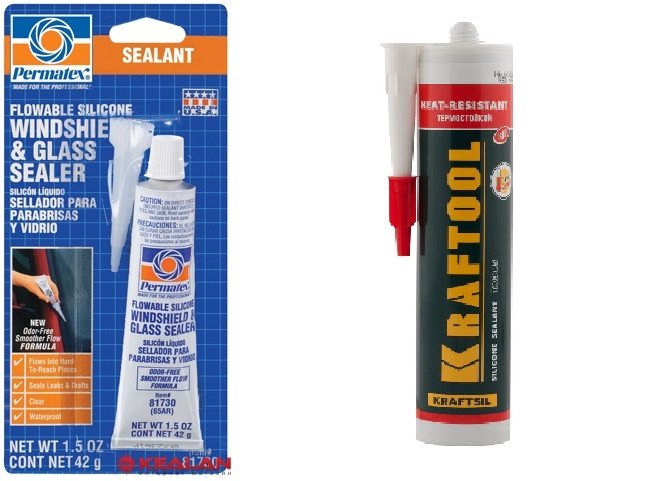
Permatex 81730 is a sealant that is specially made for sealing car windows, headlights and more. It is designed for harsh street conditions, which is exactly what we need. The sealant performed well, our craftsmen often use it to glue the tank and drum after repair - the result is excellent, no leaks have been recorded. The average cost of a 42 g tube (all goes to the tank) is $3.
Highly elastic sealant Kraftool A very resistant sealant that can withstand temperatures up to +250 degrees and high vibrations, since it was originally created for sealing connections in engines, pumps, and fireplaces. Using it to seal the tank and drum of the washing machine after the repair is completed is a nice thing, it holds very well, even without bolts. Our craftsmen use it most often because it is of high quality, cheap and the tube is enough for 3-4 tanks. Price 3.8 dollars.
F This is no longer a sealant, but a polyurethane glue. It is specially created for those who are looking for something truly killer. This glue will firmly connect the halves of the tank and drum after repair. It will not be possible to tear it off, you don’t even need any bolts - 2-3 hours and gluing is guaranteed. Our specialists don’t use it, because it’s a bit expensive, and the bolts are still more familiar and convenient, in case they have to take it apart again, but with such glue you won’t be able to take the tank apart a second time, you’ll have to cut it again. Price – 11.5 dollars per 310 ml bottle.
ABRO 11AB-R. An excellent super durable sealant suitable for almost any, even very harsh conditions. Withstands colossal temperatures, mechanical and chemical influences. It is difficult to dissolve even with sulfuric acid, so the tightness of the connection between the tank and the drum of the washing machine after a major overhaul can be easily ensured. The average price for an 85 g tube of sealant is $6.
In this case, any moisture-resistant sealant will not work, so carefully study the above list.
How to fasten the halves of the tank?
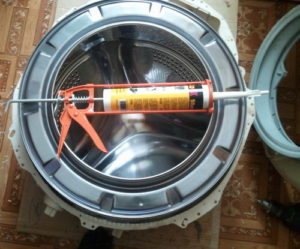
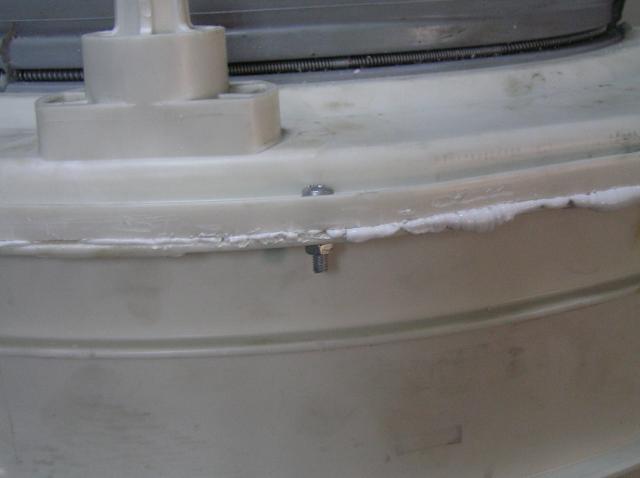
Everything is simple here. If you have prepared the tank and drum of the washing machine in advance for subsequent assembly after repair, you will not have any difficulty in fastening the tank halves together. The trick is to drill 3-4 dozen small holes across the seam just before sawing the tank, so that after you break the tank into two halves and repair it, you can easily align the holes with each other and perfectly connect these halves.
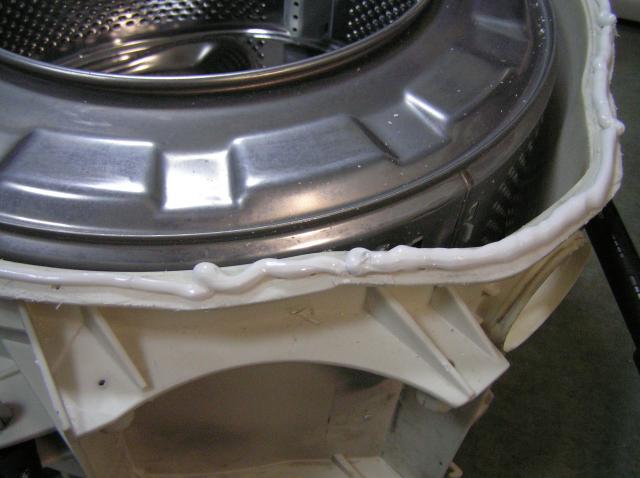
Accordingly, now we only need to generously lubricate the joint of the halves of the washing machine tank with sealant, connect them and tighten them with bolts. Screw in the bolts immediately, no need to wait for the sealant to dry. Drying will occur in a couple of hours, but immediately the sealant will set enough to keep water out.
Remember! There is no need to save sealant, but there is no need to smear it too much, otherwise you won’t be able to glue the drum to the walls of the tank before you wash it (just kidding).
In conclusion, we note that if you correctly screw the halves of a non-separable tank together with bolts, and also lubricate the seam with the correct sealant, then in the future there will be no problems with the connection of the tank of your washing machine. Happy renovation!
Hello, after assembling the tank and installing it in the s.m. It drips a little and the water supply does not turn off. I took it off, missed it, but what to do with the constant supply of water? It was working before the analysis.
Please note at the bottom of the tank there is a small flask with a fitting at the top; a thin hose goes from it to the pressure switch.When washing, pressure is created in the flask. Most likely, air is leaking through it, the pressure switch does not work and does not shut off the water supply.
Feels great on them. Because when screwed in, the self-tapping screw passes through a layer of sealant, which, after setting, seems to counter it. And prevents it from spontaneously unscrewing due to vibration.
Hello! What sealant can be used if the tank is collapsible, but since the sealing rubber is no longer new.Is it better to be on the safe side so that it doesn’t damage the tires?
 After repairing a non-separable tank, you need to think about how to put it back together, that is, put the drum in place and seal the tank. More precisely, you need to glue the halves of the tank so that this unit again turns into a waterproof monolith. To achieve this, you not only need to know what to glue with, sealant or something else, you need to know how to glue, and ordinary people and even some craftsmen have problems with this. Let's look at this issue in more detail within the article.
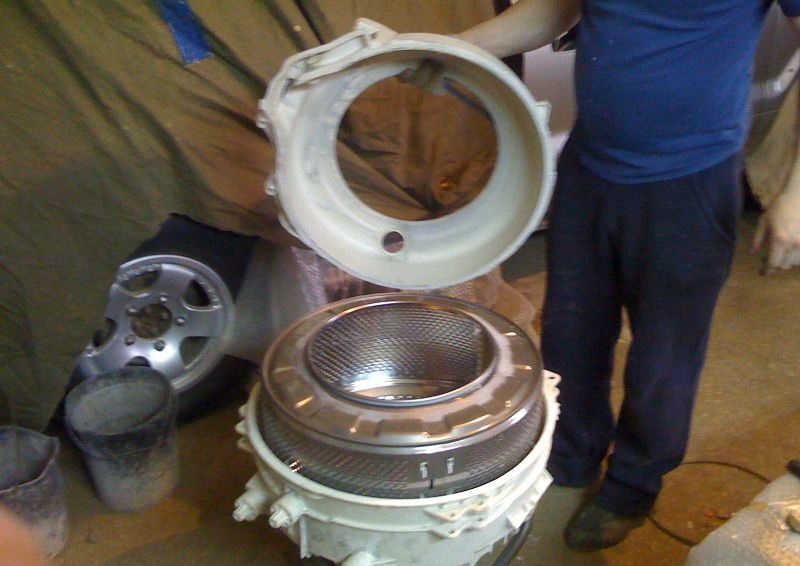


Hello, after assembling the tank and installing it in the s.m. It drips a little and the water supply does not turn off. I took it off, missed it, but what to do with the constant supply of water? It was working before the analysis.
Please note at the bottom of the tank there is a small flask with a fitting at the top; a thin hose goes from it to the pressure switch.When washing, pressure is created in the flask. Most likely, air is leaking through it, the pressure switch does not work and does not shut off the water supply.
We also have a set of water, but we sealed the bath in the water regulator system, we are disassembling it again, we found the error ourselves.
Thank you! Your information is important.
Hello, can I only use DINITROL F 500? It just won't glue the parts of the tank together?
Silicone sealant 50ml. Belife (white/transparent). Used it with screws, tank leaked. Crumble like foam rubber. Complete out!
Good evening. I did not make any holes before disassembling the tank. Is it possible to twist the halves with self-tapping screws?
Feels great on them. Because when screwed in, the self-tapping screw passes through a layer of sealant, which, after setting, seems to counter it. And prevents it from spontaneously unscrewing due to vibration.
Please tell me, is Zanussi’s vertical tank also non-separable?
There is no need to disassemble it at all to replace the bearings.
Thanks for the tip, I did everything and the leaky sealant started flowing right away. Now the new glue looks normal.
Hello! Please tell me the catalog number of Kraftool sealant, I really liked the article! Thank you
Hello! What sealant can be used if the tank is collapsible, but since the sealing rubber is no longer new.Is it better to be on the safe side so that it doesn’t damage the tires?