Homemade concrete mixer from a washing machine
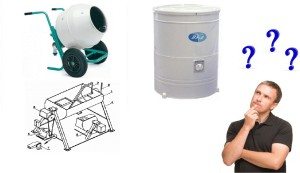 The years of total shortages are behind us; now in stores and shopping centers you can buy anything, from building materials to machinery and equipment; there are no problems with household concrete mixers either. But the trouble is, they are not cheap at all, and sometimes it’s not even a matter of price. For example, you need it only for the period of construction and repair work, there is no point in buying it and there is no one to rent it from - what to do? The solution may be a concrete mixer from a washing machine, which you make yourself.
Is it worth making such a homemade product?
If your hands grow from the right place, and you like to “tinker with hardware,” then this article is for you. “Without further ado,” you can very cheaply make an extremely useful item for your household, use it yourself, and then rent it out to friends and relatives. Many people are skeptical about homemade items, believing that factory made is always better, but in reality this is not always the case. Let us present arguments in favor of making a concrete mixer with your own hands.
- A homemade concrete mixer costs a penny, but its benefits are exactly the same.
- A homemade concrete mixer can be made according to an individual drawing, for example, taking into account the size of the body or trunk of your vehicle on which this concrete mixer will be transported.
- It’s easier to deal with a homemade product if it breaks down during operation, because you made it yourself, which means it will be easier for you to fix it.
- You will finally find a worthy use for parts from an old washing machine that are lying around in your garage, shed or on the balcony.
We have decided on the advantages, now let’s talk about the obstacles, and there are also quite a few of these obstacles. Here are some of them.
- Making a makeshift concrete mixer takes time, and the time investment is quite significant.
- You need to be able to “handle hardware” and have a desire to work, otherwise, it’s better not to start this business.
- You need to have an idea of the end result, an idea and the necessary materials and components for the work.
Important! To make a concrete mixer, you need to understand a little about electrics in order to be able to connect its motor according to the instructions.
What materials will be needed and what to do with them?
The design of a homemade concrete mixer with an engine is not that complicated. It consists of three main elements: an engine that drives the container with concrete, the container itself with an axle, and the base on which the entire structure rests.
When selecting materials and components, you need to already have an idea of what size the concrete mixer will be. A large concrete mixer has a large capacity and will be able to mix a lot of concrete at a time, but it will require a powerful motor (not suitable for a washing machine). In addition, you cannot fit such a unit into a passenger car; you will have to order a truck for transportation, and this is inconvenient. It is better to make a concrete mixer with a small container; it is easier to move, and it is also easier to find parts for it.
First, let's prepare the tools. We will need a drill, a step drill, a hacksaw or grinder, welding, screwdrivers and files, a set of wrenches and pliers. The materials we need are: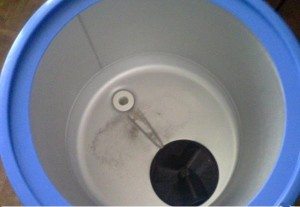
- Concrete mixer container.As a container for a concrete mixer, you can use a drum from a washing machine with sealed holes, or a round tank from an Oka washing machine, although it is quite large. Some even use old cans and flasks as containers.
- The engine is from an old washing machine. The engine is also the main element that makes the concrete mixer work. You will have to install and connect it yourself. By the way, thanks to such an engine you can do DIY emery from a washing machine, but this will be discussed in another article.
- Metal corner 50x50. We will need it for the basis of a future concrete mixer.
- The insides of an old washing machine such as Siberia, Oka or Vyatka. Elements from front-loading washing machines are partially suitable.
- Two wheels. You can take it from an old wheelbarrow or cart, the main thing is that it can withstand significant weight and move well around the site.
- Metal rod 4.5 cm. The rod is needed from durable hardened steel, since it will play the role of an axis, which will take on the weight of the structure. You will need to put wheels on it.
- Metal strips 50 mm wide and 4 mm thick.
- A piece of pipe with a diameter of 30 mm.
Important! You will also need a large number of different components: gears of different sizes, a drive belt, bolts and nuts of different sizes, a gearbox, etc. A lot can be found by disassembling an activator washing machine.
Assembling the structure
 First, we need to weld a powerful and comfortable frame from corners so that the structure is as stable as possible, and the concrete mixer can be conveniently rolled from place to place. We suggest you pay attention to the “Swing” type frame. Such an element will perform 3 functions at once: a powerful base that will not be broken even by the maximum load, will allow the entire structure to be easily moved and will make it possible to quickly remove concrete from the concrete mixer container when necessary. We do the following:
- We cut two 60 cm pieces from the 50x50 corner - these will be the bases for two triangles.
- We cut off 4 pieces of 80 cm from the same corner - these will be the thighs of the triangles, fold the triangles and weld them securely at the corners.
- We place the triangles opposite each other, place two pieces of corner 50 cm long on their reeds and weld them together - we get a stable structure of 2 connected triangles.
- We take a pipe with a diameter of 30 mm and cut it so that one end lies exactly on one upper corner of the triangle, and the other on the opposite upper corner of the other triangle.
- We weld two large nuts to the tops of the triangles, one for each top. The nut hole should be 1 mm wider than the pipe diameter.
- We drag the pipe through the nuts and press the ends so that the pipe rotates freely on the tops of the triangles, connecting them, but cannot jump out. Half of the frame is ready - this is the base.
- For the upper part of the frame, as well as for the swing, we need two pieces of a 50x50 corner, 1.4 m long. We lay them parallel, 40 cm from each other.
- We take three sections of a 40 cm corner and connect two parallel sections like a ladder.
- We find the middle of our ladder, then apply this middle across to the movable pipe of the base of the structure and weld it firmly. We got a real little swing, since the ends of our ladder can rise and fall completely freely.
Important! To make the structure stronger, you can manually weld additional rods or angles of smaller diameter across the triangle’s hips and in other places, creating a strong stiffener.
The base for the concrete mixer is prepared. Now we need to install our container. We place our barrel on one end of the “ladder” so that most of its body is in contact with the metal corner, and securely weld it to both parallel corners. The bottom of the container should face the tops of the triangles. It is better to use the tank of the Oka activator washing machine as a container., since it already contains an activator, which can be perfectly adapted for mixing concrete.
Of course, the activator will have to be significantly modified before use. More precisely, we only need a mechanism; the plastic activator itself can be unscrewed and removed. What are we doing?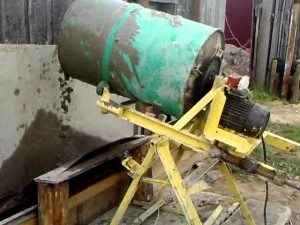
- We take two steel strips 50 mm wide, 4 mm thick and 90 cm long.
- We bend two oblong staples from them.
- We thread the pre-prepared axle through the thread of the washing machine activator so that its end is 5 cm into the washing tank, and we put a nut of suitable size on this end.
- We drill a hole in the center of the base of each bracket with a diameter corresponding to the diameter of the axle and put the brackets on the part of the axle that is in the washing tub.
- We move the brackets apart so that their bases are crosswise, put a nut of suitable size on the axle and secure it with welding so that the brackets do not jump off the axle.
What did we get? Now, if we grab the axle of our unfinished concrete mixer from the end opposite the end in the container, we can check the rotation of our mechanism, which will mix the concrete in the barrel. If done correctly, the blades that were previously the ends of the brackets will spin in a circle inside the barrel. To make concrete mixing more efficient in the future, the ends of the staples need to be twisted in a spiral half a turn using pliers (might require significant effort).
For your information! There is a drain hole at the bottom of the washing tank of the former machine; now we won’t need it and can weld it shut or just plug it well.
It's time to connect the motor to the opposite end of the axis of our homemade unit, unless, of course, you plan to make a manual concrete mixer. Doing this yourself is not very difficult, but you will need to understand the principle of connecting the engine to the network. You can watch this in the video below or find video instructions on the Internet.
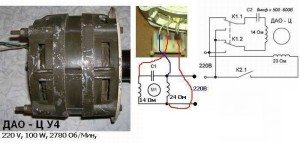 Installing the engine does not end with connecting it; we will first need to secure it to the frame of the concrete mixer and protect it from the rain with a casing. We drill holes in the corner of the ladder for fasteners that will hold the engine. There are holes in the engine housing for fastenings; they need to be aligned with the drilled holes, insert the bolts into the holes and tighten with nuts. The engine casing can be made from an old car inner tube.
Important! When making a casing for the engine with your own hands, do not try to close it completely; leave holes on the sides to avoid overheating.
The engine must be installed on the frame so that its pulley does not reach the edge of the axle by 2-3 cm.The pulley will have to be connected to the axle through a flange.
- We take a 3.2 cm piece of pipe, put one end on the axle and the other on the engine pulley.
- We drill holes on both sides, using a 4mm drill, to go through the flange and pulley and through the flange and axle.
- We pass bolts of suitable sizes through the holes and tighten them with nuts.
The engine is connected to the axle, now we connect it to a 220V network and check the operation of the concrete mixer. The advantage of our simplest concrete mixer is that when we need to drain some of the concrete from the container, we simply grab the end of the “swing support” on which the engine is located and lift it up. The barrel will go down and the concrete will flow out. The disadvantage of the design is that in order for the barrel to be located at the desired angle, we will have to place a special support under it in the form of a T-shaped crutch. But in general, such a concrete mixer, made from start to finish with your own hands, is quite functional.
Interesting:


Reader comments
- Share your opinion - leave a comment
Categories
Washing machine repair


For buyers


For users


Dishwasher


Add a comment