DIY do it yourself
Master classes, instructions, useful tips, recipes.
» »Master LED backlight
Thanks to such a simple invention as LED backlighting, various things and objects can be decorated with bright lights. For example, casual shoes, roller or hockey skates, etc.
In order to perform the illumination, we need a soldering iron with solder and flux, a 12V or 8V battery (The higher the voltage, the brighter our backlight will shine), LED strip, several wires and a toggle switch.

Master LED backlight


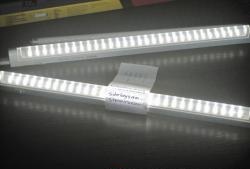
A large number of LED strips are now available, in our case we use a waterproof tape. This tape is very securely attached due to the adhesive surface.

Master LED backlight


It is best to take flexible wires so that they can be bent without risking breaking. Both copper and aluminum will do. The cross section of the wires is selected based on the amount of current that will flow through them. And since our LEDs consume very little current, the cross section will fit the most minimal. However, for high-quality soldering, the wires must be tinned, and the insulation of too thin wires will melt very much, so it is better not to use the strings.
For convenient turning the backlight on and off, any compact switch is suitable, in our case we use a 3-pin toggle switch. The toggle switches are also selected by current, but here, I repeat, it is very small.
We proceed directly to the soldering process. The greatest difficulty is the process of soldering wires to the battery. In order to reliably and firmly solder them, first we clean the metal contacts on the plus and minus with fine sandpaper or an ordinary knife. After that, we solder the wiring to the plus and minus on the battery, having previously tinned them.

Master LED backlight


After this, it is necessary to do the same procedure with the toggle switch. We also clean the contacts a little and solder the wires to them, and we take one wire from the battery minus. As we can see, the circuit is almost ready, only the LED strip is missing.

Master LED backlight


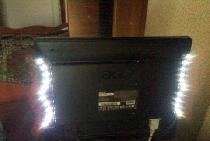
There are 2 pins on the LED strip: + 12V and GND. We take the wiring from the plus of the battery and solder it to the + 12V pin on the LED strip. The remaining free wiring from the toggle switch pin is soldered to the GND pin on the LED strip. In the photo below I present what we should get.

Master LED backlight

Master LED backlight

Master LED backlight
come back
Comments (6)
  1. Never mind
    #1 Never mind Guests April 20, 2013 13:04
    0
    Perhaps this is so hard? )))))
  2. Vladislav
    #2 Vladislav Guests April 21, 2013 04:34
    0
    Oh, complete nonsense, it will enlighten it for about 15 minutes from this gadget, it’s better to take a crown and instead of a giant toggle switch a small three-stage switch that can be removed from a children's toy, for example, will be much smaller and this big toggle switch will not stick out on the same skates . which is generally designed for 220 volts.
  3. Valek
    #3 Valek Guests September 6, 2013 17:56
    0
    Quote: Vladislav
    Oh, complete nonsense, it will enlighten it for about 15 minutes from this gadget, it’s better to take a crown and instead of a giant toggle switch a small three-stage switch that can be removed from a children's toy, for example, will be much smaller and this big toggle switch will not stick out on the same skates . which is generally designed for 220 volts.
    I completely agree with you and a topic that can be easily recreated without the help of the site and people!
  4. Allenberg
    #4 Allenberg Guests February 23, 2014 21:42
    0
    Quote: Vladislav
    Oh, complete nonsense, she’ll enlighten about 15 minutes from this gadget no more, it’s better to take the crown
    ...
    This gadget has 12 volts ...
  5. Yuri Martynov
    #5 Yuri Martynov Guests December 28, 2017 16:07
    1
    sorry did not notice the battery rating
  6. Yura
    #6 Yura Guests July 1, 2018 8:52 p.m.
    0
    Hello, please tell me if you have a scheme for turning on the LED backlight through a motion sensor. You can make and show photos. We are grateful for the scheme

Read also

Error codes for washing machines