1. So, we need a regular photo frame. I chose the cheapest, wooden photo frame in A4 format. In addition, I prepared several dry, thin twigs of birch. I prepared them in the fall, but now, in the spring, it is quite possible to pick such branches from any birch. Every woman has beads that she no longer wears. I also have these, and I decided to put them into business. I took a few red beads - they will symbolize a mountain ash in my composition. I also need paints: watercolor or gouache, green.

2. First, I prepare a photo frame for work. I take out and remove the glass from it and the back wall.

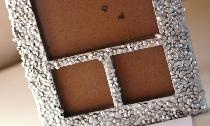
3. Then I proceed to the processing of birch branches. They should be cut with a knife into small pieces.

4. Once all the branches are cut, apply glue to the edges of the photo frame. Glue can be used differently, PVA, super moment or construction glue. I used construction glue, it is thick, dense, but it dries for a long time - about two hours.

5. Next, I lay out the branches in the photo frame, as shown in the figure. I do not recommend spreading the branches too close to each other. Better to have a short distance between them. But it is desirable that all branches "looked" in one direction.

6. As a result, we should get the same photo frame as in the picture - all in birch branches.

7. Next, we will spread on our composition berries of mountain ash, that is, red beads. They need to be glued using the same glue as the birch branches. You can lay out the beads in any order as you like.

8. Now the turn has approached the green paint. Using a brush, we apply green paint to the birch branches. Not everywhere, but selectively, as shown in the figure.

9. Then I insert the glass and the back wall back into the photo frame.

10. My final touch is a golden twig from a Christmas tree toy. I stuck it on the bottom corner of the photo frame. Instead of such a branch, you can use any artificial flower, or just a bow, or a beautiful satin ribbon of green or golden color.

Our beauty photo frame is ready! I called it spring, because it contains rowan berries, preserved from autumn, bare branches that have not yet “woken up” after winter, and bright green branches that are already full of strength. Such a photo frame can be hung on a wall or put on a chest of drawers, after inserting a beautiful photo into it.