DIY do it yourself
Master classes, instructions, useful tips, recipes.
» »Cube - paper transformer
An entertaining paper craft “Cube - Transformer” can be made independently in a few minutes.
For this we need - sheet A - 4, scotch tape, a ruler, a pencil. Instead of a ruler, you can use any flat plate.

Cube - a transformer from paper


We bend sheet A - 4 as shown in the figure.

Cube - a transformer from paper


Using scissors, we cut off the excess part by bending.

Cube - a transformer from paper


We got a square.

Cube - a transformer from paper


The resulting square is bent in half and cut into two equal parts.

Cube - a transformer from paper

Cube - a transformer from paper

Cube - a transformer from paper


For our transformer we need one rectangular part. We put the second aside, it will no longer be useful to us.

Cube - a transformer from paper


We bend the rest as shown in Fig.

Cube - a transformer from paper

Cube - a transformer from paper

Cube - a transformer from paper

Cube - a transformer from paper

Cube - a transformer from paper

Cube - a transformer from paper

Cube - a transformer from paper

Cube - a transformer from paper

Cube - a transformer from paper

Cube - a transformer from paper

Cube - a transformer from paper

Cube - a transformer from paper

Cube - a transformer from paper

Cube - a transformer from paper

Cube - a transformer from paper


Bends are carefully smoothed.
As a result, expanding we got a rectangle divided into even, equal parts.

Cube - a transformer from paper


Fold it in half along the central fold.

Cube - a transformer from paper

Cube - a transformer from paper


Now, using a ruler and a pencil, draw along the folds of the line.

Cube - a transformer from paper


We should get the ruler as shown in the figure.

Cube - a transformer from paper


It is important to note that the lining of the opposite sides is different from each other. If on one side the line goes through two squares, on the opposite side it goes through one and vice versa.
With the help of scissors, we make cuts strictly along the lined lines.

Cube - a transformer from paper

Cube - a transformer from paper


Expand and smooth the rectangle.

Cube - a transformer from paper


We cut the central part with scissors as shown in the figure.

Cube - a transformer from paper


We bend the central part of the rectangle and glue it as shown in the figures.

Cube - a transformer from paper

Cube - a transformer from paper

Cube - a transformer from paper

Cube - a transformer from paper

Cube - a transformer from paper

Cube - a transformer from paper

Cube - a transformer from paper


As a result, we should get a detail, as in the figure.

Cube - a transformer from paper


Fold the extreme sides to the center and glue them with tape. The figures show how to do it right. The main thing is not to confuse the parties.

Cube - a transformer from paper

Cube - a transformer from paper

Cube - a transformer from paper

Cube - a transformer from paper

Cube - a transformer from paper

Cube - a transformer from paper

Cube - a transformer from paper

Cube - a transformer from paper


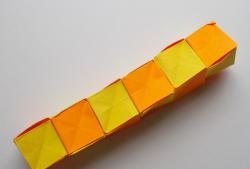
We straighten the resulting product, as in the figures.

Cube - a transformer from paper

Cube - a transformer from paper


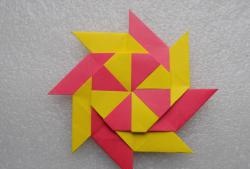
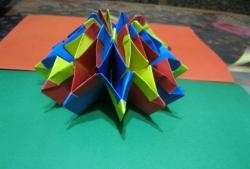
Cube - the transformer is ready. It is quite interesting to watch his transformation.

Cube - a transformer from paper

Cube - a transformer from paper

Cube - a transformer from paper

Cube - a transformer from paper

Cube - a transformer from paper

Cube - a transformer from paper

Cube - a transformer from paper

Cube - a transformer from paper

Cube - a transformer from paper

Cube - a transformer from paper

Cube - a transformer from paper


A similar craft can successfully please yourself and your loved ones. Even the spoiled abundance of various electronic toys, children will like it.
If you have a small child in your family, you can use felt-tip pens to paint the sides in different colors and see how the transformer will change its coloring. You can put letters of the alphabet or numbers on the sides and study numbers and letters with such a funny form. You can stick on the sides drawings from his favorite books or cartoons. It all depends on your imagination and desire.
come back
Comments (6)
  1. feelloff
    #1 feelloff Guests March 11, 2013 19:19
    0
    Can not be! He is a wizard wink wink wink
  2. Helena
    #2 Helena Guests January 11, 2014 12:59
    0
    The class I did! smile Just a class !!!!!!
  3. Vika
    #3 Vika Guests January 27, 2014 17:03
    0
    I managed. Class!
  4. niezbek
    #4 niezbek Guests March 8, 2014 09:52
    0
    yeahhhh super it turned out now now i'm playing it a big thank you site
  5. Dasha
    #5 Dasha Guests December 29, 2014 10:00
    1
    A bit not what I was looking for, but the result exceeded all expectations
  6. Bushouev’s novel
    #6 Bushouev’s novel Guests April 30, 2015 01:53
    0
    It’s a pity that there’s no video, and so I got klaaaaaaass

Read also

Error codes for washing machines