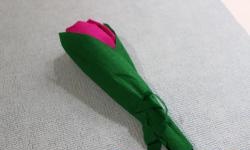
Therefore, we suggest you make a tulip out of paper using step-by-step instructions and a photo.
So, for work we need only colored paper and scissors. Your flowers can be of different colors, for example, the favorite color of the person to whom it will be intended present. Or maybe you will come up with a new variety of tulips?
In our case, the tulip will be made of yellow paper, and then the petals will be slightly stained with red veins. So a bouquet of tulips will look much more interesting and livelier.
1 step
The sheet of paper from which we will make tulips should be square. Therefore, we take a sheet of A4 format and fold it obliquely so that we get a triangle. The excess strip must be carefully cut - we will make a stem out of it.


2 step
Now open the triangle and you will have a square sheet in your hands. Fold it again diagonally so that the square has folds to each corner. Now fold the square into a triangular shape with the folds inward, squeezing the corners slightly. This is easy to do, as the square already has folds. You will get a triangular shape, as in the photo.


3 step
Put the figurine on the table and bend the corners of the top layer of paper. Next, fold the corners up so that you get a rhombus. Turn the figure over and do the same. As a result, you get a folded sheet with curled sections to the middle of the paper figure. Turn the corners of the rhombus so that the slices appear inside the figure. After that, the rhombus will be smooth.


4 step
Now bend both corners so that you get a figure with bent corners. A fold of future petals should converge towards the middle of the rhombus. Turn the figure over and repeat the action. One of the corners of the rhombus will be with a hole - this will be the bottom of the tulip.

5 step
Next, bend the corners to the middle so that it is possible to fill one into the other.

6 step
Now you need to breathe life into our flower! Yes, just inhale! To bloom the tulip, gently blow into the hole and bend the edges of the petals.

Now our flower should find a delicate color. Take the red paint and make light brush strokes on the flower petals, under them and in the middle of it.
Fold the remaining stripes of paper lengthwise and insert them into the tulip hole - they will serve as legs for the flowers.

And so that our bouquet does not look “naked”, cut strips of green paper and insert them into the bouquet in the form of leaves.
All! Our spring flower is ready!
Do not forget to make a pair of tulips to get a bouquet!

Good luck