To work, you need to take: a synthetic blue fabric (you can take lycra or fiber), a measuring tape, matching threads, a needle, a light translucent blue fabric (you can take frills), as well as beads, tweezers, scissors, needles and an elastic band.
Starting work, we obtain the necessary data on the size and length of the future shirt, after which we make two samples from paper: a sample of the front side of the future shirt and a sample of the back side.
After that, we need to take the fabric and, according to the data obtained, cut two parts out of it, on the upper side of which we will need to sew fringed jewelry made of thinner fabric, or frills.
Ruffles can be bought at a special store, or you can use a sewing machine, and sew them yourself from thin translucent fabric. But in case you have a thing at home - a piece of clothing that does not find use for itself, but it is a pity to throw it away - then you can take it to work.
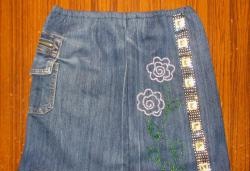
Our thing turned out to be a skirt from a mini-dress, which was not used for a long time because it was too short. The dress kept a fresh look and it was a pity to throw it away. Cut off the dress skirt, decorated with frills, we decided to use as the top of the shirt:

Having cut off the skirt, I leave on top a small piece of fabric (allowance) for stitching. After that, we take the gum, which must be sewn into the stock.
The elastic should be slightly longer than the circumference of the head so that the finished shirt can be conveniently worn over the head.
Now I sew the upper part of the skirt, introducing an elastic band inside:

You can use a sewing machine to sew, but if it is not available or if it is not possible to use it, you can sew the shirt manually.
Gum inserted inside must be sewn at the ends. After this treatment, the former skirt will look like this:

Now we take synthetic fabric and paper samples.
We shorten the paper samples from the top according to the length of the cropped skirt (about a quarter) and cut two parts from the fabric according to the size of the chest and waist according to these samples. After that, we mark the areas in which there will be slits for the hands, and make seams along the edges, folding inward the allowance. We don’t need to sew the upper edges of the sleeves together:

After that, we sew them with the former skirt, turning it on the wrong side, and form a shirt. To expand the sections of the sleeves, we make cuts in the sides of the lower part of the former skirt and make seams on them:

Next, we add two strips of medium width (1.5 cm) from thin fabric. These strips will need to be carefully sewn to the bottom of the shirt. The allowance fabric we will need to trim and fold several times before stitching.

Next, I trim the excess tissue in the areas of the openings for the hands, leaving areas of allowance. And then, having folded up the allowance sections several times, I sew them together.
After sewing the “stripes” to the bottom of the shirt and shortening the sleeves, it will look like this:

We turn the resulting shirt from the inside out:

Now we cut three short and one long strips from the thin fabric to make a bow.
Having folded the strips exactly, you need to make seams on them: one longitudinal seam (long) and one seam across (short). Also, each strip must be left on one side not stitched in order to turn them out of the wrong then:

After stitching the strips, they need to be turned out from the inside with tweezers:

We sew two short strips at the ends, and only a tip sew together a long strip:

Now from pearl beads and threads we need to make a figure of seven rows of four beads. This figure will have to bind the strips in the middle, forming a bow:

After all the strips of fabric are tied in the center with a bead decoration, we will get such a bow:

If the sides of the bow will not be held in a “standing” position, they must be sewn at the back at the ends:

When the sides of the bow are sewn on the back, the finished bow will look like this:

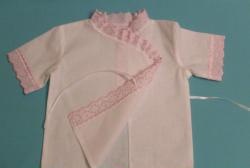
The finished bow needs to be sewn to our almost finished shirt, and after that the work with it will be completed:

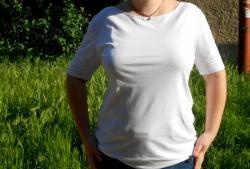
So our shirt will look after its fitting:


Sincerely, Vorobyov Dinara.