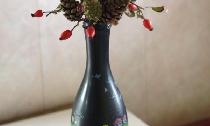
Materials for work:
- Deep pan with a lid - 1 pc.;
- Plastic salad bowl - 1 pc.;
- High flower pot - 1 pc.;
- Plaster bandage - 1 pc.;
- Hooks from the window planter - 2 pcs.;
- "Cold welding" - 3 whetstones;
- Gouache paint “bronze”, glue “liquid nails”, clerical knife, plastic (or self-hardening clay), toilet paper, construction PVA glue, varnish, gouache, putty, eggshell, rolling pin, craquelure varnish.
Stages of the work:
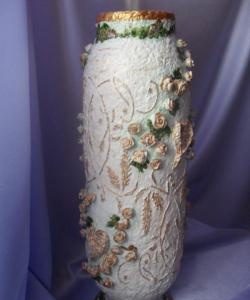
The first stage: preparation of the basis.
We select containers that are suitable in size (in this MK we used a deep frying pan with a lid, a plastic salad bowl, a high flower pot).

Cut the bottom of the pot and salad bowl.

We glue the pot and salad bowl with glue “liquid nails”.


We complement the design with a pan (having previously got rid of its handle) and an inverted lid, gluing the elements with “liquid nails”.

Second stage: decorative handles.
We fasten the handle bandage to the sides (hooks from the window planter, can be made of large wire). We fix the bandage with the help of "liquid nails". Sushim.

The third stage: we give the design the desired shape.
The gypsum bandage is gradually untwisted, carefully sprayed with water.


We cover the entire surface with a bandage, moving from top to bottom. Gypsum needs to be moistened strongly and the entire surface, immediately smoothing it with a palm. Dry the day.


All roughnesses and irregularities are covered with a thin layer of putty (I used the already induced, creamy consistency).

The fourth stage: we draw up the lower part.
To simulate masonry, we use eggshells. We glue PVA thickly over a small part of the surface of the vase, put pieces of eggshell on it and generously moisten it again with PVA. Sushim.

We cover the shell with toilet paper (we put the paper on it, apply liquid PVA over the surface with a soft brush, align and squeeze out air bubbles).

We wrap the very bottom of the vase all the way with toilet paper.

Strongly wet the paper with liquid PVA, lay the folds.

Sushim.

Fifth stage: we draw up the upper part.
With a simple pencil, we draw a picture of old towers, arches, tree trunks (you can use printer prints, transferring a picture from them through a carbon copy).


Sixth stage: create volume.
To create volume in the figures, cut the toilet paper into strips.

We twist the strips into spirals and wet them in liquid PVA.

We stick spirals along the contours of the drawings.


We make foliage from moistened PVA and crumpled toilet paper.

Seventh stage: we make roses from plastic.
To create roses, you can use plastic or self-hardening clay, a cap from drops, a rolling pin.

We roll out a small piece of plastic very, very thinly. Cut the mugs into a cap and stack them on top of each other (5-6 pieces each).

We twist the folded circles, pinch them in the center with a thick thread. Sushim.

From each twist you get two tiny roses.

The eighth stage: we decorate a vase with roses.
Dip each rose into “liquid nails” glue and attach to the upper and lower parts of the vase.


The ninth stage: colorize the volumetric image.
To color the trees, we apply black strips of gouache on the left side of the trunks.


We circle black the hollows around the eggshells.


Add brown to the trunks and branches.

And paint over the "brickwork".

Matting trunks and masonry white.


The point of the foliage is pale brown.

Add languid brown pokes with a brush.

Draw the dark brown branches.

Color the turrets and the arch in the same way.


Red-brown color draw (in places) leaves.


Read decor top and bottom of the vase.

Draw the leaves.

We cover the roses themselves with bronze paint.


In places we draw leaves.


Tenth stage: craquelorim.
On all surfaces not covered by the pattern, apply craquelure varnish. Sushim.

Overwrite the cracks with brown paint. Sushim.

With a wet disk, remove the excess color (without pressing the disk). Sushim.

Eleventh stage: make the neck.
For the width of the neck, you can use a plastic bucket, having previously cut the bottom. In order for water to be poured into a vase, we fasten a rolled bar of cold welding to a flower pot. It is necessary to fix it at such a height that the plastic bucket inserted inside rests against welding. Fill in “liquid nails” (to seal possible cracks and holes)

After the hardening of the welding, we “plug” the distance between the pot and the bucket of toilet paper.

On a surface of toilet paper we roll out a couple of “cold welded” whetstones, which blocks the ingress of water inside. Sushim. We paint with bronze.

Varnish a vase with several layers of colorless varnish, pre-drying each.

All! We calculate savings and boast of beauty!