Materials for work:
- Soft chintz fabric (old bedding) - according to the size of the rear walls of the niches + 20-25cm along the perimeter of each;
- Toilet paper - 1 roll;
- Building alabaster (can be replaced with gypsum medical powder), water, wallpaper glue, dry putty mix, PVA building glue, art gouache, sponge for washing dishes.
Stages of the work.
The first stage: we create the basis.
We dissolve a small amount of alabaster in water with the addition of PVA construction glue (add 400 grams of alabaster and 200 grams of liquid PVA glue to 400 grams of water). We prepare the solution in a small container, as it quickly thickens and becomes unsuitable for use (a new solution for each niche).

The fabric is placed in a container with a solution and thoroughly soak the entire surface. The fabric piece should be 20-25 centimeters larger on all sides than the surface to be decorated. Slightly squeezing the fabric, we straighten it in the recess of the niche, bending the edges to avoid their shabbiness. We begin to fix the fabric, pressing it to the surface of the recess of the niche. It is better to move from the corner to the center and the opposite corner, then fasten the rest of the fabric.

We lay chaotic folds of different sizes and directions. We press each centimeter of fabric to the wall.

Thoroughly spray the entire surface of the fabric with water and form leaves and flower petals from the laid folds (make tucks and smooth out the inside). While the fabric is wet, it moves easily in any direction. You can pre-draw an arrangement of flowers, leaves and buds.

We induce a new solution and repeat the first stage of work, filling all the niches with the fabric.

Second stage: add volume to the flowers.
We induce a putty solution: having mixed a glass of water with a glass of PVA glue, we gradually add putty into it, without ceasing to interfere. The consistency should be very thick sour cream: it is easy to warm up, while not dripping and not flowing.


We apply the solution into the cavity of the leaves, without smoothing and not equalizing it. With insufficient volume, you can apply another layer of the solution, but only after drying the previous one.

We scratch the veins of the leaf (I used a nail for 20).

Similarly, fill the cavity of the petals of flowers, buds.


The third stage: we paste over the remaining surfaces.
We apply wallpaper glue to all the side parts of the niches and the joints between them.

And we decorate them with white wallpaper (for painting).

Fourth stage: close the corners.
We cut the toilet paper roll in half.

Dissolve wallpaper glue in a small amount of water. The glue should be thick enough not to drip or leak.

Apply thick glue to the corners.

Roll out a half of the toilet paper roll and, clamping the pepper folds, apply it to the applied glue, pressing it to the corner on both sides.

Carefully “weep” the surface of the toilet paper with a soft sponge dipped in thick wallpaper glue. Do not rub and pull!

Align the folds of the wrinkled and pressed to the surface of the toilet paper (I used the old handle, just putting it to the edge and slightly pushing it towards the corner).Alignment is necessary immediately after applying the paper until it is dry.

Raw edges look like this.


After complete drying, the paper becomes almost stone, firmly securing the junction of the wallpaper and masking the corner.

Fifth stage: we paint all surfaces in the desired color scheme.
We paint all the external and internal parts of niches, including fabric decors and toilet paper at the corners, in one color.


Sixth stage: we emphasize corners.
On the side of the brush we apply darker paint on the edges of the folds of toilet paper.

Decorate the corner from the outside and inside.

Seventh stage: we color the leaves.
We apply dark paint (as at the corners) on the leaves (covering them harder, almost completely) and on the buds (applying weaker, rare strokes).


Without touching the edges of the sheet, apply a wide brush with green longitudinal strokes.

We paint the scratched veins in dark brown.

Shade the sheet with gray paint (without touching the edges).

Apply ragged narrow strokes of the base paint (as at the corners).


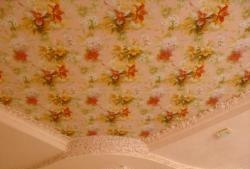
The eighth stage: we paint flowers and buds.
We fill the volume parts of the petals with white paint. We also bud the buds without touching the edges.


Apply a dark base paint in the center of the bud and along the edges.

Dip the brush in water and “wash” with it the applied dark strokes (we make lateral movements of the brush back and forth along the dark smear).

Similarly, apply a pale pink color: a smear of paint, then wash it off with water. You can use two shades of pink (the bud will seem more vibrant).

In some places, the edges of the bud can be darkened by applying random strokes darker than the base.


We apply the base paint on the edges of the petals, wash it with water.


We also paint the scratched veins of the middle of the petals.

We apply “torn” strokes with brown paint (darker than the base paint) in the place of the middle of the flower (I just poked with a brush as God put it on my soul).

We draw pistil stamens in the fort of a very elongated letter "T" with the same brown paint. Immediately determine in which direction the flower will look, in the same direction we "scatter" the pistil stamens.

On top we make thinner strokes of black paint. Add some stretched dots at the base of the stamens-pestles.

We “revive” the flowers with pink strokes, washed out by water.


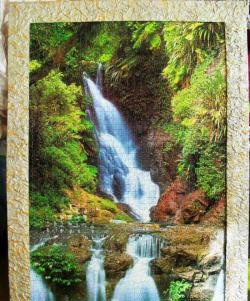
All the work is done! We admire the beauty and originality of a masterpiece created by our own hands.