Often, before decorating something, it is necessary to restore the surface. Let's talk about how to strengthen and align the plastic lampshade for subsequent decorative decoration.
Decoupage lampshade restoration
Once I already did the restoration and decoupage of the lampshade, then the product came to me with much smaller flaws than now. In addition, the dark color of the selected motive concealed all the irregularities of the light. But a lampshade is an object that transmits light, by definition.
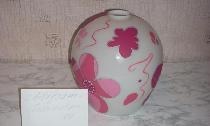
Recently, a desk lamp fell into my hands. Her lampshade had clear drawings, floral ornaments. The owners managed to get bored with the drawing, and plus everything had defects: lines from a ballpoint pen drawn by a child. Upon closer inspection, it became noticeable that in some places the plastic burst.

To decoupage this lampshade, I decided to take light motifs. The choice fell on the delicate tulips against the background of a wooden ornament, greenery and tenderness of flowers won me over.

In the color of gray shades of the napkin I looked at the lace from cotton (lace) for processing the bottom of the lampshade.
I would like to talk more about the restoration of this interior item.
Removing the old coating
The lamp leg is white so that it does not get paint, we cover it with newspapers.

Before embarking on any kind of decoration at all, you should understand what kind of object it is and what it is made of. I saw that the lampshade itself was plastic, almost transparent, and on top it was covered with fabric that was cut out according to the pattern and firmly glued to the surface.
An attempt to lighten the fabric with hydrogen peroxide did not lead to anything, only dust and dirt remained on the cotton wool.


It turned out that the drawings were printed on fabric, the plastic itself has no pattern.
Also, by applying napkins and pieces of old wallpaper, I realized that the flowers shine through anyway.


It became clear that the fabric needed to be removed. Whether it was just white or cream, one could try decoupage directly on top of it.
So, we get rid of the old fabric. I found the seam and gently began to separate the fabric from the surface on which it is glued. From time to time, the glue lost its adhesive properties, and the fabric separated easily, but not everywhere.

This must be done very carefully: in several places where there were cracks, the lampshade managed to burst.

I was ready to complete the work and take the thing to where it belongs, that is, in the trash, but the interest in creativity overpowered. So, the cracks had to be restored.
Restoration, work with cracks
As the previous time, I started the restoration from the inside (gluing small patches) and from the front (gluing white napkins).


Last time I used white paint instead of a primer: the lampshade was covered with even paper of the same color. I started to paint plastic and now.

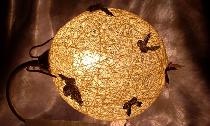
And here is what I got when I turned on the lamp:

All irregularities, cracks, patches were perfectly visible in the light. It became clear that the napkin would not hide them.It was necessary to do something. A few days of reflection led me to the fact that the paint needs to be washed off (it is good that it was not waterproof).
Under a stream of warm water, very carefully, I wiped all the paint with a sponge, not excluding a crack. The patches were all washed away too. And the work began again.

For some time I chose putty (primer). The choice was made on the collection acrylate moisture-resistant “putty” of the collection company: the manufacturer promises that it is ideally suited for decorative coatings, and what is a napkin motif, if not a decorative coating?

I continued the restoration experiments, all of which were carried out with the lamp turned on, in order to assess the degree of transparency. Cracks from the inside and the front (if not concave) were covered with several layers of adhesive tape (cut into small squares and glued, trying to avoid bubbles).

The second step was the first primer coat on the lamp. First, I closed up large cracks, then began to apply the composition to the entire surface.

And then the trouble: exactly it lay down only in some places, in some places it became thicker, in some - it let in light. I did not despair, applied the paste and left to dry for a couple of hours. After this time I tried to sand the surface with sandpaper No. 60 and found that all the bumps are very easy to smooth.

After the first coat has dried, I (with the lamp turned on!) Began to apply the primer thicker and bolder, with wide strokes, trying to make sure that the light was transmitted uniformly. After the surface dries, it can be polished, and it will be ready for further work.
After the main part has dried, you can add pastes to those places where points, cracks or other defects are visible. This is convenient to do with cardboard, using it as a spatula. Leave to dry again, or you can dry it with a hairdryer.
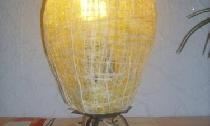
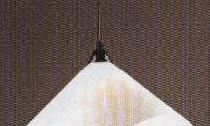
Here is the lampshade after applying "putty" and grinding the surface:

Now it’s clear that the tissue motif will be clearly visible when the lamp is on and off.
Coloring
After priming, I just paint the lampshade with gray paint. There is another little secret: I tint (add color) the paint in regular watercolor. Of course, I don’t breed it with water, but I add a piece of watercolor to the paint and mix for a long time until the color becomes uniform.


Color should be tried in the corner: is it dark? If dark, add white paint and mix again.

Now it’s very simple: I paint with a wide brush, aligning the paint layer, if in some places there is a texture in the form of small scratches, then this is not scary and even interesting. It is still desirable to paint in one chosen direction (either from top to bottom, or in a circle).

That's all, now the lampshade is ready for decoration in any way! You can perform decoupage, or you can use ribbons, or paint with acrylic paints, causing the selected pattern.
Tender lilies: lampshade decoupage
Housewives who love and know how to make lovely little things and interior items with their own hands will be interested to learn about such a decoration method as decoupage. This is the design of any surface using color motifs from three-layer napkins. Indeed, there are sometimes bright, beautiful patterns on serving napkins that one would like to transfer, for example, to a lampshade. Such a table lamp will look good both in the bedroom and in the living room, and decoupage motives can be chosen in accordance with the general interior of the room.
In the previous part of the article, we already examined in detail the stages of preparing the surface for decoration. Let's summarize.
Paint is not suitable as a primer, and restoration with white napkins is not suitable, as it is visible through plastic. We closed the cracks from the inside with a transparent adhesive tape, and then put putty (primer) on the surface, which was then polished for a long time with sandpaper No. 60.

The next step will be a thorough treatment of small cracks and irregularities with this paste.
After sanding, apply two coats of paint, and our lampshade after drying will be ready for decoration.
Napkin preparation and decoupage
After the surface has dried and is ready for decoration, you need to choose and prepare napkins. The quality of the image greatly affects the final appearance of the thing being drawn up.
Recommendations for choosing napkins:
three-layer wipes are better than two-layer;
choose motives taking into account the fact that they will need to be cut, that is, without small details;
the brighter the colors, the better, do not get too light and too dark napkins.
Before you start decorating the lamp, separate the colorful layer from the napkin, iron the folds from the wrong side with an iron. After that, cut out the motives.
Attention! You can first cut out the motives, then separate the layers and only then iron it. Choose a convenient option.
As glue, spread wallpaper glue a little thinner than for gluing walls.
Think over the composition: attach napkins to the lampshade, imagine the finished product. If a solution is found and an idea appears, you can proceed to decoupage.
Apply glue with a wide brush to the place where the motive will be. Then attach the motif with the colorful side up, trying to get it stuck in the middle, and then smooth the edges. If everything is done correctly, the napkin itself will go to bed evenly, you will only need to help it slightly. This paper is very thin, and you need to handle it delicately. We can say that there is no room for error.


Gradually cover with motives the entire surface or part of it, in accordance with your idea. Depending on the motive, the figure needs to be combined in whole or in part. Some patterns do not require a match.


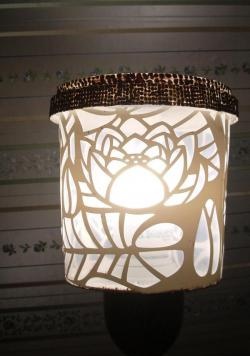
In this example, I began to fill the surface from top to bottom: first - a gray background with tree motifs, below - flowers and even lower - also floral motifs. It turns out something like a flower bed of lilies.
The resulting pattern can truly be seen only after drying. At the same time, it is possible and even necessary to dry it with a hairdryer, since at the same time you can still eliminate minor irregularities and other defects. Turn on the lamp and see what happens.


Final touches
Decorate (glue) the top of the lamp.

Look at the resulting picture: maybe it requires some kind of element to be drawn. In this case, I marked with a simple pencil the flowers that fell on a light background.
A layer of transparent wallpaper glue will serve as varnish. It dries in a couple of hours.
To handle the bottom of the lamp, I took a gray tape that matches the style. I fix it on a few drops of glue from a glue gun.


As a final chord, I put textile flowers at the junction.
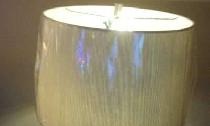
So, now you can remove the protective coating from the lamp foot, wipe it with a flannel and take the final photo.


application
List of necessary materials for this work:
1. Lampshade.
2. Primer or putty indicating: “under the decorative coating”.
3. Sandpaper.
4. Brushes.
5. Watercolor paints.
6. Waterproof white paint.
7. Napkins with suitable motifs.
8. The braid.
9. Scissors.
10. Glue gun.
11. Adhesive tape.