- Cardboard or white paper (suitable in A4 format);
- glue;
- Blue rhinestones (2 pcs.);
- Scissors (simple for paper);
- Special scissors for metal;
- CDs (about 7 pcs.);
- Filler (cotton wool);
- The tape is red;
- Cap from a bottle of perfume (as a stand);
- Needle and thread;
- Tweezers.
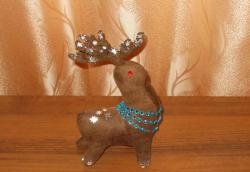
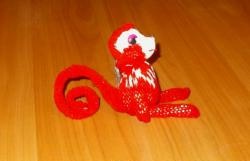
This is how the finished craft looks:

First, we need to cut four figures of toy samples from white paper or cardboard and glue them in pairs. This gives durability to two parts. crafts. After that, we glue them together in the area of the head and tail, and then glue the back and neck, but only from the inside to the edge so that the figure turns out to be voluminous (you can use adhesive tape here) without gluing the front side. In the front side, between these two figures, we must make the third part, connecting them and giving bulk to the craft.
We get the following figure:


Further, in order for the resulting figure not to lose its shape (wrinkled), we must fill it from the inside. Cotton wool is suitable here, and for convenience, you can use tweezers when entering it into the far sections of the craft:

After the figure is filled with cotton, the hole in it from below will need to be sealed. It can be pasted over with two layers of new paper, but it is undesirable to use adhesive tape.
Next, we take the cap from the perfume bottle and make three pairs of holes on it on top in order to attach (hem) it to our figure:

In order to make it more convenient to insert a needle with a thread in the lower part of the cap, you can use tweezers:

This is what the craft looks like after sewing on a cap to it:

Next, we take compact discs, which with the help of scissors for metal need to be cut into many different particles of arbitrary size and shape. On the head of the figure on both sides, you need to glue one blue rhinestone, which will serve as the eyes for the toy:

You can use laser discs in different shades: gray, green and purple. You can "color" the craft arbitrarily:

Some discs scatter into components when they are cut and they have to be glued together, and some of the discs crack when cut. This is difficult when working with them, since you will need to spend more glue, and you also need to have either very good scissors or special scissors for metal.
Pasting crafts can take up to ten days. At the end of gluing, if the tail began to bend and fall (i.e., it has lost strength from the severity of particles glued to it from the discs), then it can be hemmed to the neck area of the craft.

In order to prevent the craft from swinging on the stand and standing constantly straight, it needs to be wrapped with something in the sewing area, for example, with a plastic bag. The package can be hidden behind the tape:

If the tape has cut off crumbling sections, then they need to be scorched with a lighter or matches.
So our craft looks on the reverse side:

The plot tied with a package can be decorated with a lush bow:

So the resulting craft looks on the other hand. After that, our toy will be ready. It can become a good decoration for the holiday, having reflective properties. And after its manufacture, we will be able to give a “new life” to some items that we were going to throw away: