Hello. Today I will tell you about the regulator (thermostat) for domestic use. This is a complete device, nor any board that still needs to be powered with something and know how to connect. Therefore, any person can cope with it, without knowledge of electronics, by watching this video or by reading the instructions that come with the kit.

The device is designed to control temperature from -40 to +120 degrees Celsius, can work both for heating and cooling. It can be used for an aquarium, terrarium, incubator, hotbeds, refrigerators, boilers, etc., and just to maintain the temperature in the room, for which, in fact, I use it.

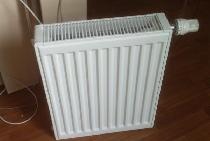
In the spring-autumn period, heating is either turned off early or turned on later. In the apartment this is an eternal problem. I take this thermostat and connect a heater to it. As a result, the room always has a stable temperature, which I can set with great accuracy. The thermostat that is in the heater is no good - it supports the upper aisle of heating the heater, and indeed works as soon as it pleases.
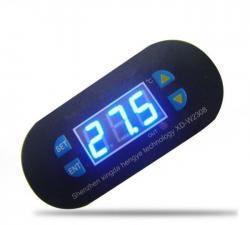
In appearance, the thermostat is more like a surge protector with a single outlet. The socket is universal and designed to include plugs of any state, ours is no exception. Above the outlet is a display. The display is large, bright, two-row, two-color, so that the readings are visible from a long distance. Above the display is an indicator - an LED that signals the load is on. In addition to the power plug, a temperature control sensor comes out of the thermostat, which must be installed at the control object.


At the back of the case there are holes for mounting on a wall or some other surface, which is very convenient. On the sides are such rubberized, comfortable to touch four buttons for control: two on the left and two on the right.
Let's turn on the thermostat. The upper reading is the temperature of the sensor, which is displayed in real time, the lower reading is the supported temperature that the user set.

Agree that two-color indications look very nice.

Let's look at the function of the buttons and the available settings and modes. Here I give you a picture of what is drawn on the buttons and described in the instructions that come with the kit. And again, it is in Chinese and English. The first button from the bottom left is indicated as you probably already guessed - on-off. I want to upset you: you are mistaken, as I was mistaken. This turns out to be a factory reset. If you need to roll back the device to the initial settings - just hold this button for more than 5 seconds until the upper (green) readings flash. After that, all settings will be reset. Press the same button again so that the readings stop flashing.
Further, the only and main menu of the device consists of 4 items: P0-P3. In order to get into this menu, you must press and hold the “S” button for more than 3 seconds, until “P0” appears. The value of this item is displayed on the bottom line. Go from point to point using the same “S” button, the points will be flipped in a circle P0-P3. Use the up and down arrows to set the values you need. To exit the menu, press the reset button with the “on-off” icon, or wait 5 seconds and only then the set values will take effect.
Now let's look at what all the menu items mean:

Let's go through each item.
P0 - our thermostat regulator has the ability to work like a fire, controlling, say, a heater. Including (closing) the relay contacts when the temperature drops below the set value (mode "H"). Or work on cooling by controlling, say, a cooler or fan. Including (closing) relay contacts when the temperature rises above the set value (mode "C").
I will set the “H” mode to heat the room.
P1 is the temperature of maintenance. Set any value from -40 to +120. If you hold down the arrow buttons for a long time, the readings themselves will begin to increase or decrease, if you need to radically change the readings without pressing the button 150 times.
I will set 29 degrees to demonstrate the operation of the device.
P2 - Delay before turning on the load. As soon as the readings have reached the desired level, the time relay is activated and, at the end, it turns on the relay if the specified levels are in the operation limit. To put it simply, it sometimes happens that the temperature rises to 29 degrees, and after 2-3 minutes it drops again to 28, as a result of which short-term switching of the load occurs, which may not have a good effect. Here for this a time relay can come in handy.
I will set zero.
P3 - hysteresis or the difference between the on and off temperatures. Initially, 0.5 degrees Celsius was set at the factory settings, which means that for the “H” mode, the load in my case will turn on when it reaches 28.5 degrees and turn off when it reaches 29 degrees.
Initially 0.5. I will leave it unchanged.
I will connect the load. I turn on the thermometer. Since now the temperature is less than 29 degrees, the LED is on and the load is working, such as a heater. Now I imitate with my hand that the room has warmed up and the load will turn off. Warmed up. The load turned off at 29 degrees. Leave to cool. The load turned on at 28.5 degrees. Everything is working properly.
If during operation the sensor readings exceed +120 degrees, then “HHH” will be displayed. And if the temperature drops below 40 degrees, the display will show “LLL”. The same indications can be displayed in case of a sensor malfunction or a wire break to it.
So we looked at the thermostat in action. Now I will talk about the warning indicated in the instructions:
1. The device cannot be installed in places where water is dripping; humidity of 90% is exceeded. The sensor itself is tight and can be installed anywhere, but the device does not tolerate water and high humidity.
2. The temperature sensor wire must go separately from the high voltage wires. Since interference with the network may not affect the readings of the device.
3. The thermostat mainly controls the energy-intensive load, so pay special attention to the reliability of the electrical connections: the thermostat with the network, the controller with the load.
Let's go through the characteristics of this device:
- Model: MH-2000
- Black color
- Material: PC plastic.
- Operating voltage: 90 V ~ 250 V
- Rated Current: 10A.
- Power Consumption: ≤ 3W.
- Standby Power Consumption: ≤0. 5 watts
- Temperature control accuracy: 0.1 ° C.
- Resolution: 0.1 ° C.
- Measurement error: ± 0. 3 ° C.
- Control Range: -40 ~ 120 ° C.
- Swivel temperature range: 0.1 ~ 30 ° C (adjustable).
- Operating temperature: -20 ~ 70 ° C.
- Operating Humidity: 90% RH, non-condensing.
- Temperature sensor: NTC 25 degrees = 10 K B3435 ± 1% (1.48 m).
- Power wire length: 1.5 m.
- Sensor wire length: 1.5 m.
- Relay: 10A / 250V.
- Size: 155x60x28 mm.
- Weight: 245.2 g.
- Packing size: 155x60x28.5 mm.
- Package weight: 317 g.
In conclusion, I want to say the general impression: the regulator has a high-quality case, wires, buttons. The case has a full size, which is very pleasing, this is not a Chinese trifle. It feels like it’s definitely not cheap stuff that will break or crack today or tomorrow. Impressions of work and external quality are very positive. The regulator worked for me in the region of the month: there are no complaints or comments, I will put 5 with a plus for the work.

This is an excellent household thermostat. I personally really liked it.
Link for purchase - #
I have it all) Thank you for watching this video! If you like it, please like it. All questions are in the comment. The lowest price of the device according to the links in the description below the video.Subscribe to the channel. Goodbye. See you again.