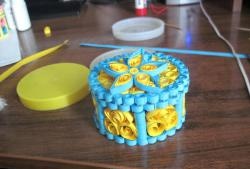
Materials for work:
1. Wooden casket - 1 piece;
2. Beads - in quantity along the perimeter of the bottom and the lid of the inner part of the box;
3. Velvet paper - 2 sheets;
4. Craquelure varnish - 1 jar;
5. Color paper printout - to cover the side and top of the box;
6. PVA glue - 1 pencil;
7. Solvent, emery paper, brush, scissors, paints, skewer for applying spot painting, knife for cutting paper, eye shadow in the color of the printout, plasticine spatula, glue "liquid nails".
Stages of the work:
The first stage: remove the former beauty from the surface.
To facilitate removal of the painted pattern, it is necessary to remove the upper lacquer fixing layer with a solvent. We moisten a cotton swab with any solvent and carefully wipe the entire casket with it.


After the solvent dries, remove the remnants of the former luxury with sandpaper. We clean until the surface becomes smooth.

The second stage: preparing the basis.
When using dark tones for the foundation, they can be applied in pure form. If the base is light, then the use of a pure white color will lead to a dirty color after applying varnish. Therefore, we dissolve whiteness in a drop of ocher color.

We apply a couple of layers of gouache paints on the entire surface of the casket.

Let each layer dry thoroughly.

The third stage: imitate decoupage.
In the absence of suitable beauty of decoupage napkins, you can use the color printout of your favorite drawings. In the presented embodiment, colored borders were used for the background of the side parts of the casket, and the combined frame and pattern for the front side.

With printouts we cut off unnecessary moments.

Combine the frame and the picture.

Apply a thick layer of PVA glue to the back.

Firmly pressed to the surface of the box, carefully smoothing every millimeter of the picture.

The box is tightly closed and we fix the printed borders on the sides.

Carefully cut the paper with the knife for cutting the junction of the lid with the box.


So that the printout does not look like a separate existing spot, we tint the shadows of the green color free from the picture of the box.

The fourth stage: imitate the spot painting.
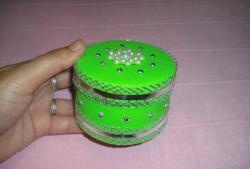
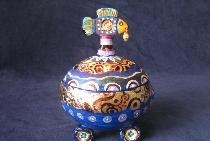
On the parts of the box not covered by prints, with a spatula from plasticine, apply a “golden mesh”. To do this, just touch the surface of the "golden" paint and press the spatula to the box, drawing curved lines first in one direction, then in the other. The mesh in some places turns out to be crooked, but decoupage varnish will mask this drawback.


With a skewer for applying dot painting on the joints of oblique gold lines, we draw points. In the absence of a special skewer, you can use the back of a thin brush or chopstick for sushi.


Fifth stage: repeated varnishing.
We cover the entire surface of the box with acrylic colorless varnish in several layers. At this stage, you will have to patiently apply varnish on each side of the box separately to avoid the formation of smudges. Dry each coat of varnish thoroughly. Layers must be at least 2.

After the last layer of acrylic varnish has dried, apply a thick layer of craquelure (for beginners: craquelure varnish is sold in art stores, for the formation of coarse and large cracks it is better to use craquelure pair, it is applied with movements in one direction, brushing only once on the place of application). Sushim.

For a clearer identification of cracks, they can be gently wiped by dipping a finger in the paint (ocher) and gently drawing them on the surface in both directions.


After the paint dries in cracks, soak a cotton pad with water and remove excess paint.


Varnish the entire box with acrylic varnish.

Sixth stage: paint the inner side parts.
Apply gouache paints to the sides of the inner surface of the box.

We paint the outsides by imitating a bitmap. At the same time, “mask” the convex part of the fastener with “golden” strokes.


We stroke the inside with “gold”, applying arbitrary brush strokes.

Seventh step: give the surface velvet.
From velvet paper we cut out the details according to the size of the bottom and the lid of the inner parts of the casket. From the remnants of the printed borders, select several motifs, cut out.

On the part of the velvet paper that we will attach to the lid, we impose the cut out motifs of the borders, forming their location.

Turn the motifs over, circle the outline.

Cut out.

We attach the velvet to the casket, we circle the places of scraps.

Cut motifs glue PVA to pre-defined places.

We cover them with acrylic varnish in two layers.

We insert the velvet, having previously applied a thick layer of PVA to its back surface. Smooth thoroughly. Similarly, glue the bottom of the box with velvet.

“Golden” dots decorate the junction of the cut motif and velvet paper.

The eighth stage: mask the joint.
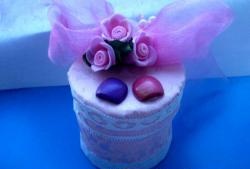
To mask the junction of velvet paper and the “golden” sides of the box, you can use beads glued with glue “liquid nails”.

Having poured glue into a small container, dip the beads into it.

Gently push the beads into the joint. At the corners, you can use single large beads.

We glue the beads around the entire perimeter of the bottom and cover.


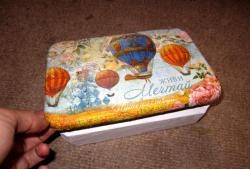
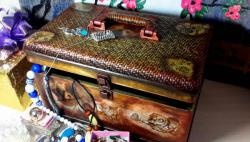
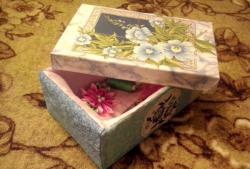
Here is such an antique box in the end. Very similar to the one that could be passed from generation to generation by inheritance by a grandmother-noblewoman.