We wanted to get them in different ways. For one we use the decoupage technique, for the second we use the miter technique, and the third, made from the remnants of the “paper dough”, simply wrap in candy wrappers.
What we need to work:
For making balls:
• old newspapers;
• threads;
•toilet paper;
• table paper napkins;
•PVA glue;
• satin ribbon about 20 cm long. - 3 pieces.
For decoupage:
• white acrylic paint;
• paper napkins with a pattern;
• soft brush.
For trimming:
• corrugated paper 2 colors;
• candy wrappers from sweets;
•glue stick;
• stick for sushi;
•scissors.

Operating procedure:
We make balls. Take 2 bowls. In one small piece we tear toilet paper, in the second - napkins. Fill the contents of both containers with water and leave to soak.


Meanwhile, we crumple newspaper sheets and roll 2 dense balls of different sizes from them, wrap them with thread (so that they do not straighten out). In the process of winding we attach ribbons in the form of loops (for them we will hang ready-made toys on the Christmas tree).

Squeeze the soaked paper base for papier-mâché and, pouring with PVA glue, knead the “dough”.


Now we glue the newspaper blanks with the obtained adhesive mass, trying to form even balls. From the remnants of the "dough" we roll up a small lump - it will make the third toy. In this form, leave until completely dry (two days).

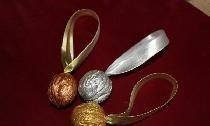
We make balls. We got 3 balls of different sizes. We’ll decorate the largest using the “decoupage". First, cover it with a layer of white acrylic paint and set it aside so that it dries.

In the meantime, we take on a ball of a slightly smaller size - we will decorate it with a volume application of corrugated paper and candy wrappers from sweets using the “trimming” technique. From the “corrugated” rolls we cut strips about 1 cm wide and cut squares from them. We do the same with candy wrappers.

In the center of the paper blank we put the end of the sticks from the land and wrap a square around it. We get something like a straw.

The butt of the resulting figure is coated with glue and glued to the ball.

Thus we make out the whole toy.


We simply wrap the smallest ball in a candy wrapper and fasten it with a stapler, not forgetting to attach a ribbon.


Meanwhile, the paint on the big ball is already dry. From the beautiful paper napkin we cut out the drawing we need, remove the extra layers, with a brush and PVA, glue it onto the ball using the decoupage technique.


Our papier-mâché Christmas balls are ready.

Enjoy your work!